Quantcast
Channel: VMware PowerCLI Blog
Viewing all 146 articles
Browse latest View live

New Release PowerCLI 12.1- vLCM Enhancements

$
0
0

What an exciting past couple of weeks we had with VMworld announcements and contents. Now, we bring PowerCLI 12.1 release with some of the notable enhancements concerning vSphere.

We have now introduced new cmdlets for managing-

  • vSphere Lifecycle Manager (vLCM)
  • Cloud-Native Storage Volumes (CNS volumes)
  • vSAN secure disk wipe
  • vVOL Storage containers
  • Workload Management Clusters

Also, we have enhanced our existing capabilities to support-

  • Secure Encrypted Virtualization in New-VM and Set-VM cmdlets
  • Content library- Support extended to allow uploading items from internet and datastore URLs
  • Added support for Site Recovery Manager 8.3.1
  • New features for VMware Cloud on AWS. Click here to know about the enhancement related to VMCOnAWS

And, there are plenty of improvements and bug fixes in our existing capabilities. Please check out the complete release notes here to know more details about what’s new with PowerCLI 12.1.

In this blog post, I am excited to demonstrate cmdlets related to managing vSphere Lifecycle Manager(vLCM). vLCM has been introduced with vSphere 7.0 and has generated a lot of interest among the vCommunity members.  If you are new to the vLCM, I would recommend you check out this blog post.

Install/Update PowerCLI 12.1

Install

Execute below cmdlet to install the latest PowerCLI version.

Install-Module -Name ‘VMware.PowerCLI’

Update

Execute below cmdlet to update the latest PowerCLI version.

Update-Module -Name ‘VMware.PowerCLI’

Use-cases to manage vLCM via PowerCLI

There are three new cmdlets to manage vLCM and these are-

  1. Get-LcmImage
  2. Test-LcmClusterCompliance
  3. Test-LcmClusterHealth

Also, there are significant changes that have been made with cluster related cmdlets so that we can update vLCM related settings on a vSphere Cluster.

Let us see a few of the use cases in detail which demonstrate PowerCLI capabilities to manage vLCM.

Get-LcmImage

This cmdlet retrieves the vSphere Lifecycle Manager images available on a vCenter Server system. The cmdlet returns a set of vSphere Lifecycle Manager images that correspond to the provided filter criteria.

You can filter the LcmImages with an Image type (Baseline, VendorAddon, and Component), or you can also filter a specific version of a LcmImage.

get-vLCMImage

Execute the below cmdlet to know more about Get-LcmImage.

Get-help Get-LcmImage -ShowWindow

Create a New Cluster with vLCM enabled

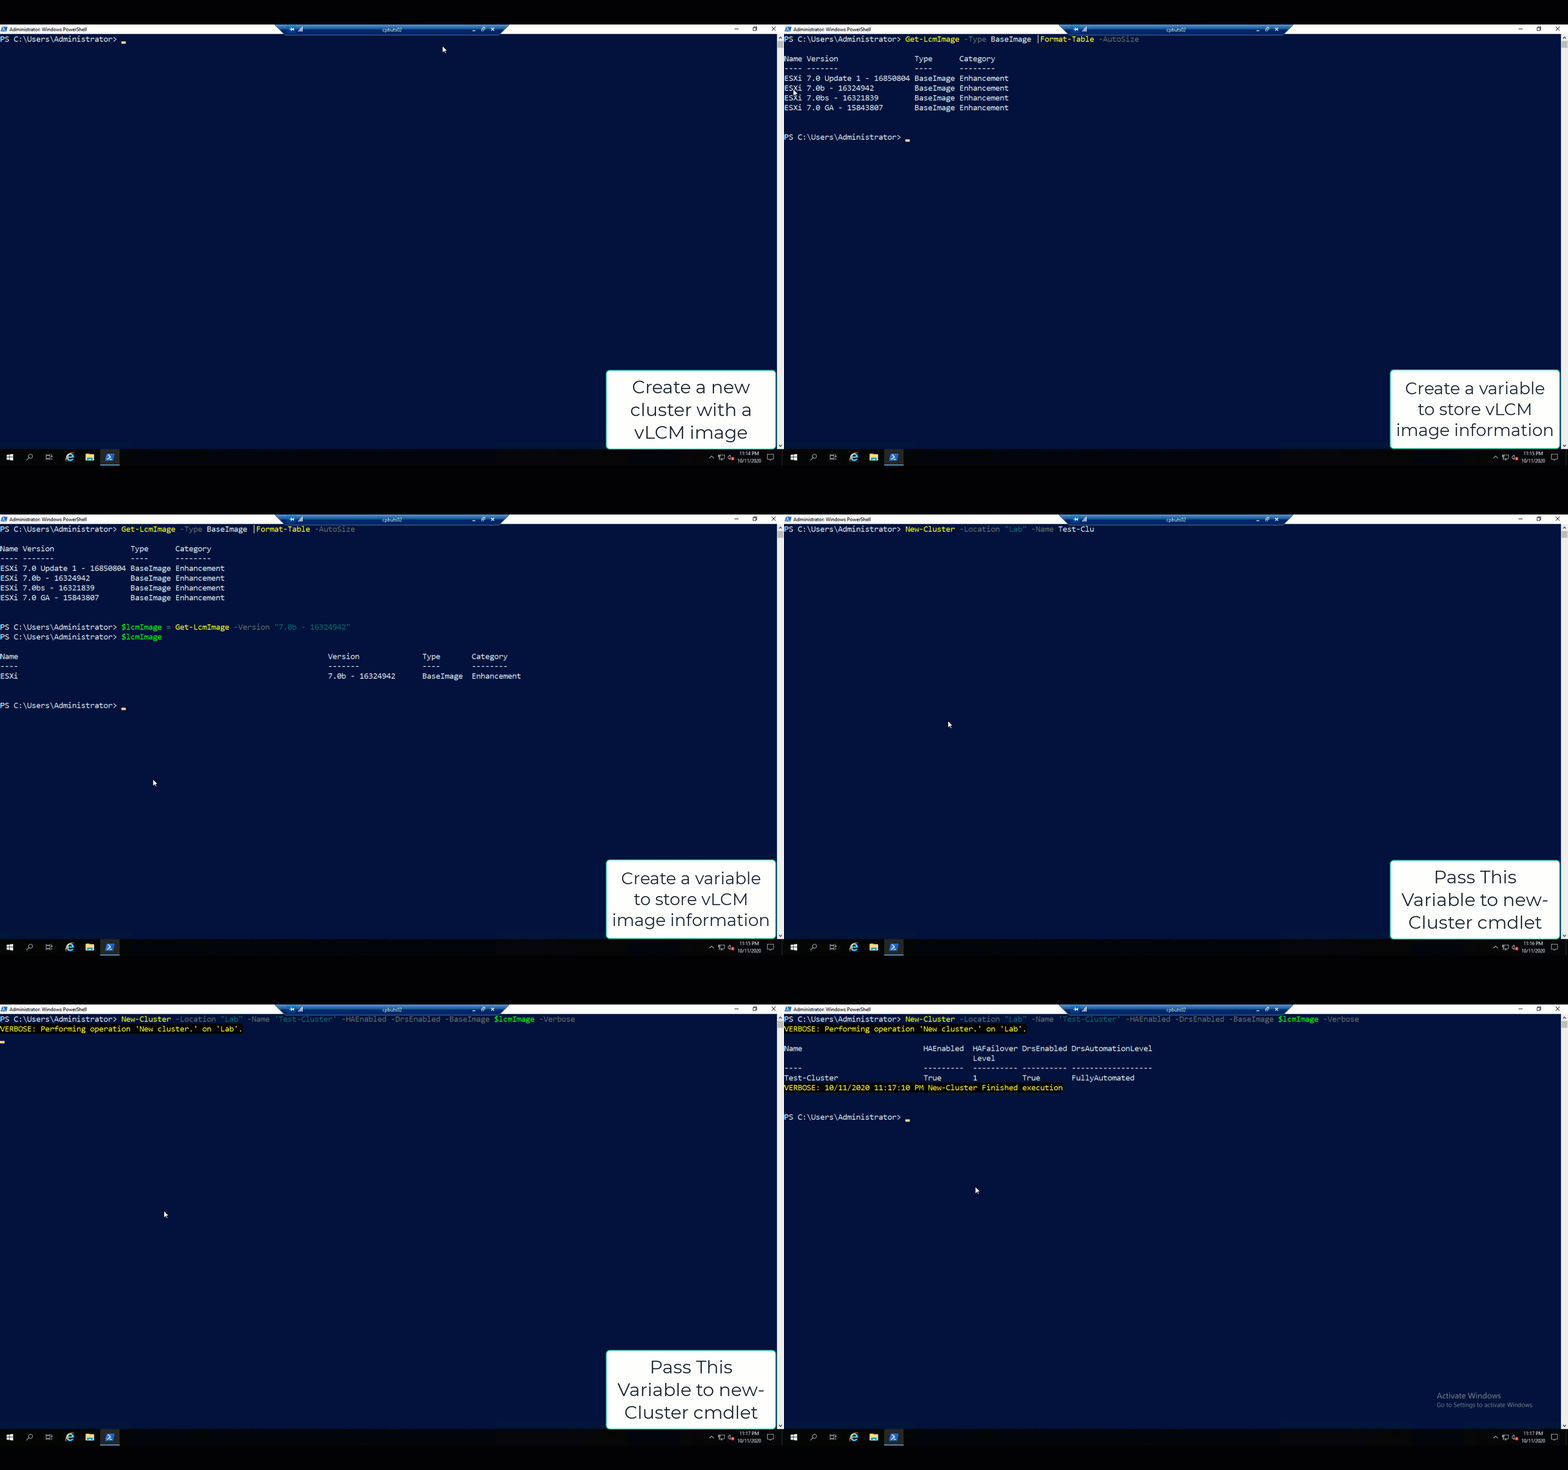
You can now use the New-Cluster cmdlet to create a vSphere Cluster managed by a vLCM image. You can achieve this by specifying 2 additional parameters which are -BaseImage and -VendorAddon in order to create a vLCM cluster image. Please note that -Component parameter is not currently available and you can use Set-Cluster cmdlet to update your vLCM cluster image later on.

Ex. Below, PowerCLI cmdlets create a new vSphere Cluster named as ‘vLCM-Cluster’ and Manage the hosts within this cluster with a single vLCM image with 7.0 Update 1 ESXi.

$LcmImage= Get-LcmImage -Version "7.0 Update 1 - 16850804"  New-Cluster -Location 'Lab' -Name 'vLCM-Cluster' -HAEnabled -DrsEnabled -BaseImage $LcmImage

NewCluster

Enable vLCM on an existing cluster

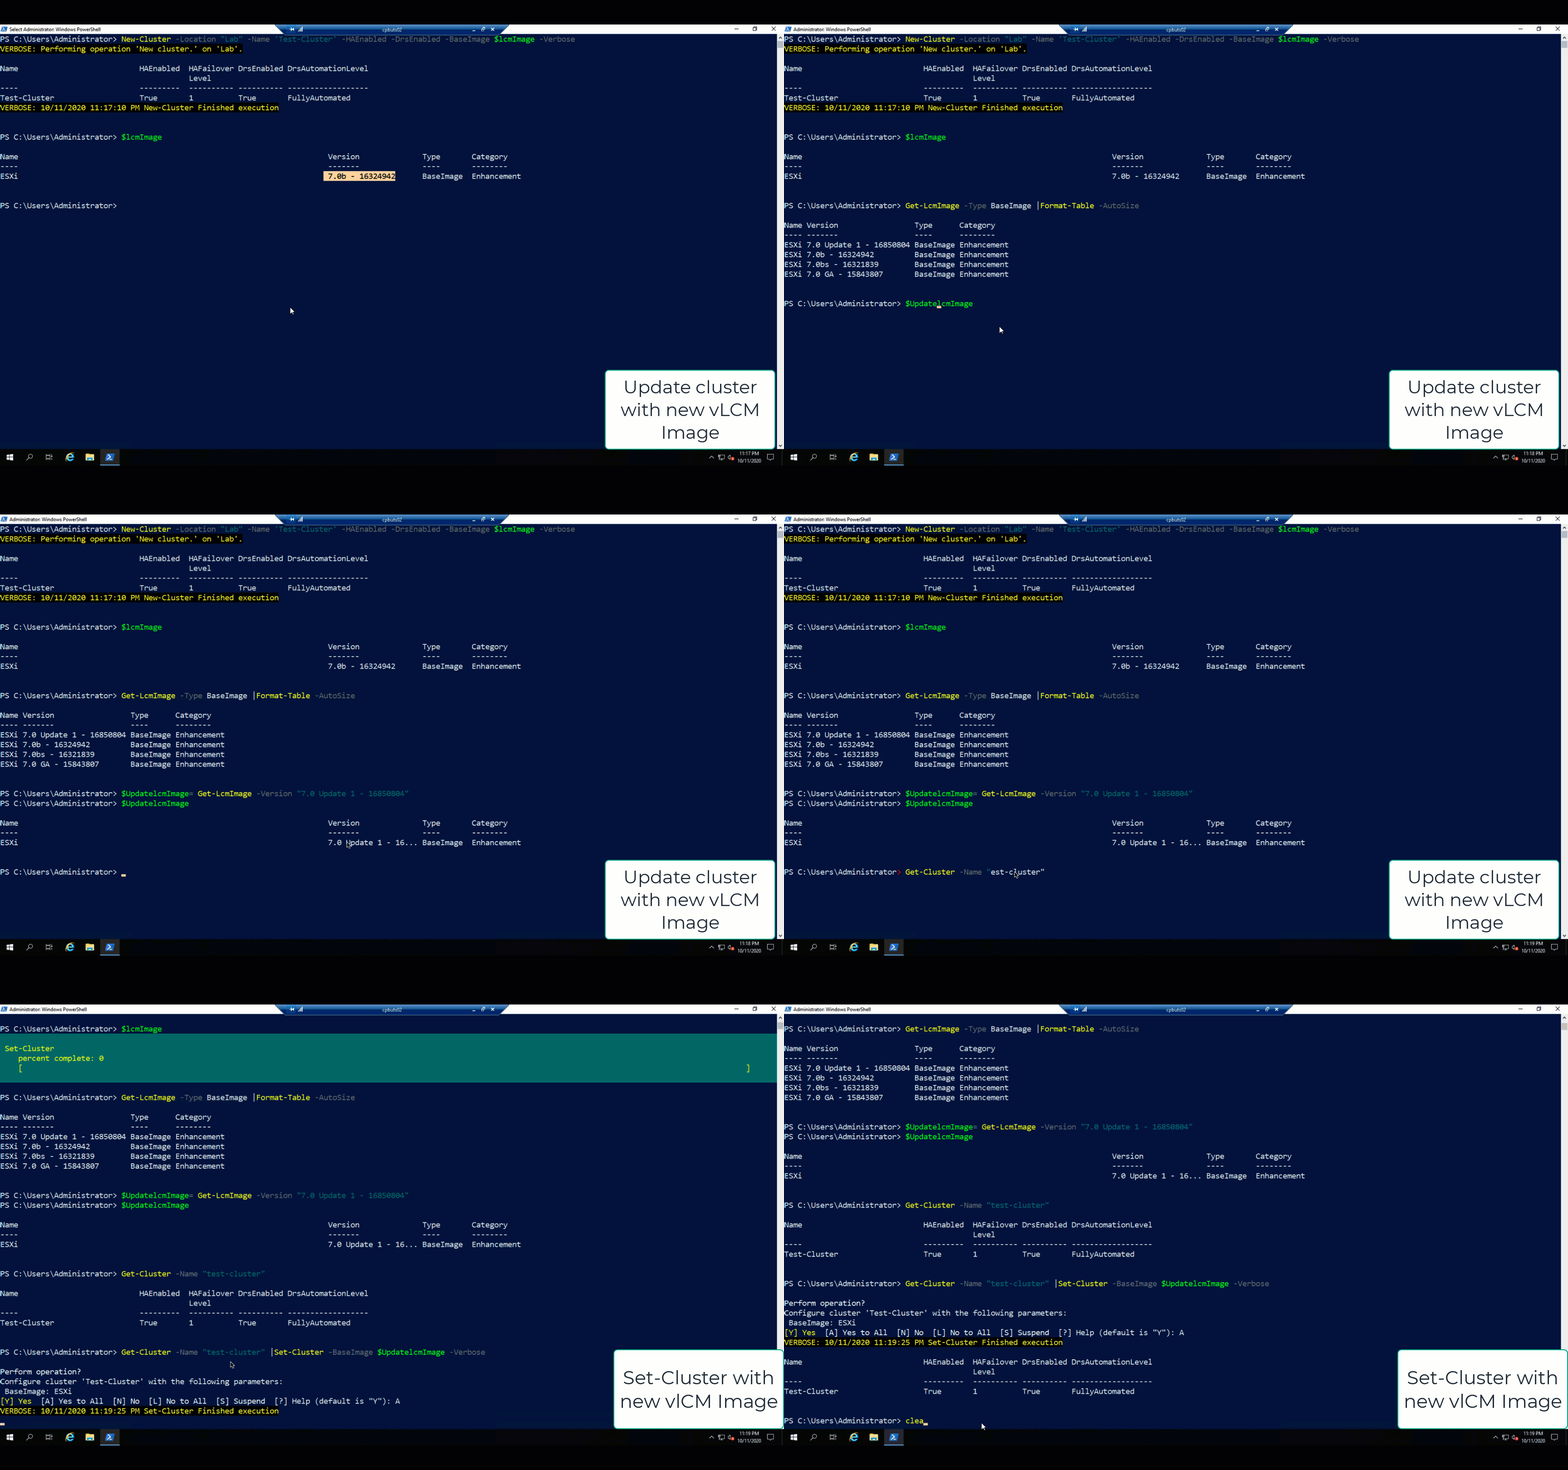
Set-Cluster cmdlet allows you to specify -BaseImage , -VendorAddon , and -Component which allows you to update existing cluster and enables vLCM cluster Image.

Ex. Update the existing cluster to set a new vLCM image.

$UpdateLcmImage= Get-LcmImage -Version "7.0 Update 1 - 16850804"  Get-Cluster -Name "Test-Cluster" |Set-Cluster -BaseImage $UpdatelcmImage

Set Cluster

Test-LcmClusterCompliance

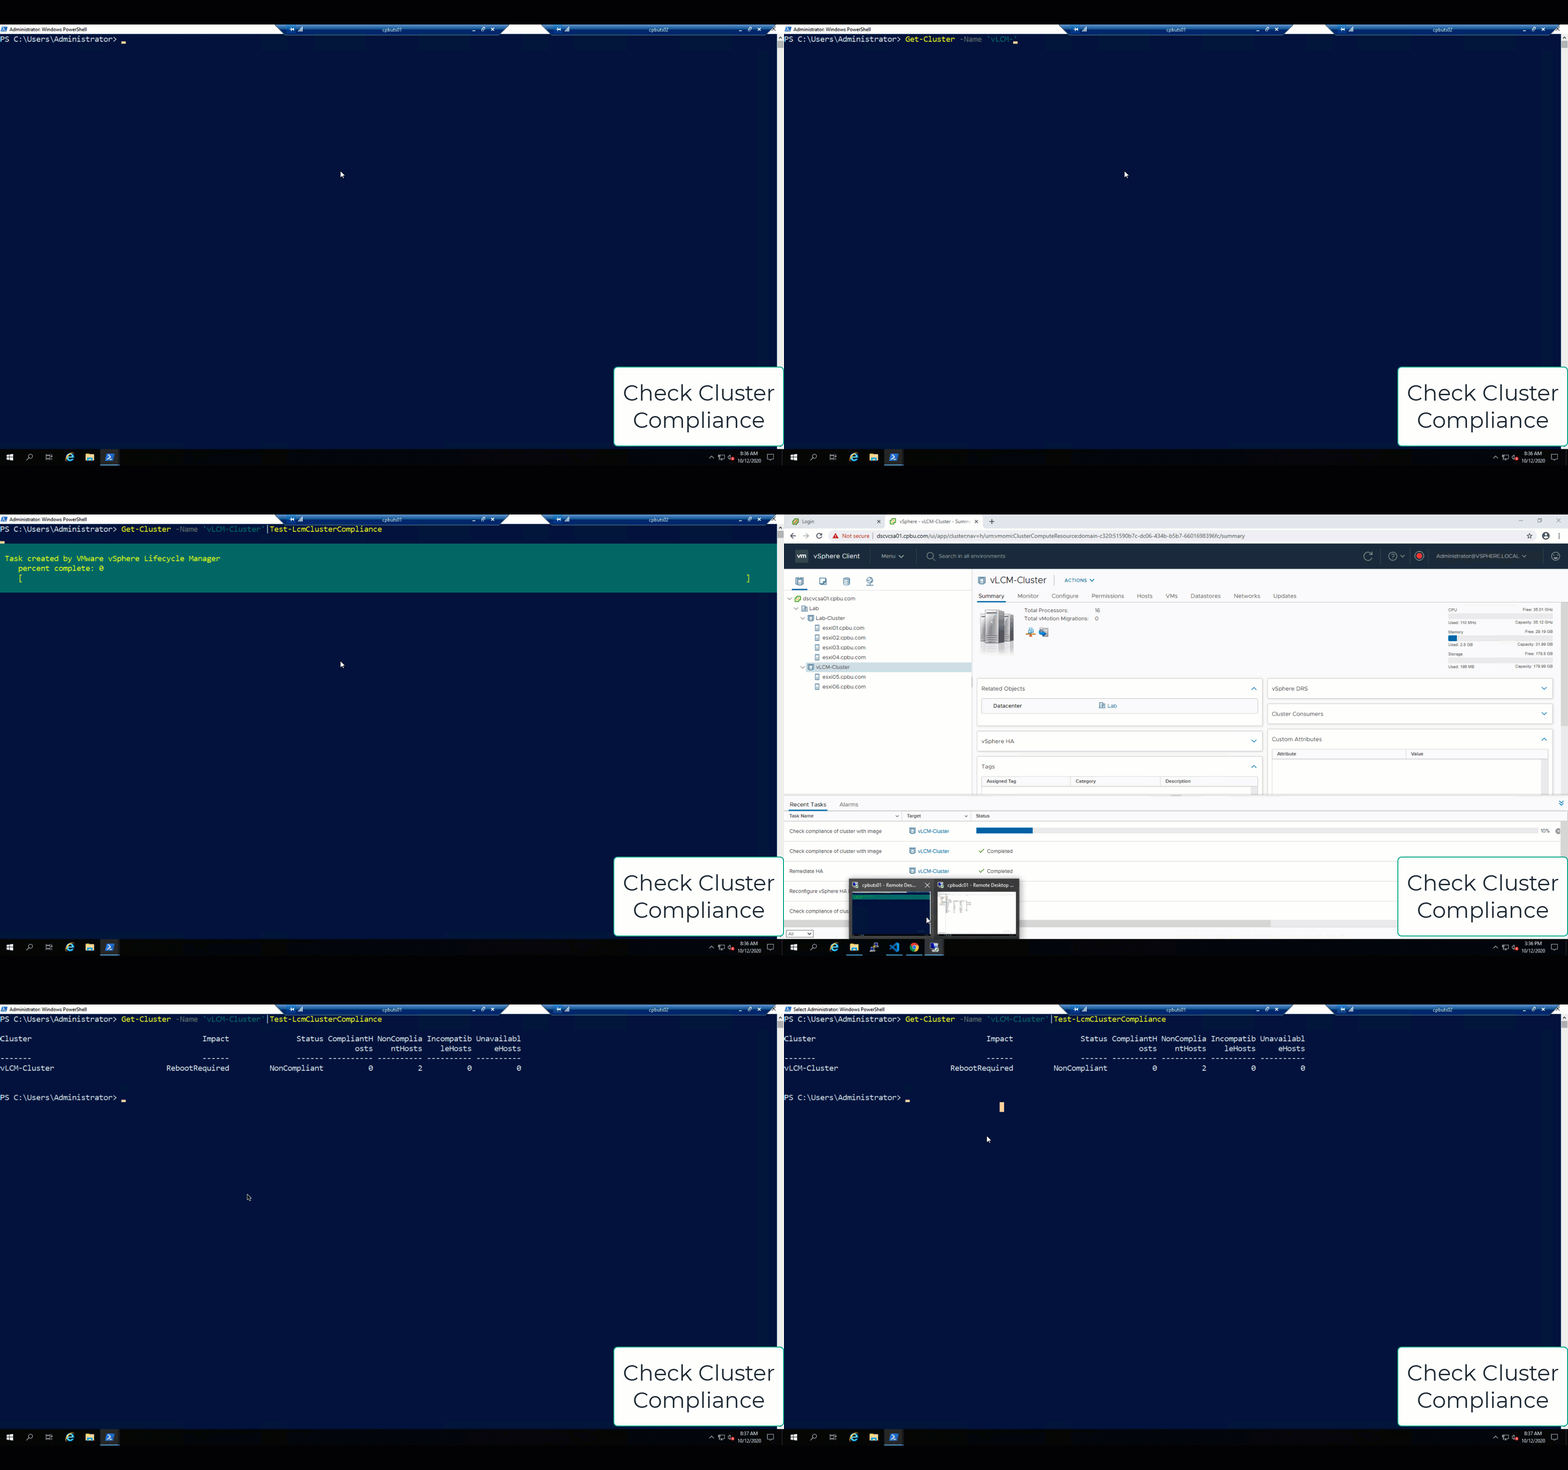
This cmdlet tests cluster’s host’s compliance concerning its target state. You can test the specified cluster’s hosts for compliance with the cluster’s vSphere Lifecycle Manager desired state.

Get-Cluster -Name 'vLCM-Cluster'|Test-LcmClusterCompliance

Test Cluster Compliance

Remediate vSphere Cluster

Set-Cluster cmdlet now allows you to remediate the vSphere cluster against a vLCM desired image and ensure all the hosts are compliant with the vLCM desired image. This is done by specifying a new switch -Remediate

Ex.

In this example, ESXi hosts are running with ESXi 7.0, and cluster desired state is 7.0 update 1. The below cmdlet remediates a vSphere Cluster against any possible drift on ESXi hosts concerning a vLCM cluster image.

Get-Cluster -Name 'vLCM-Cluster' |Set-Cluster -Remediate -AcceptEULA -RunAsync

Remediate


List vLCM image details for all the vSphere Cluster

To report details of the vLCM cluster image, Use the below cmdlet. This example only shows the BaseImage version. You can modify this cmdlet to list VendorAddon and components details also on a vLCM enabled cluster.

Get-Cluster |Select name, @{n='BaseImageVersion';e={$_.BaseImage.Version}}

report

To Conclude

Undoubtedly, PowerCLI is a proven platform to automate VMware infrastructure. Having vLCM capabilities delivered via PowerCLI allows you to automate the management aspects of vLCM and keep your infrastructure consistent with the vLCM cluster image.

More Information

vSphere 7 – Lifecycle Management

PowerCLI 12.1 – Product Release

New Capabilities in PowerCLI 12.1 for VMware Cloud on AWS


The post New Release PowerCLI 12.1- vLCM Enhancements appeared first on VMware PowerCLI Blog.


Introduction to Script Runtime Service (SRS) for vSphere

$
0
0

PowerCLI is the preferred automation strategy for vSphere administrators. More organizations are moving to an event-driven datacenter, and want to utilize the investment they’ve made in PowerCLI to orchestrate datacenter operations. This usually requires a remote execution host to be setup for orchestrator tools such as vRO or vRA. In the past, setting up a remote execution host required customers to deploy a Windows VM and set up was complicated with additional security and remote execution settings.

Today, we are capable of running PowerCLI on the Linux platforms. This also opens up the ability to run PowerCLI within a Kubernetes container.

We are pleased to introduce the VMware Open-Sourced project, Script Runtime Service (SRS) for vSphere. SRS is a Kubernetes based application that allows you to manage PowerCLI instances and invoke PowerCLI cmdlets or scripts via REST APIs.

Additionally, some customers ask us to provide a capability to execute PowerCLI scripts within the vSphere web client.  SRS is undoubtedly laying the necessary foundation for us to deliver that functionality.

Highlights

  • Lightweight application – SRS is built upon Kubernetes and runs as a Kubernetes application
  • Developer-friendly APIs – Leverage REST APIs to invoke PowerCLI cmdlets and Scripts
  • Scalable – Create and manage multiple PowerCLI instances at the same time


Technical Overview

Let’s take a look at the high-level overview of SRS. SRS deployment creates a dedicated namespace in a Kubernetes cluster, allowing PowerCLI to run as a Kubernetes pod. The PowerCLI pod spins up with a container image. The container image has all the PowerCLI modules and required SRS management components that transform inputs and outputs for a script and manages the execution of the requested script.

The initial SRS setup runs a Kubernetes job that registers the SRS with vSphere SSO. vSphere SSO is the identity and authentication provider for SRS. SRS API clients authenticate once, and then SRS takes care to connect PowerCLI to federated vCenter Servers automatically.

SRS


Note: As of today SRS is not available on vSphere with Tanzu. Please do not confuse SRS service with the vSphere with Tanzu Supervisor Cluster services. We are at a very initial stage of the development and evaluating the option to integrate SRS with vSphere with Tanzu.

How to deploy SRS?

There are currently two ways to deploy SRS.

  1. Install SRS on a Kubernetes Cluster

Install the service on a machine of your choice. Please check out the detailed installation instructions here.

  1. Install SRS on a VM

Suppose you are new to Kubernetes constructs and do not have any Kubernetes environment up and running. In that case, we provide a Photon OS virtual machine with a prepared Kubernetes cluster to run Script Runtime Service for vSphere (SRS). The Script Runtime Service for vSphere 1.0.0 helm chart and binaries are embedded in the virtual machine.

Please check out the detailed installation instructions here.

Getting Started with SRS APIs

Once the SRS is deployed and registered with the vCenter server, you can browse the SRS APIs at https://{SRS-IP}/swagger/index.html

SRS uses vCenter Server SSO for Identity and Authentication. Any vSphere user that can authenticate with vSphere SSO can access the SRS feature by establishing PowerCLI connections to vCenter Servers on behalf of the authenticated user.

Please refer to the Getting Started with SRS API to explore the APIs and their functionalities.

SRS support channels

SRS works with vSphere 6.7 and above and below are the ways you can submit your queries

Conclusion

By providing a REST front end to manage scripts, execute jobs, and track results, we can provide a universal integration point for our products to execute PowerCLI script (jobs) with the simple REST APIs. Start testing the SRS APIs, and do let us know how you feel about it.

The post Introduction to Script Runtime Service (SRS) for vSphere appeared first on VMware PowerCLI Blog.

Introducing the New PowerCLI Home Page

$
0
0

In the recent past, VMware introduced the all-new Developer Documentation. It had an intuitive UI, improved categorization, and a user-friendly Interface, which helped improve the information experience. Initially, it was only the API reference, and the PowerCLI documentation was not part of it. Later in the year, PowerCLI documentation was included, and we asked our community members to share the feedback. I thank our community members for stepping up and providing valuable feedback to us.

Today we are pleased to inform you that we have updated the PowerCLI home Page, Which further improves your experience working with PowerCLI documentation.

In this article, I am providing key highlights from the new PowerCLI Home Page.

1.    PowerCLI Home Page

We have now got the PowerCLI home page. From here, you can navigate to the community, GitHub sample repo, ideas and feature requests, PowerCLI blog, Release notes, changelog, and user’s guide. This page will be the single entry point for you to get all the PowerCLI related content from now onwards.

The Home page also contains the link to the installation guide, which helps you install PowerCLI on Windows, Mac, or Linux operating systems.

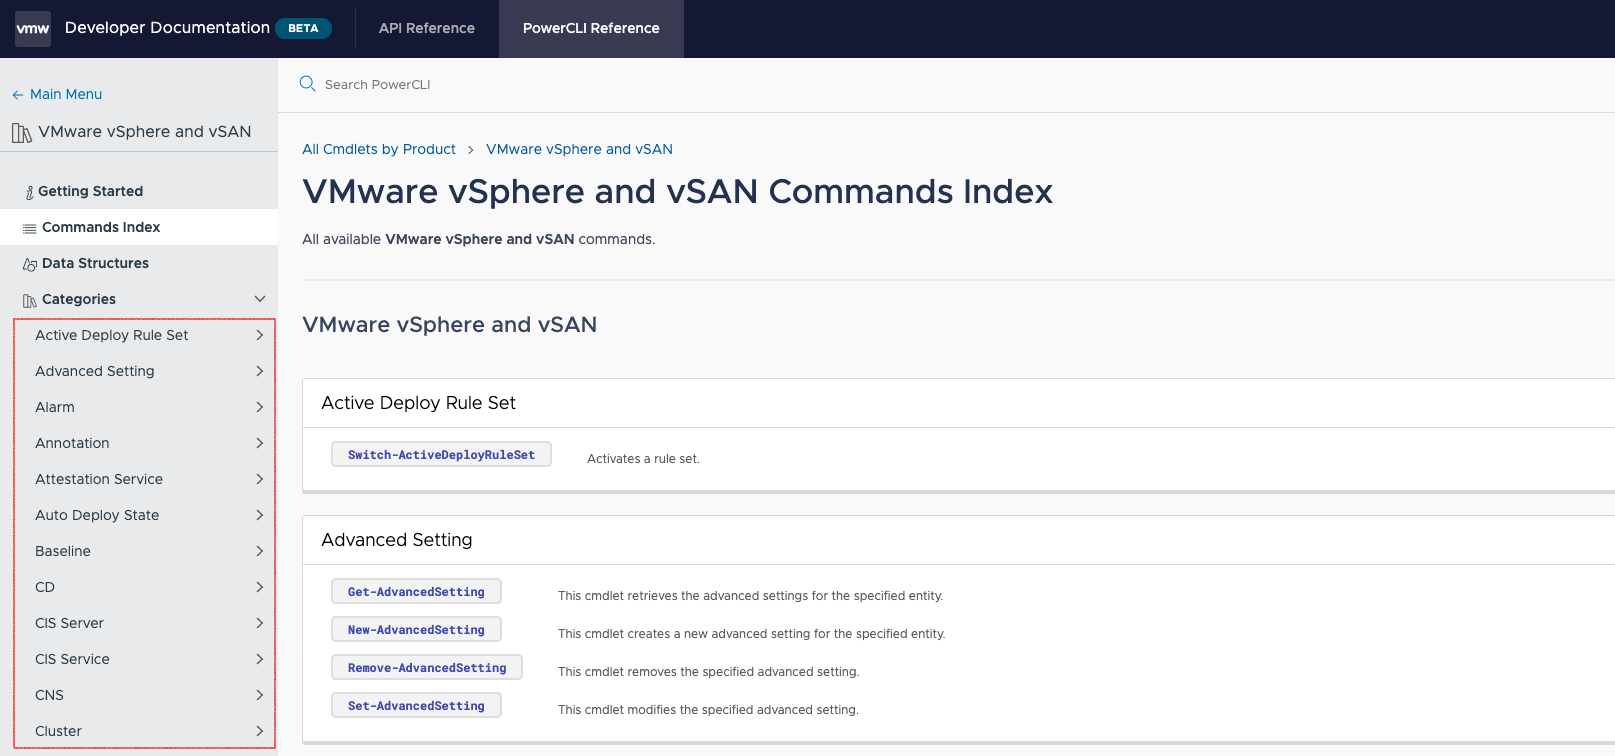
2.    Re-organization of cmdlets

Initially, The cmdlets were organized by PowerCLI modules, which wasn’t the most effective way to present the cmdlets. Since the beginning, the plan was to organize the cmdlets by VMware product. With the latest release, all the cmdlets are re-organized by VMware Product. It helps you specifically focus on a VMware product and allows you to navigate better within the PowerCLI documentation.

3.    Global Search Bar

Now, We have the global search bar available at the PowerCLI homepage and on the product reference page. No matter what content you are viewing currently, The search bar is available across the PowerCLI documentation. You can now search the cmdlets, irrespective of a PowerCLI Module or a VMware Product.

4.    Data Structure

PowerCLI is all about objects. The one thing which I found interesting is the data structure tab. With this, You can clearly understand an object and its properties. The data structure tab also provides the details of how this object is consumed via different PowerCLI cmdlets. Quite handy, must try out.

5.    Categories

All the cmdlets are categorized by objects. These objects are easily understandable and provide another meaningful way to search the cmdlets.

6.    CMDLET Reference Page

The cmdlet reference page provides a clean interface to get the details about a respective cmdlet. A well-informed description and neatly highlighted syntax help you to understand the cmdlets much better.

The cmdlet reference page also provides sample examples, which you can copy and modify according to your requirements. No matter if you are an experienced PowerCLI geek or a rookie, this cmdlets reference page will always be a great help to you.

For example, check out the Connect-VIServer cmdlet reference page.

That’s it from me in this blog post, and I encourage you to explore the PowerCLI Home Page on your own and let us know how you feel about it.


Join the PowerCLI community on slack. Click here to join and add the #powercli channel to engage with us.


The post Introducing the New PowerCLI Home Page appeared first on VMware PowerCLI Blog.

New Release – VMware PowerCLI 12.2

$
0
0

The VMware PowerCLI 12.2 is released now. It brings plenty of improvements to the existing cmdlets and introduces new cmdlets.

Please find the release highlights here-

  1. Horizon
    • VMware Horizon PowerCLI module is now supported for macOS and the Linux OS
  2. VMC
    • We’ve added support for one of the most popular VMware Cloud Services – DRaaS. Using the new cmdlets customers can now enable/disable DRaaS on their VMC SDDC as well as add and remove SRM instances.
  3. vSphere
    • Extended support for vLCM
      • New cmdlets to export and import the cluster desired state
      • New cmdlets to get the vLCM recommendations
      • New cmdlets to get the vLCM hardware compatibility
      • Enhanced Set-Cluster to allow custom depot for ROBO environments
    • Extended the support ‘ovf’ parameters for the content library item
    • Added support for VM templates in the content library
    • Foreach-object -Parallel is now supported
  4. Workload Management
    • New cmdlets to manage namespace limits
  5. NSX-T
    • NSX-T global manager APIs are now supported

In this blog post, I will discuss some of these improvements in detail.

VMware Horizon – Compatible with macOS and Linux

There was a requirement for a long time to make VMware Horizon compatible with PowerShell core. The good news is, it is now compatible with PowerShell core to work with macOS, Linux, or any other platform of your choice.

‘DRaaS’ Support for VMC

New cmdlets have been introduced to support the DRaaS management. The new cmdlets allow you to activate ‘Site recovery’ on a specified SDDC and help you manage Site recovery instances.

Activate Site Recovery on an SDDC

The Set-VmcSddc has got a new parameter called -EnableSiteRecovery, which allows you to activate site recovery on a specific SDDC. Check out below PowerCLI snippet and a short demo.

$sddc = Get-VmcSddc -name ‘test_zerocloud_sddc’  Set-vmcSddc -SDDC $sddc -EnableSiteRecovery

Check out the Set-VmcSddc cmdlet reference to know more.


Manage Site recovery Instances

A new set of cmdlets are introduced to manage the Site recovery instances. Once site recovery is enabled, you can manage the instances via the below cmdlets.

Get-VmcSddcSiteRecoveryInstance

New-VmcSddcSiteRecoveryInstance

Remove-VmcSddcSiteRecoveryInstance

Extended Support for vLCM

We have introduced the vSphere Lifecycle Manager (vLCM) cmdlets starting from PowerCLI 12.1. With the release of PowerCLI 12.2, we are now further extending the vLCM cmdlet coverage. Let’s look at some of these operations in detail.

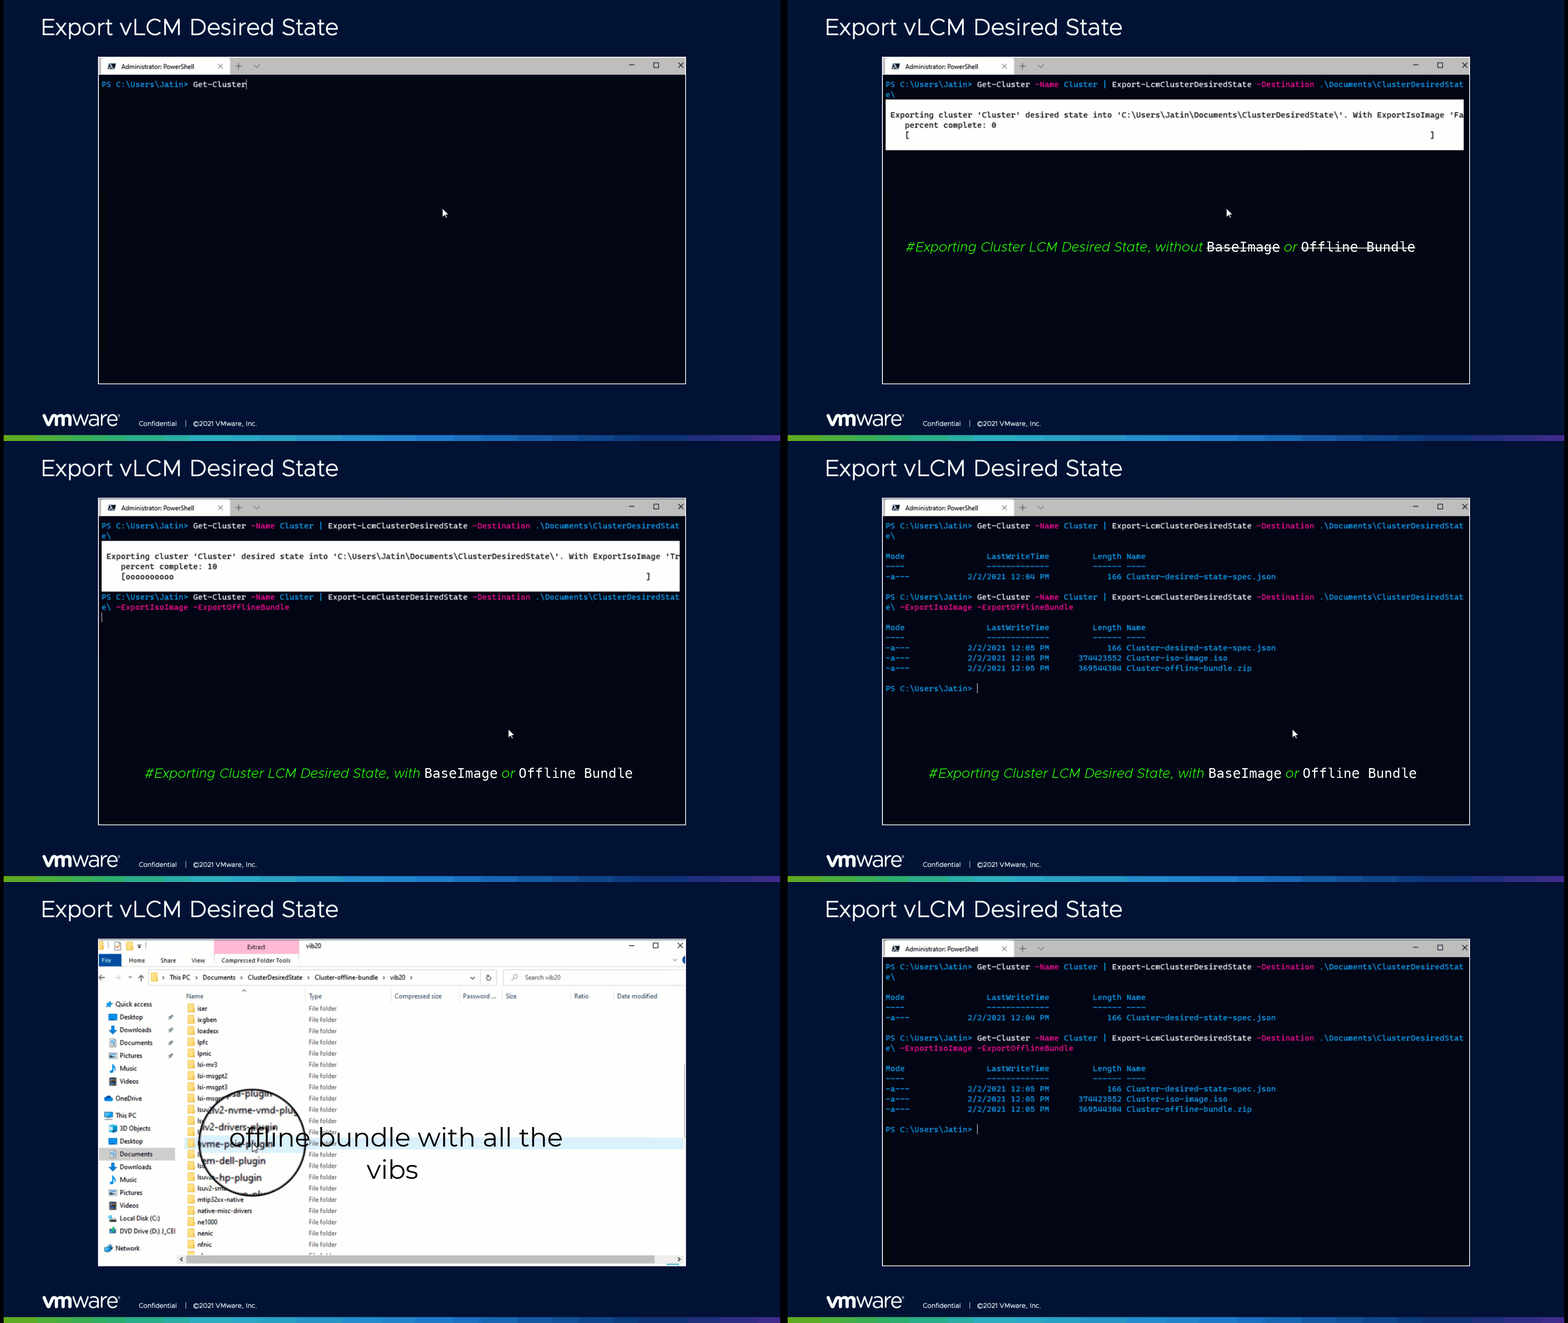
Export Cluster Desired state

A new cmdlet Export-LCMClusterDesiredState is introduced to export a cluster desired state. Do check out the cmdlet reference to learn more.

Export-LCMClusterDesiredState

Ex.

Get-Cluster -name ‘Cluster’ | Export-LCMDesiredState -Destination \documents\ClusterdesiredState -ExportIsoImage -ExportOfflinebundle

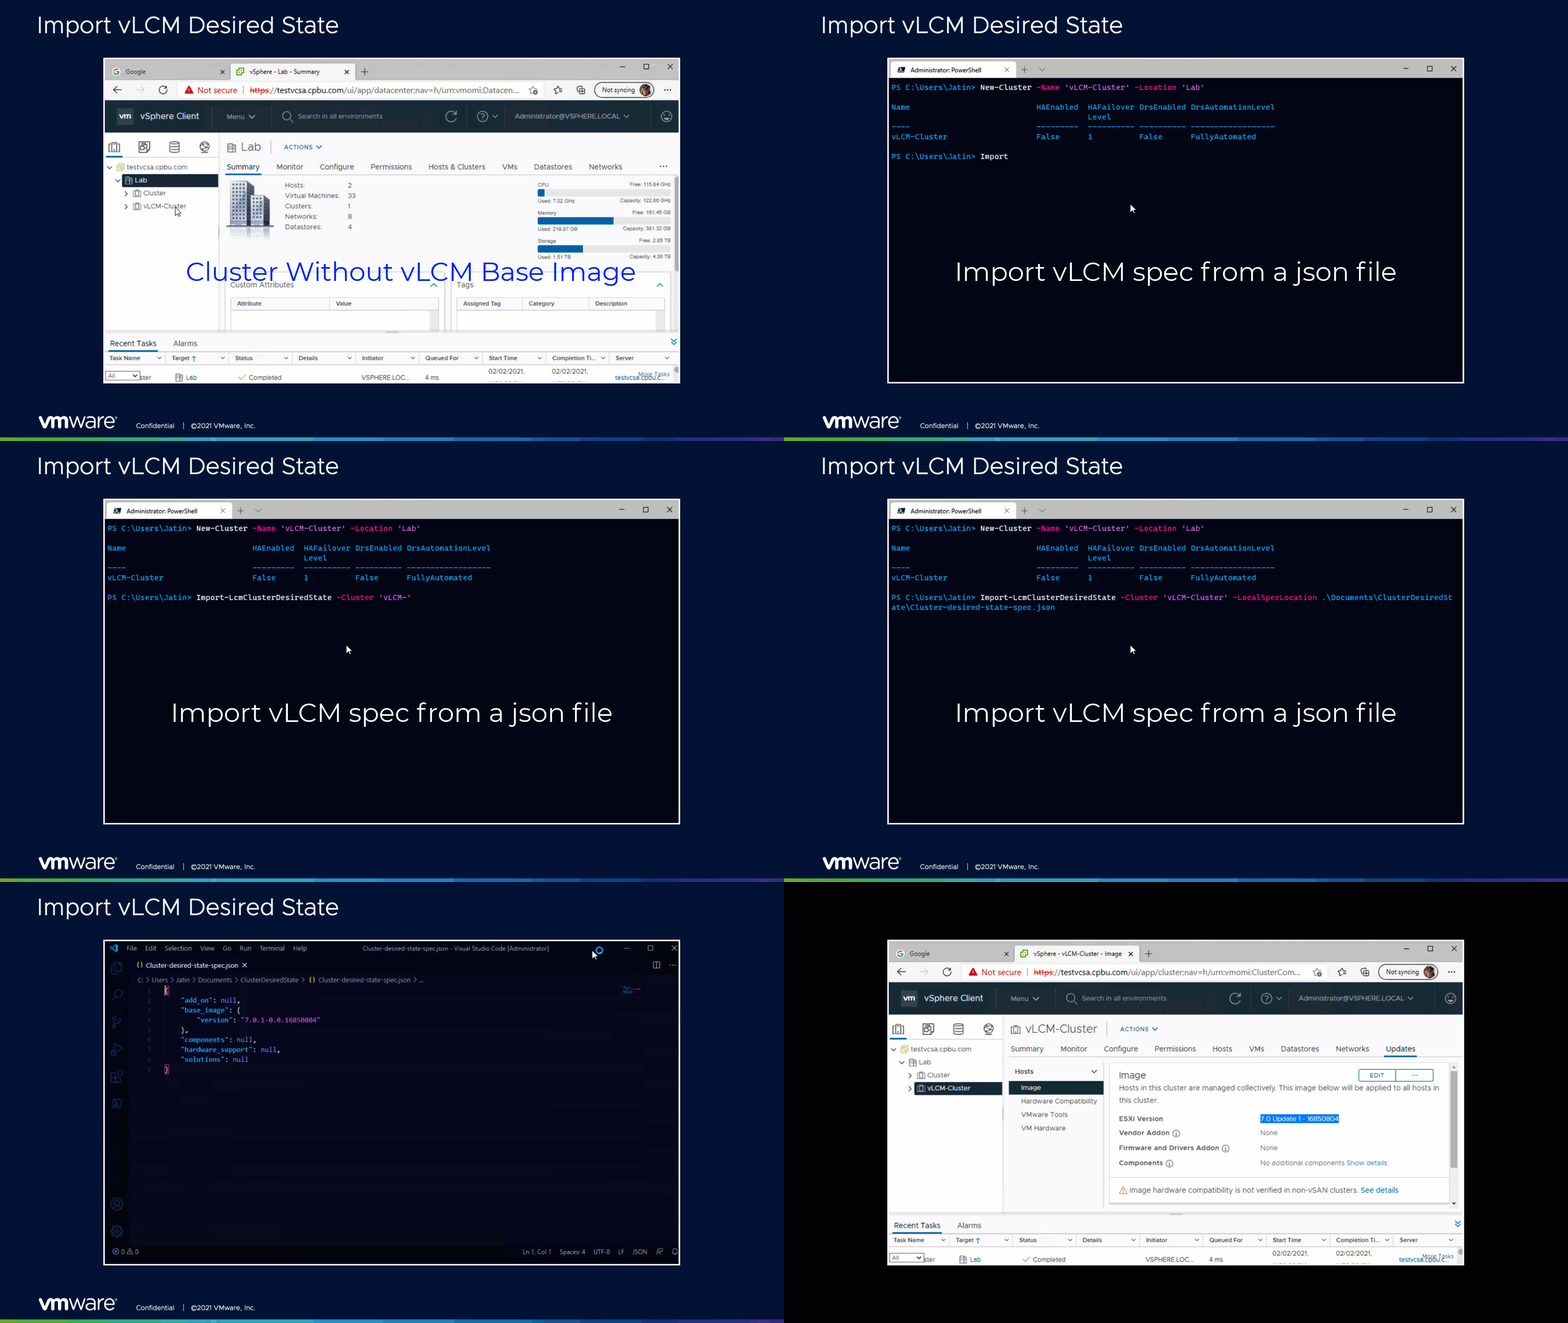
Import Cluster Desired Image

A new cmdlet Import-LCMClusterDesiredState is introduced to import a cluster desired state. Do check out the cmdlet reference to learn more.

Import-LCMClusterDesiredState

Ex.

Import-LCMDesiredState -Cluster ‘vLCM-Cluster’ -LocalSpecLocation \Documents\ClusterdesiredState\cluster-desired-state.json

Get vLCM Recommendations

A new cmdlet is introduced to provide the desired state recommendation if any new base image is available to use.

Check out the details here.

Get-LcmClusterDesiredStateRecommendation

Override custom depot

We have added an additional parameter –DepotOverrides <String[]> to the Set-Cluster cmdlet, which allows you to define a custom image depot to be used by vLCM.

Set-Cluster -DepotOverrides <String[]>

Extended PowerCLI support for content library items

Please find the details of enhancements we are introducing with PowerCLI 12.2 concerning the content library item.

OVF Parameters on a Content Library Item

A new parameter  -ContentLibraryItem is added on Get-OvfConfiguration cmdlet. It will allow you to fetch and update the ovf parameters from a content library item.

Example:

$ContentLibItem Get-ContentLibraryItem -name 'ContentLibraryItem'  $vmhost = get-VMHost -name '10.23.81.190'      $ovfConfig = get-OvfConfiguration -ContentLibraryItem $ContentLibItem -Target $vmhost  $ovfConfig      $ovfConfig.EULAs.Accept.Value=$true  $ovfConfig.NetworkMapping.Network_1.Value= 'VM Network'


Specify OvfConfiguration

New OVFConfiguration parameter has been added to the New-VM cmdlet to allow specifying OVF parameters when deploying OVF template from the content library

New-VM -name 'MyVM' -VMHost $vmhost -ContentLibraryItem $ContentLibItem -OvfConfiguration $ovfConfig  $vm = Get-VM -name 'MyVM'  $vm| Format-List


Deploy VMs from VM Templates Stored in a Content Library

New-VM cmdlet is now capable of deploying VMs from VM templates in a content library

New-VM -Name 'MyVMFromtemplate' -VMHost -ContentLibraryItem $vmTemplateContentLibItem  Get-VM -name 'MyVMFromTemplate'


Foreach-Object -parallel {} is now supported

PowerShell team introduced a new switch -Parallel to foreach-object cmdlet starting from PowerShell v7. The new switch allowed PowerShell to execute parallel jobs on a collection of objects, thus reducing overall execution time. However, Foreach-Object -parallel wasn’t supported with VMware PowerCLI until now.

When you use Foreach-Object -parallel, PowerShell creates child runspaces to execute the respective jobs. The problem PowerCLI had was that it couldn’t reuse the VISessions within the child runspace hence failing to execute the PowerCLI cmdlets.

Happy to inform you all that foreach-object -Parallel is now supported with PowerCLI. This can be achieved by 2 ways.

Inline -Server parameter

You will require to store VISession in a variable and pass the connection variable to each PowerCLI cmdlet under foreach-object -parallel.

Let’s take a look at the below example.

$cred= Get-Credential  $conn = Connect-VIServer testvcsa.cpbu.com -Credential  $cred  Function Execute-WithoutPcliContext  {    $vmlist= get-VM    $vmlist |ForEach-Object -Parallel {       (Get-VM -Name $_.Name -Server $using:conn).Name    }   }

Use PowerCLI Context

You can execute and store the Get-PowerCLIContext cmdlet to a variable, which will store the VISession variables and Imported modules from the parent runspace. You can then use the PowerCLI context within the foreach-object -parallel to pass the VISession information to child run space. This method eliminates the need to specify inline -Server parameter to each PowerCLI cmdlet.

Let’s take a look at the below example.

$cred= Get-Credential  $conn = Connect-VIServer testvcsa.cpbu.com -Credential  $cred  Function Execute-WithPcliContext  {       $pcliContext= Get-PowerCLIContext       $vmlist= get-VM      $vmlist |ForEach-Object -Parallel {          Use-PowerCLIContext -PowerCLIContext $using:pcliContext -SkipImportModuleChecks          (Get-VM -Name $_.Name ).Name      }   }

Manage Namespace Limits via PowerCLI

Two new cmdlets have been introduced to manage the workload cluster namespace limits.

Check out below cmdlets references to know more.

Get-WMNamespaceLimits
Set-WMNamespaceLimits

Concluding this, I recommend you to visit the PowerCLI 12.2 release notes to know more about improvements and bugfixes. Also, Do check out the PowerCLI home page for anything and everything related to PowerCLI.


The post New Release – VMware PowerCLI 12.2 appeared first on VMware PowerCLI Blog.

New Release- vSphereDSC 2.2

$
0
0

The vSphere Desired State Configuration(vSphere DSC) is an open-source project lead by the VMware PowerCLI team. The project got started in 2017, and since then, it is keep growing. Today, we are excited to announce the release of vSphere DSC 2.2. This release brings various enhancements and increases the overall count of vSphere DSC resources to 73 compared to 67 from the previous release.

I also have another great piece of news for all of you. The vSphereDSC is now fully supported on Linux platforms and does not mandate you to set up a windows box to execute vSphereDSC resources.

New DSC Resources

Below are some of the new DSC resources which have been introduced with this release.

  1. DatastoreCluster: Create, modify, update, or remove Datastore cluster
  2. DatastoreClusterAddDatastore: Add Datastore to a datastore cluster
  3. DRSRule: Create, modify, update, or remove DRS rules.
  4. VMHostVdsNic: Modify, update, or remove a ‘VMKernel nic’ on a vSphere Distributed switch. 
  5. VMHostStorage: Enable or disable the software iSCSI adapter. 
  6. VMHostIScsiHbaVMKernelNic: Used to bind/unbind VMKernel Network Adapters to/from the specified iSCSI Host Bus Adapter.

Bugfixes

  1. VMHostVDSwitchMigration: Fixed the bug to allow multiple vmnic to be migrated to a dvSwitch 
  2. VMHostVssTeaming: Fixed bugs with physical network adapters when updating the teaming policy of the standard switch.
  3. NfsDatastore: Fixed the bug, to allow mount operation on the VMhost if the NFS datastore already present.

Install/Update VMware vSphereDSC Module

Execute the below command to install or update the vSphereDSC module from PowerShell Gallery.

Install

Install-Module -Name VMware.vSphereDSC

Update

Update-Module -Name VMware.vSphereDSC

VMware.PSDesiredStateConfiguration module

The vSphere DSC is a PowerShell DSC-based module that provides DSC resources for VMware vSphere. The PowerShell DSC enables IaC (Infrastructure as a Code) approach to author and build infrastructure as per the desired state configuration.

The PowerShell DSC has an important component known as Local Configuration Manager (LCM), the PowerShell DSC execution engine. The vCenter Server and ESXi host don’t have PowerShell and LCM installed and we had the compulsion of using a windows server to act as a proxy LCM server.

Recently, Microsoft has introduced a new cmdlet, Invoke-DSCResource, which allows you to execute DSC resources without a PowerShell LCM engine. We have leverage Invoke-DSCResource capabilities and introduced a new module VMware.PSDesiredStateConfiguration, to execute the vSphereDSC resources. The module is fully compatible with both Windows and Linux platforms and allows you to execute vSphereDSC resources without using the PowerShell LCM engine.

Please note that you can either choose to run vSphereDSC with a PowerShell LCM engine or VMware.PSDesiredStateConfiguration module.

Execute the below cmdlet to install VMware.PSDesiredStateConfiguration

Install-Module -Name VMware.PSDesiredStateConfiguration

Let’s take a look at the new cmdlets introduced along with this module.

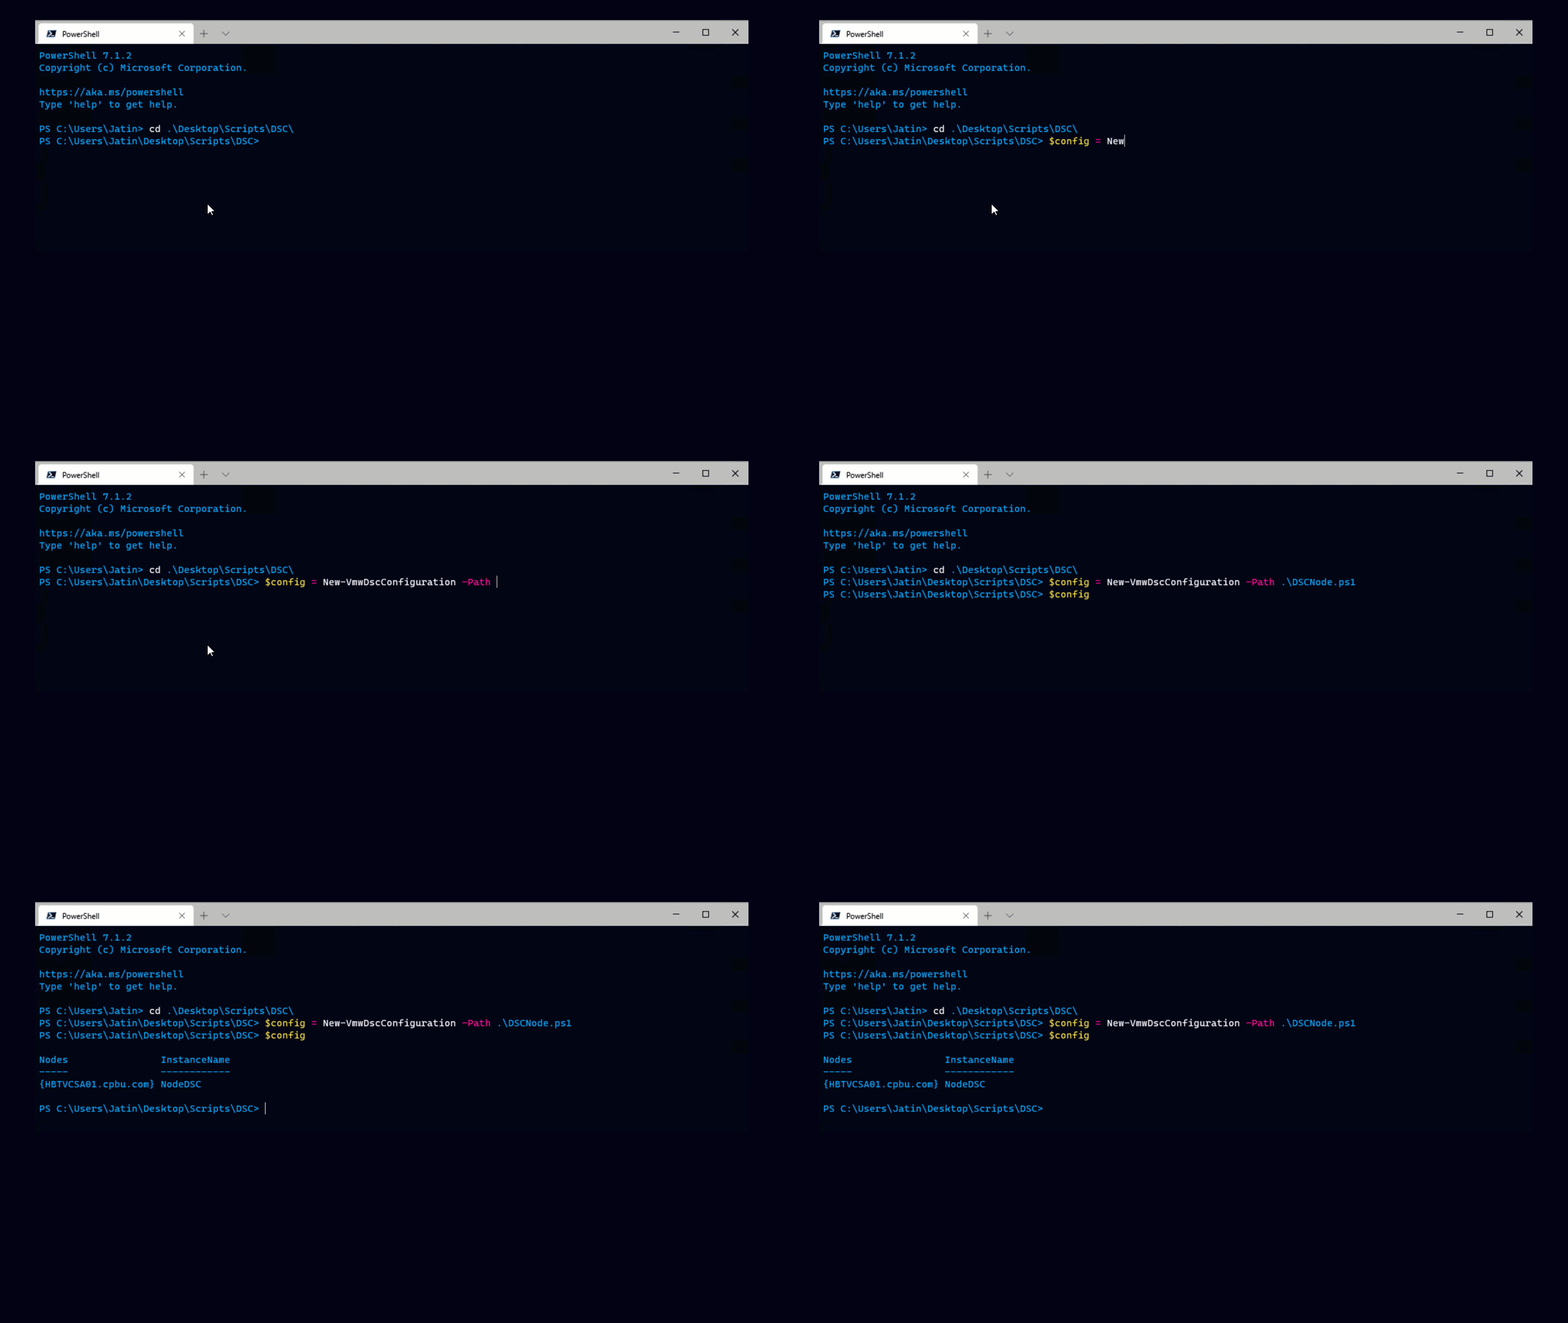
New-VmwDscConfiguration

This cmdlet creates a VmwDscConfiguration object which contains information about the configuration. You can document the configuration with a .ps1 file and pass the configuration document as a parameter to this cmdlet.

This object is then used with the other cmdlets to perform the three primary DSC operations(GET, START, TEST).

Example:

$config = New-VmwDscConfiguration -Path ./Site-A.ps1

Start-VmwDscConfiguration

This cmdlet starts the DSC execution with the PowerShell object, which was created using the New-VmwDscConfiguration cmdlet.

Example:

Start-VmwDscConfiguration -Configuration $config

Test-VmwDscConfiguration

This cmdlet check the compliance of your vSphere infrastructure against a DSC configuration.

Example1:

Test-VmwDscConfiguration -Configuration $config

This will return a Boolean result that shows if the state is desired or not.

Example 2:

If you want a detailed result in which every resource state is shown you can use the optional -Detailed switch for the Test-VmwDscConfiguration cmdlet.

Test-VmwDscConfiguration -Configuration $config -Detailed

Advantages of using VMware.PSDesiredStateConfiguration module

vSphere Nodes

A new construct, vSphereNode is introduced which allows you to specify a VINode(vCenter or ESXi host) and apply DSC configurations directly to the respective vSphereNode.

Note: vSphereNode construct is supported from PowerShell core (PS7).

Persistent VI session

With the PowerShell LCM engine, each resource required a server name (vCenter or ESXi host), and its credential to establish a VISession. If you have 3 resources in a configuration, DSC will create a separate VISession for each resource.

           With Vmware.PSDesiredStateConfiguration creates a persistent VISession across all the DSC resources and removes the need to have a separate VISession for each vSphereDSC resource.

No more MOF files

 New-VmwDSCconfiguration cmdlet executes the DSC resources without involving the PowerShell LCM engine and does not create any ‘mof’ file. The configuration can be complied with and stored in a PowerShell variable.


Important Links

Conclusion

The new VMware.PSDesiredStateConfiguration module and the ability to execute vSphereDSC from a Linux platform provide greater flexibility of consuming the vSphereDSC resources.

We would like to thank our community members and customers for sharing the required feedback, new feature request, and issues with us. We request you to start using the vSphereDSC resources and let us know what more we can do here. Happy to hear your thoughts!

The post New Release- vSphereDSC 2.2 appeared first on VMware PowerCLI Blog.

Use-Case: Execute PowerCLI Scripts as vSphere Alarm Actions using Script Runtime Service

$
0
0

Throughout the years, our customers have continuously asked how to execute PowerCLI scripts as vSphere alarm actions. Out of the box, the vCenter Server Appliance (VCSA) supports executing bash, python scripts, but not PowerShell ones. Even if it’s possible to install PowerShell Core on the VCSA and execute scripts directly there this is not recommended because running a complex script that consumes more resources could have an impact on the performance of the vCenter Server. There are also other options using remote execution through WMI or other VMware products like vRO, which both require some complex setup, but now there is also a pretty straightforward way to achieve the same result using the recently released Script Runtime Service (SRS).

SRS is a Kubernetes-based application that allows you to manage PowerCLI instances and invoke PowerCLI cmdlets or scripts via REST APIs. It is an open-source project that you can find here and you can read more about it in this blog post. If you’re a Kubernetes expert you can install SRS on a pre-deployed Kubernetes cluster, but I used the easier way that is provided here – with a host VM that is provided as an OVF.

After you have installed SRS successfully comes the next task – to create a script on the VCSA that calls the REST API that SRS provides and execute the PowerCLI script that you want and attach it to an alarm action. Let’s understand this with a use-case, I have several VMs on the host and some of them are business-critical and others are not. I want to set up an alarm on the vCenter such that when the host memory utilization becomes too high the non-essential VMs are powered off. I have created two tags – “essential” and “non-essential” and have tagged the VMs accordingly.

To make the script more universal I have separated it into three parts – the configuration part, the script itself, and the PowerCLI script that is stored in a separate .ps1 file. Here are what the three files look like:

config.sh – this is the file where you define the SRS endpoint address, the vCenter username, and password

#!/bin/bash  ##################################################  srs_address="<SRS_Address>"  username="<VC_username>"  password="<VC_password>"  ##################################################

ExecutePowerCLIScript.sh – this is the BASH script that makes the actual REST API calls to the SRS to initiate the script execution. Disclaimer: I’m not a big expert in writing BASH scripts so this might not be the most optimal script. Feel free to improve it and suggest improvements in the comments. My purpose was to provide a script that does not require any additional software to be installed on the VCSA and only uses what’s there by default.

#!/bin/bash    . /root/config.sh    encodedauthinfo=$(echo -n $username:$password | base64)    #login to SRS  srsapikey=$(curl -X POST "https://${srs_address}/api/auth/login" -H "accept: \*/\*" \  			-H "Authorization: Basic ${encodedauthinfo}" -H "content-length: 0" -i -k \  			| grep X-SRS-API-KEY: | awk {'print $2'})  			   #create runspace  runspaceInfo=$(curl -X POST "https://${srs_address}/api/runspaces" --http1.1 \  		     -H "accept: application/json" -H "X-SRS-API-KEY:${srsapikey}" \  			 -H "Content-Type: application/json" \  			 -d "{\"name\":\"MyRunspace\",\"run_vc_connection_script\":\"true\"}" -k)    #extract the runspace ID				  runspaceId=$(echo $runspaceInfo | pcregrep -o '"id":.*?[^\\]"' |awk -F':' '{print $2}' | tr --delete \")    #wait for the runspace to become ready  state=""  while [ "$state" != "ready" ]  do     sleep 3     response=$(curl -X GET "https://${srs_address}/api/runspaces/${runspaceId}" \              -H "accept: application/json" -H "X-SRS-API-KEY:${srsapikey}" -k)     state=$(echo $response | pcregrep -o '"state":.*?[^\\]"' |awk -F':' '{print $2}' | tr --delete \")     done    #read the PowerCLI script placed under /root. Script name is passed as the first parameter via vSphere Client UI  scriptText=$(</root/$1)    #Initiate script execution  curl -X POST "https://${srs_address}/api/script-executions" --http1.1 \       -H "accept: application/json" -H "X-SRS-API-KEY:${srsapikey}" -H "Content-Type: application/json" \  	 -d "{\"runspace_id\":\"${runspaceId}\",\"name\":\"My script exectution\",\"script\":\"${scriptText}\"}" -k

You can download the two bash files from the SRS GitHub repository here: https://github.com/vmware/script-runtime-service-for-vsphere/tree/master/clients/vcva

TurnOffNonEssentialVMs.ps1 – this is the PowerCLI script that you want to execute and it is copied under /root

Get-VM -Tag 'non-essential' | Stop-VM -confirm:$false

Note that when using the SRS to execute a script you don’t need the Connect-VIServer part. SRS does the server connection for you with the vCenter that it’s registered with.

The next step is to save these three files in the /root folder on the VCSA and then create the alarm that executes them. Before that you need to set the script to an executable by running the following command:

chmod +x ExecutePowerCLIScript.sh

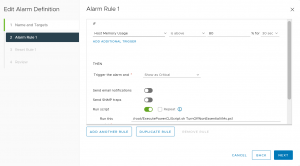
Here is what my created alarm rule looks like:

When host memory utilization grows above 80%, the bash script will get executed. This will trigger the execution of the PowerCLI script in SRS and will lead to the non-essential VMs being powered off.

SUMMARY

Script Runtime Service is a new open-source Kubernetes-based application that provides a REST API interface for executing PowerCLI scripts. In this blog post, I demonstrate one of its possible usages that makes it easy to run a PowerCLI script as an action of a vCenter alarm. If you have such a use case try it out and let us know what you think.

The post Use-Case: Execute PowerCLI Scripts as vSphere Alarm Actions using Script Runtime Service appeared first on VMware PowerCLI Blog.

New Release – PowerCLI 12.3

$
0
0

It is my pleasure to announce the release of PowerCLI 12.3. Here are some of the key highlights for this release.

Release Highlight

Workload Management

  • Support for vSphere with Tanzu with vSphere Networking
  • New cmdlet New-WMNamespaceNetworkSpec to create a network specification for Namespace network

vSphere

  • Support for Native Key Provider
  • Cross vCenter VM Cloning

vSAN

  • vSAN file service Snapshot Management

Horizon

  • Latest Horizon API 8.2 binding

SRM

  • Latest SRM API 8.4 binding

Let’s explore some of these features in detail.

Workload Management

With the release of PowerCLI 12.3, additional parameters are introduced to Enable-WMCluster cmdlet. These new parameters allow you to enable a workload management cluster with vSphere networking.

Check out the updated syntax below.

            vSphere Networking

            NSX Networking

Also, a new cmdlet New-WMNamespaceNetworkSpec has been introduced, which allows you to create a network specification for the Namespace network.

Let’s check out the sample script to enable workload management with vSphere Networking.

Do edit and customize the values If you choose to re-use the script for your environment.

#Connect to vCenter. Edit values as appropriate.  $vc = "192.168.x.x"  $vc_user = "administrator@vsphere.local"  $vc_password = "******"  Connect-VIServer -User $vc_user -Password $vc_password -Server $vc  $Cluster = Get-Cluster  -Name "cluster"  $datacenter = Get-Datacenter "datacenter"  $datastore = Get-Datastore -Name  "vsanDatastore"  $vmhosts = Get-VMHost  $tkgcl = "tkg-cl"  $ntpservers = @("time.vmware.com")  $ManagementVirtualNetwork = get-virtualnetwork "VM Network"  #    #Extracting CA Cert from the HAProxy VM  $HAProxyVMname = "haproxy-demo"  $AdvancedSettingName = "guestinfo.dataplaneapi.cacert"  $Base64cert = get-vm $HAProxyVMname |Get-AdvancedSetting -Name $AdvancedSettingName  while ([string]::IsNullOrEmpty($Base64cert.Value)) {              Write-Host "Waiting for CA Cert Generation... This may take a under 5-10 minutes as the VM needs to boot and generate the CA Cert (if you haven't provided one already)."          $Base64cert = get-vm $HAProxyVMname |Get-AdvancedSetting -Name $AdvancedSettingName          Start-sleep -seconds 2      }      Write-Host "CA Cert Found... Converting from BASE64"      $cert = [Text.Encoding]::Utf8.GetString([Convert]::FromBase64String($Base64cert.Value))  #    #Enable Workload Management with HAProxy and vSphere Networking  Write-Host "Enabling Workload Management"  Get-Cluster $Cluster | Enable-WMCluster `         -SizeHint Tiny `         -ManagementVirtualNetwork $ManagementVirtualNetwork `         -ManagementNetworkMode StaticRange `         -ManagementNetworkGateway "192.168.x.x" `         -ManagementNetworkSubnetMask "255.255.255.0" `         -ManagementNetworkStartIPAddress "192.168.x.x" `         -ManagementNetworkAddressRangeSize 5 `         -MasterDnsServerIPAddress @("192.168.x.x") `         -MasterNtpServer @("time.vmware.com") `         -ServiceCIDR "10.96.0.0/24" `         -EphemeralStoragePolicy "kubernetes-demo-storage" `         -ImageStoragePolicy "kubernetes-demo-storage" `         -MasterStoragePolicy "kubernetes-demo-storage" `         -ContentLibrary $tkgcl `         -HAProxyName $HAProxyVMname `         -HAProxyAddressRanges "192.168.24.208-192.168.24.222" `         -HAProxyUsername "admin" `         -HAProxyPassword "vmware" `         -HAProxyDataPlaneAddresses "192.168.x.x:5556" `         -HAProxyServerCertificateChain $cert `         -WorkerDnsServer "192.168.111.1" `         -PrimaryWorkloadNetworkSpecification ( New-WMNamespaceNetworkSpec `            -Name "network-1" `            -Gateway "192.168.24.1" `            -Subnet "255.255.255.0" `            -AddressRanges "192.168.24.2-192.168.24.126" `            -DistributedPortGroup "Workload24" `         )  #

vSphere Security

vSphere Native Key Provider, a new feature in vSphere 7 Update 2, provides a way within vSphere to enable data-at-rest protections like vSAN Encryption, VM Encryption, and vTPM straight from vSphere itself. You can visit https://core.vmware.com/native-key-provider to learn more about the native key provider.

PowerCLI 12.3 extends the cmdlets to support the native key provider. Below are some of the operations which will help you manage the native key provider.

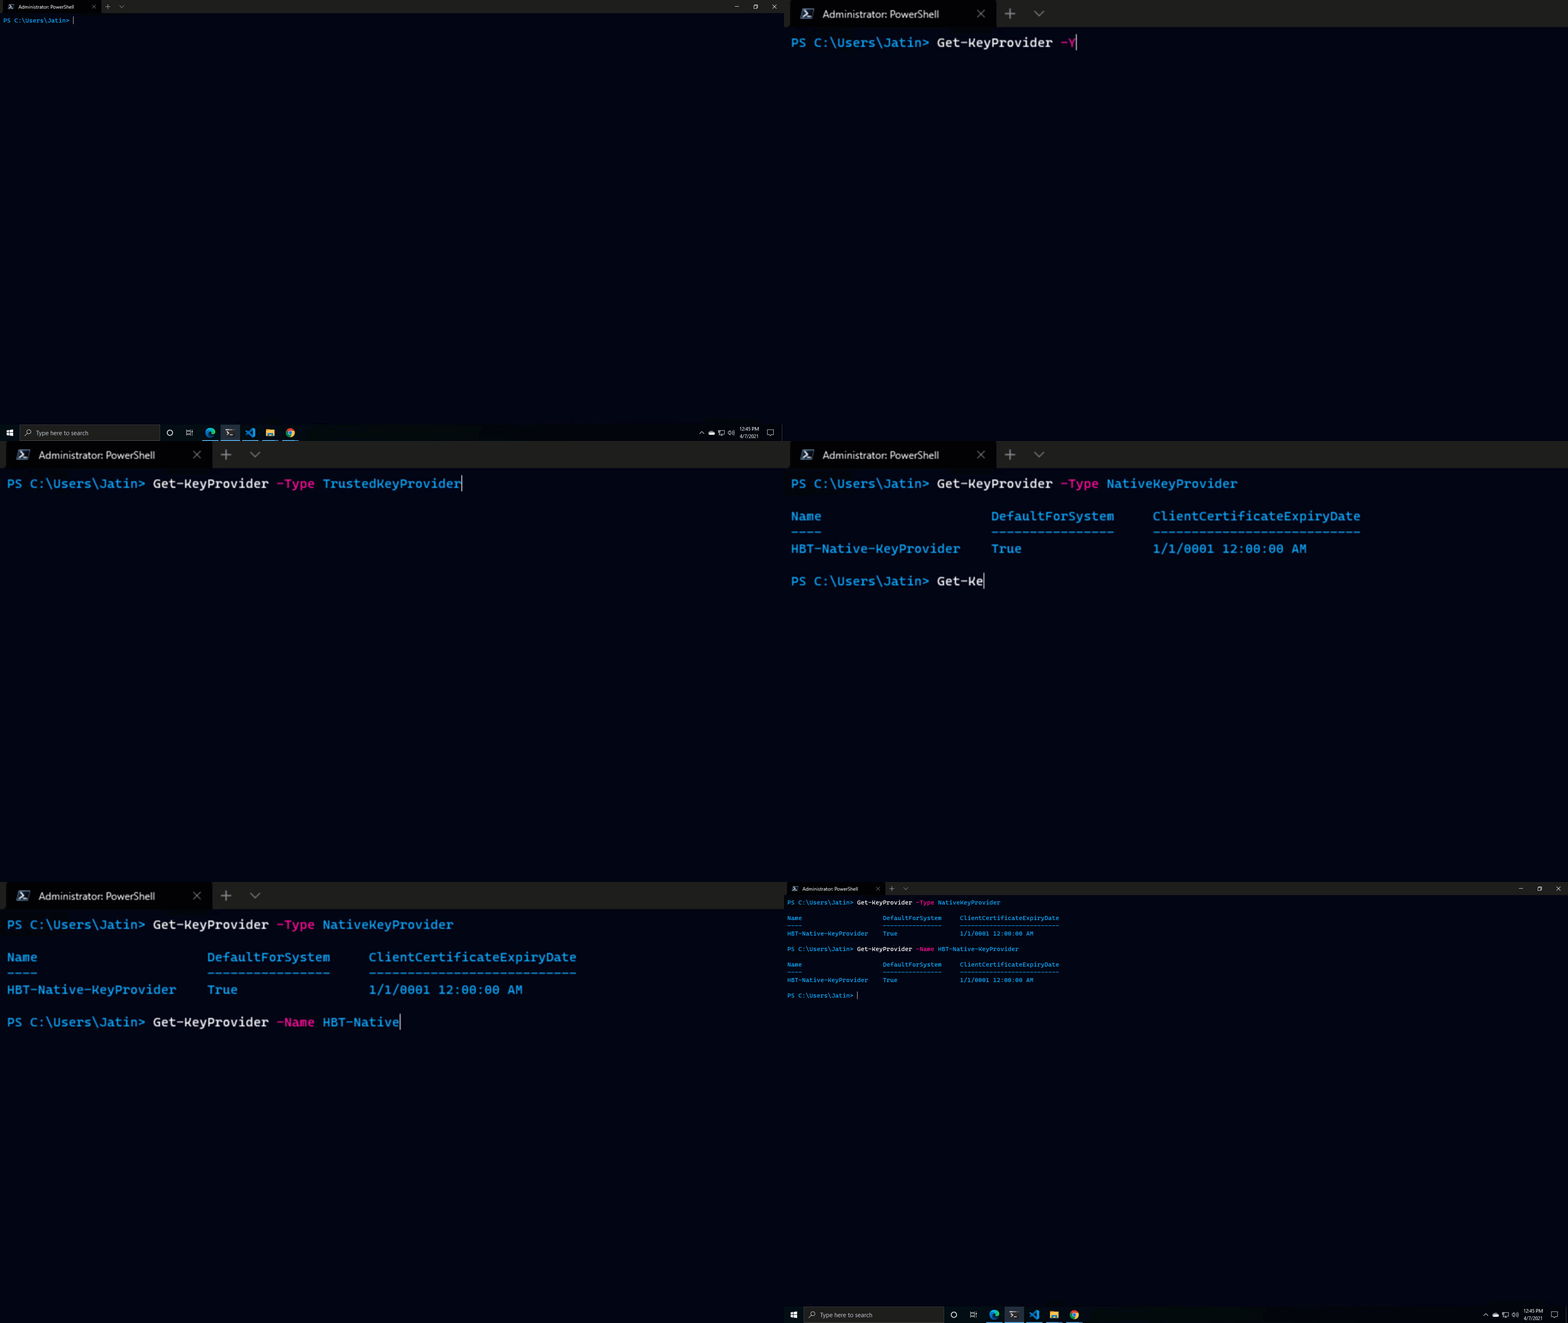
Filter the Native Key Provider

Get-KeyProvider cmdlet retrieves all key providers from the vCenter Server system. A new parameter -Type is introduced to filter the key provider based on its type.

#Get all the Native Key Provider from vCenter Server  PS C:\> Get-KeyProvider -Type NativeKeyProvider

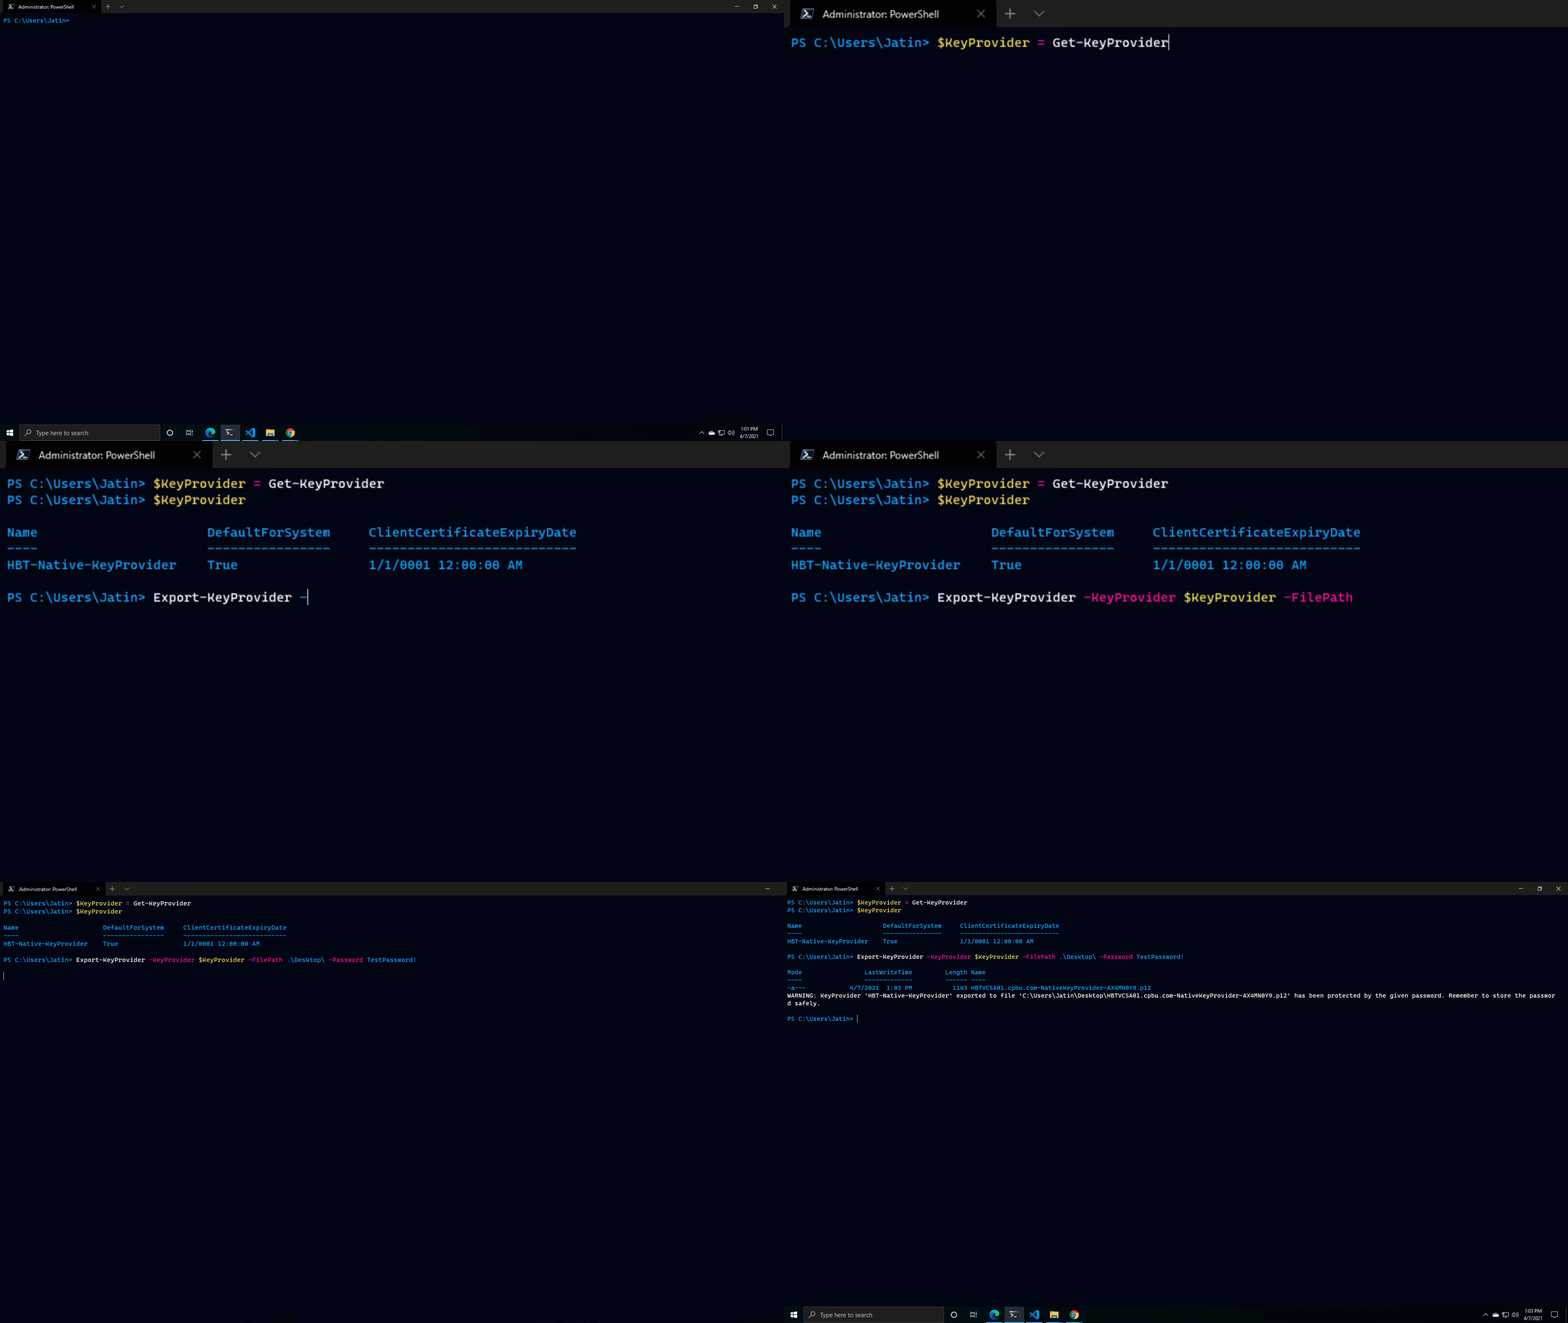
Export the Key Provider Configuration

It is a good idea that you back up the native key provider, especially if the native key provider is a default key provider.

PowerCLI 12.3 introduces a new cmdlet, Export-KeyProvider to backup (Export) the native key provider.

Note: You can only specify the NativeKeyProvider value to the -KeyProvider parameter.

#backup native key provider  PS C:\> Export-KeyProvider -KeyProvider NativeKeyProvider -FilePath .\SecurePath -Password ‘xxxx-xxxx’

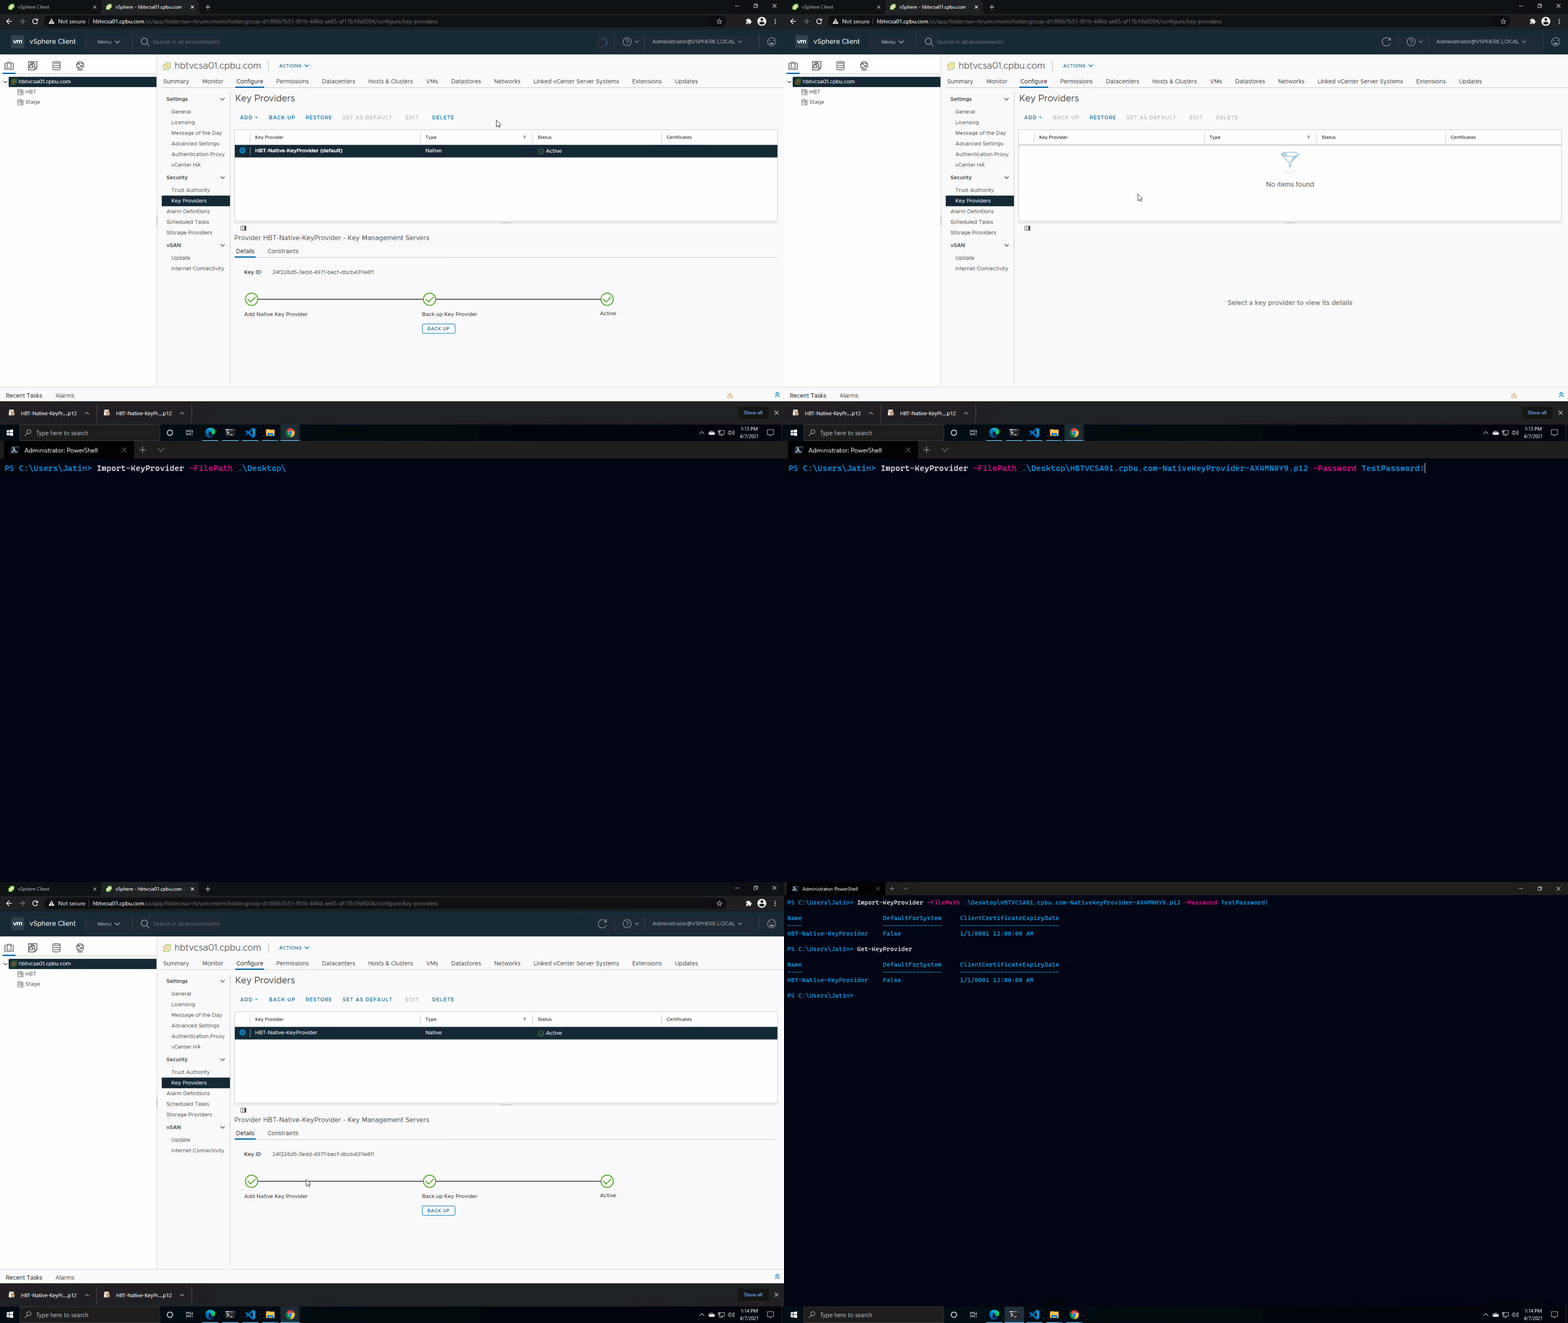
Import the key provider configuration

Caution: As explained earlier, if you have already configured the native key provider, make sure that you do not delete it. The vSphere UI provides you a conscious choice before you actually hit delete.

PowerCLI 12.3 introduces a new cmdlet, Import-KeyProvider to import (Restore) the native key provider if you need to import the key provider.

#Restore native key provider  PS C:\> Import-KeyProvider -FilePath .\SecurePath -Password ‘xxxx-xxxx’

Configure the VM encryption with Native key provider

You can now use PowerCLI to configure VM encryption using the native key provider. The Set-VM, Set-HardDisk, New-VM, and New-HardDisk cmdlets are updated to support the native key provider.

#Restore native key provider  PS C:\> $vm = Get-VM TestVM   PS C:\> $keyProvider = Get-KeyProvider  HBT-Native-KeyProvider  PS C:\> Set-VM $vm -KeyProvider $keyProvider

vSAN File Service Snapshot Management

The vSAN file share snapshot is a built-in feature in vSAN that provides a point-in-time image of a vSAN file share. You can check out the details here.

There are 3 new cmdlets that has been introduced to manage the vSAN File Service snapshot.

New-VsanFileShareSnapshot

This cmdlet creates a vSAN file share snapshot for the specified vSAN file share.

#Creates a new vSAN File Share Snapshot  PS C:\> New-VsanFileShareSnapshot -Name "FileShareSnapshot1" -FileShare $fileShare

Get-VsanFileShareSnapshot

This cmdlet retrieves vSAN file share snapshots based on name or other filters.

#Retrieves all vSAN File Share Snapshot  PS C:\> Get-VsanFileShareSnapshot

Remove-VsanFileShareSnapshot

This cmdlet removes vSAN file share snapshot.

#Removes vSAN File Share Snapshot  PS C:\> Remove-VsanFileShareSnapshot -FileShareSnapshot $vSanSnapshot -Confirm:$false

Other Improvements and bugfixes

There are some notable enhancements done that will help you with day-to-day PowerCLI operations. For example, there is a new parameter -Reason is introduced with Set-VMHost, Stop-VMHost, and Restart-VMhost to specify the reason for respective VMhost Power operation via PowerCLI.

Similarly, The performance of Foreach-parallel has dramatically improved, and bug fixed the issues reported by the PowerCLI community.

Conclusion

The PowerCLI 12.3 is a small release in terms of feature offerings. However, it is quite a significant release for vSphere Security and vSphere with Tanzu. The support for vSphere with Tanzu with vSphere Networking will ease up the deployment of the tanzu environment. Similarly, The PowerCLI support for native key providers extends the automation capabilities to configure Native Key Provider during the build phase itself.

Concluding this, I recommend you to visit the PowerCLI 12.3 release notes to know more about improvements and bug fixes. Also, Do check out the PowerCLI home page for anything and everything related to PowerCLI.

The post New Release – PowerCLI 12.3 appeared first on VMware PowerCLI Blog.

PowerCLI 12.4 – What’s New

$
0
0

Hello everyone, It is time for you to update the PowerCLI module to the latest one, which is PowerCLI 12.4. The PowerCLI 12.4 is a very significant update with regards to how you will work with the REST APIs. Until now, we have had two major vSphere API bindings available for PowerCLI, and these are-

  • Get-View (SOAP API bindings)
  • Get-CISService (JSON-RPC)

Both of these API bindings are quite famous and still relevant for PowerCLI users. With PowerCLI 12.4, we’re introducing additional API binding for accessing the vSphere REST APIs. The new PowerCLI API bindings significantly improve the usability of working with vSphere REST APIs and provide PowerShell native user experience.

How to use vSphere Automation API SDK Module?

Update the current PowerCLI module to PowerCLI 12.4, and it will download a new set of PowerCLI modules packaged under ‘VMware.Sdk.vSphere’. This is a new manifest module containing sub-modules for all the REST APIs available for vSphere.

REST APIs have methods to execute the API and data structures to be used as an input to the API. The new API bindings provide low-level PowerShell functions to deal with the methods and data structure.

Invoke-

      The invoke function will be used to execute the REST methods, such as GET/PUT/POST and DELETE.

#List VM via REST API  Invoke-ListVM

Initialize-

The Initialize function will be used to create the data structure which will be used as an input for REST API. For, Example Create a Local account.

$LocalAccountsConfig = Initialize-LocalAccountsConfig -Password 'Tes$TPa$$w0Rd' -Roles 'superAdmin' #Create Account Config  $LocalAccountsCreateRequestBody = Initialize-LocalAccountsCreateRequestBody -Username 'dimilov' -Config $LocalAccountsConfig #Create Account Request Body  Invoke-CreateLocalAccounts -LocalAccountsCreateRequestBody $LocalAccountsCreateRequestBody #Create Local Account

Updated vSphere API Documentation

The vSphere API Documentation is updated with PowerCLI examples to invoke the respective REST API via PowerCLI. For example, check out the REST API documentation of Create Local Accounts, and you can find the example to invoke the same API using PowerCLI.

The new vSphere Management Module

A new module is introduced for vSphere Management. It is a PowerShell-based module backed by the newly introduced vSphere Automation API SDK modules. You can actually explore the source code of this module and understand how we have created PowerCLI cmdlets by leveraging the Invoke and Initialize functions provided by the new REST API bindings. Currently, the module contains 6 cmdlets to complement certificate management. Explore the cmdlet documentation to know more.

Add-VITrustedCertificate

Get-VIMachineCertificate

Get-VITrustedCertificate

New-VIMachineCertificateSigningRequest

Remove-VITrustedCertificate

Set-VIMachineCertificate

Other Improvements

  • Upsizing VMC SDDC
  • Copy-DatastoreItem is modified to support upload/download of vmdk files from vSAN datastore
  • API bindings in the Horizon module have been updated with the API features of the latest Horizon 8.3.

New PowerCLI Logo

We are updating the PowerCLI logo to adhere to the new VMware brand guidelines. You can access the new logo files from here.


To wrap this up, I would conclude that the new API bindings provide you the native PowerShell experience while working with REST APIs. Please check out the PowerCLI 12.4 release notes for more details on the improvements and bug fixes.


Certificate issue while upgrading
You may encounter a certificate error while updating the existing PowerCLI module via Update-Module, as discussed here.

This is due to the fact that the certificate we used to sign the modules was replaced with a new one from a new publisher. To resolve this issue, you may be required to delete the existing module and re-install the module with the Install-Module cmdlet.


The post PowerCLI 12.4 – What’s New appeared first on VMware PowerCLI Blog.


Join us LIVE – What’s New With PowerCLI 12.4

$
0
0


PowerCLI

Every month we do a live stream on the vSphere YouTube Channel (and recently on Facebook and Twitter, too), talking about different topics at the infrastructure levels of the software-defined data center. Recently, we have released PowerCLI 12.4 on 9/16. So far, the response is quite good, and we have already crossed 10K downloads within a week. This time around, we are bringing the PowerCLI Development team on vSphere LIVE. The team is here to present cool demos around PowerCLI 12.4 and would be happy to take the questions LIVE!

Excited about it, Make sure to add this event to your calendar.

vSphere LIVE: What’s New with PowerCLI

September 23, 09:30 AM PT 

Youtube Link https://www.youtube.com/watch?v=Jt8gO0hIZPU

If you’ve followed us on Twitter, Facebook, or subscribed to the YouTube channel you’ll get a notification when we start. You could also set a reminder (“ring the bell” as the YouTube folks say) if you were subscribed to our channel (hint, hint…)

Thanks

The post Join us LIVE – What’s New With PowerCLI 12.4 appeared first on VMware PowerCLI Blog.

TODAY!: Join us for vSphere LIVE, on What’s New With PowerCLI 12.4, 09:30 AM PT

$
0
0

What are you doing at 09:30 AM PM Pacific today (September, 23rd )? Come on over to the vSphere YouTube Channel and tune into the September episode of vSphere LIVE. We’ll be talking about VI Admins #1 tool and that is PowerCLI. Joining with us today, Jatin Purohit (Sr. Technical Marketing Manager with vSphere Technical Marketing Team) providing commentary and perspective while Kamen Nikolov (R&D Manager, PowerCLI) and Dimitar Milov (Sr. Staff Engineer, PowerCLI) will deep dive into PowerCLI 12.4. As always we have Bob Plankers (Sr. Technical Marketing Architect, vSphere Technical Marketing Team) who will put on customer’s hat and will keep asking the questions which matter to you the MOST.

So remember the time, September 23, 09:30 AM PT. See you there. https://www.youtube.com/watch?v=Jt8gO0hIZPU  

All the vSphere LIVE videos are archived on the vSphere YouTube channel, in case you missed one. Check out last month’s AI & ML discussion, was probably our best yet!

The post TODAY!: Join us for vSphere LIVE, on What’s New With PowerCLI 12.4, 09:30 AM PT appeared first on VMware PowerCLI Blog.

PowerCLI 12.5 – What’s New

$
0
0

Today, We have released PowerCLI 12.5 and with this, we are continuing to expand our cmdlet coverage to various VMware products and solutions. Below are some of the key highlights out of this release-

Release Highlights

  1. New cmdlets to support the appliance service management
  2. Support for Encrypted vMotion
  3. Support for CPU and Memory hot add/remove
  4. Support for VMC AWS Outpost
  5. Query VMC SDDC Group
  6. Support for multiple vRops adapter instances
  7. Horizon API Binding Updates with 8.4

For more details, please refer to the PowerCLI release notes here.

vCenter Server Appliance Service Management

There are 4 new cmdlets that have been introduced with PowerCLI 12.5. These are-

Get-VIApplianceService – Retrieves vCenter Server Appliance Services

Start-VIApplianceService – Start vCenter Server Appliance Service

Stop-VIApplianceService – Stop vCenter Server Appliance Service

Restart-VIApplianceService – Restart vCenter Server Appliance Service

VMware Cloud on AWS Outpost

For customers looking to extend their AWS-centric model to their on-premises datacenter, VMware Cloud on AWS Outposts is a perfect solution and available since Q3 FY22. With the current PowerCLI release we have added a new cmdlet, Get-VmcOutpost to retrieve the outposts available in the VMC organization. Also, a New -Outpost parameter has been added to the New-VmcSddc cmdlet to allow specifying the outpost to create an SDDC on.

VM Related Enhancements

            Support for CPU/Memory Hot add/Remove

There are new parameters that have been introduced to help you in setting up CPU Hot add/remove and memory hot add on a virtual machine. These parameters can be used with the Set-VM and New-VM cmdlet.

-CpuHotAddEnabled, Enable CPU Hot Add

-CpuHotRemoveEnabled, Enable CPU Hot Remove

-MemoryHotAddEnabled, Enable Memory Hot add


            Enable encrypted migration

New -MigrationEncryption Type parameters have been added to the Set-VM and New-VM cmdlet to allow enabling of encrypted migration.

Along with the above updates, the Horizon module has been updated with the new Horizon 8.4 API bindings. That is it from PowerCLI 12.5 release. Please check out the release notes for more information on the bug fixes and resolved issues.


Certificate issue while upgrading

You may encounter a certificate error while updating the existing PowerCLI module via Update-Module, as discussed here. This is due to the fact that the certificate we used to sign the modules was replaced with a new one from a new publisher. To resolve this issue, you may be required to delete the existing module and re-install the module with the Install-Module cmdlet.


The post PowerCLI 12.5 – What’s New appeared first on VMware PowerCLI Blog.

Managing vSphere Certificates with PowerCLI

$
0
0

Managing vSphere certificates is a feature that many customers have been asking for on our feature request site. And when all the necessary APIs for it were added in vSphere 7 we were finally able to add it to PowerCLI 12.4.

This doesn’t mean however that all the cmdlets require vSphere 7. Some of them are supported in 6.7 or even 6.5. For example, you can check what are the trusted certificates on vSphere 6.7, but to add a certificate or certificate chain to the trusted certificate store you need vSphere 7. Also, you can check or change the machine certificate of an ESXi host for all supported ESXi versions, but to do that for vCenter Server you need vSphere 7.

So, let’s take a look at what cmdlets are available for certificate management. Here is the list:

Managing the Trusted Certificate Store

Let’s start with trusted certificate store management. We can use Get-VITrustedCertificate to check the details of the trusted root certificates on our vCenter Server and/or the connected ESXi hosts, such as issuer, expiration date, serial number, etc. Here is an example of how we can check the certificate stores of our servers for expired certificates.

#Check the trusted certificate store of the vCenter and all connected ESXi servers for expired certificates
Get-VITrustedCertificate | Where-Object { $_.NotValidAfter -lt (Get-Date) }

If we want, for example, to add the certificate or certificate chain of the certificate authority that we use to the trusted certificate store we can use Add-VITrustedCertificate. Here is a sample script for this.

#Read the certificate or certificate chain from a .pem file
$trustedCertChain = Get-Content "C:\Users\jdoe\Downloads\ca-chain.cert.pem" -Raw

#Add it to the trusted certificate stores of the vCenter and the ESXi servers
Add-VITrustedCertificate -PemCertificateOrChain $trustedCertChain

We also have the Remove-VITrustedCertificate cmdlet to remove trusted certificates that we no longer need. However, this is a command that you should be very careful with. Make sure that you don’t remove a certificate that is in use, or is a part of a trust chain that is in use. It’s not accidental that this operation is not available at all in the UI. Here is an example how to use Remove-VITrustedCertificate to remove the expired certificates from the trusted certificate store of the vCenter Server:

Get-VITrustedCertificate -VCenterOnly | `
Where-Object { $_.NotValidAfter -lt (Get-Date) } | `
Remove-VITrustedCertificate

Managing the Machine SSL Certificate of vCenter Server

Now let’s move on to managing the Machine SSL certificate of a vCenter Server. If we have a lot of people accessing the vSphere client and we want it to present a certificate that is accepted by default by various browsers, we have to replace it with a certificate generated by a trusted certificate authority. First, let’s check the details of the current machine certificate:

Get-VIMachineCertificate -VCenterOnly

Next, we have to create a certificate signing request (CSR) for the vCenter Server to give to our trusted certificate authority. We can use New-VIMachineCertificateSigningRequest as in the following example.

$csrParams = @{
    Country="US"
    Email="jdoe@vmware.com"
    Locality="San Francisco"
    Organization="My Company"
    OrganizationUnit="PowerCLI"
    StateOrProvince="California"
}
$csr = New-VIMachineCertificateSigningRequest @csrParams

$csr.CertificateRequestPEM | Out-File "C:\Users\jdoe\Downloads\vc.csr.pem" -Force

Then, when we receive our certificate file from the certificate authority, we can change the VC machine certificate by using Set-VIMachineCertificate like this.

$vcCert = Get-Content "C:\Users\jdoe\Downloads\vc.cert.jdoe.pem" -Raw
Set-VIMachineCertificate -PemCertificate $vcCert


Note: Before we try to set the Machine SSL certificate we have to make sure that the root certificate of our CA is added to the vCenter Server trusted root store. Also keep in mind that changing the certificate will cause the vCenter to reboot.


Managing Machine SSL Certificates of ESXi Servers

If we want to go to full custom mode and manage all the certificates on our own, we’ll have to change the certificates of the ESXi hosts as well. The workflow for changing the ESXi machine certificate is a bit more complex. First, we have to change the ESXi host certificate management mode setting on the vCenter to ‘custom’ and reboot the vCenter for the change to take effect.

$vCenterConnection = Connect-VIServer vc1.example.com `
    -User 'My User' `
    -Password 'My Password'
$certModeSetting = Get-AdvancedSetting "vpxd.certmgmt.mode" -Entity $vCenterConnection
Set-AdvancedSetting $certModeSetting -Value "custom"

Then, we must to generate the CSR for the ESXi server. This step is similar to the one for the vCenter Server with the only difference that for the ESXi server it’s important to specify the CommonName parameter. The CommonName must be either the ESXi host’s FQDN or IP address. And it must match the identifier that we use to add the host to the vCenter Server system.

$esxRequest = New-VIMachineCertificateSigningRequest `
    -VMHost $vmhost `
    -Country "US" `
    -Locality "San Francisco" `
    -Organization "My Company" `
    -OrganizationUnit "PowerCLI" `
    -StateOrProvince "California" `
    -CommonName <ESXi host's FQDN> or <ESXi host's IP address>

$esxRequest.CertificateRequestPEM | Out-File "C:\Users\jdoe\Downloads\esx.csr.pem" -Force

Then, when we get the certificate from the certificate authority we have to follow the steps below to set it to the ESXi server.

      1. Put the host in maintenance mode and remove it from vCenter
        $vmhost = Get-VMHost 'MyESXiHost' `
        Set-VMHost -VMHost $vmhost -State Maintenance
        Remove-VMHost $vmhost
      2. Connect directly to the ESXi host, set the new machine certificate and restart the host for the changes to take effect
        $esxConnection = Connect-VIServer $vmhost.Name `
            -User 'My User' `
            -Password 'My Password' `
            -Force
        
        $esxCertificatePem = Get-Content "C:\Users\jdoe\downloads\myesxcert.pem" -Raw
        $targetEsxHost = Get-VMHost $vmhost.Name
        Set-VIMachineCertificate -PemCertificate $esxCertificatePem -VMHost $targetEsxHost | Out-Null
        
        Restart-VMHost $targetEsxHost
        
        Disconnect-VIServer $esxConnection

        Note: Just like with the vCenter, before we try to set the machine certificate, we need to make sure that the root certificate of our CA is added to the trusted root stores of the ESXi server and all other servers that will communicate with it – vCenter Server and ESXi.


      3. Re-add the ESXi server to the vCenter.
        $vCenterConnection = Connect-VIServer vc1.example.com `
            -User 'My User' `
            -Password 'My Password'
        
        $vmhost = Add-VMHost -Name <ESXi host's FQDN> or <ESXi host's IP address> `
            -Location (Get-Datacenter "My Datacenter")`
            -User "My User" `
            -Password "My Password"
        
        $vmhost = Set-VMHost -VMHost $vmhost -State Connected

Summary

With the new certificate management cmdlets it’s now much easier to automate vSphere certificate management with PowerCLI. There are some specifics in the process (especially for the ESXi hosts), so I hope this blog post will be useful in getting the entire process right. For step-by-step guidance on vSphere certificate management, visit the PowerCLI User’s Guide. Let us know in the comments if you want to see more technical blog posts like this and feel free to propose new topics.

Don’t miss the blog post for PowerCLI 12.5 here: PowerCLI 12.5 – What’s new?

The post Managing vSphere Certificates with PowerCLI appeared first on VMware PowerCLI Blog.

What’s New With PowerCLI 12.6 Release

$
0
0

It is with great pleasure that I announce the release of PowerCLI 12.6. As many of you know, with PowerCLI 12.4, we introduced a new PowerShell binding for vSphere Automation API. With this, the experience of working with vSphere REST APIs was greatly simplified. I have covered the working of new API bindings in the PowerCLI 12.4 release blog post, and you can refer to it for more information. With PowerCLI 12.6, we are extending the PowerShell Bindings to NSX Policy manager APIs.

Key Highlights

1.     PowerShell Binding for NSX Policy Manager APIs

A new module, i.e., VMware.Sdk.Nsx.Policy has been added to provide PowerShell binding for NSX Policy Manager APIs.

2.    New cmdlets for vCenter Server Appliance Management

New cmdlets have been added to manage vCenter Server appliance backups:

New-ApplianceBackupJob : This cmdlet starts a file-based backup job for a vCenter Server system to a backup server.

Wait-ApplianceBackupJob : This cmdlet monitors the progress of a backup job and returns the ApplianceBackupJob.

Get-ApplianceBackupJob : This cmdlet retrieves a list of finished or currently running backup jobs.

Stop-ApplianceBackupJob : This cmdlet stops a list of running backup jobs matching the specified parameters.

Get-ApplianceBackupPart : Retrieves a list of parts that can be included in a backup job, and their estimated backup size. Non-optional backup parts are always included in the backup.

3.     VMware SRM 8.5

The VMware.VimAutomation.Srm module has been updated to support VMware Site Recovery Manager 8.5.

4.     Bugfixes

Product /Category Cmdlet Name Description Status
HCX New-HCXMigration VM with multiple networks attached and if migration is triggered without mapping all the source networks to the target, the validation does not throw an error Fixed
HCX New-HCXMigration Initiating a Non-Mobility migration using New-HCXMigration cmdlet does not show the network mapping in the migration dashboard UI Fixed
vSAN Get-VsanView Get-VsanView throws ‘Object reference not set to an instance of an object.’ on PowerShell 7.2.2. Fixed
HCX Get-HCXVM Get-HCXVM cmdlet throws “Unexpected character encountered while parsing value: <. Path ”, line 0, position 0..” when the number of VMs available in the inventory is very big Fixed
HCX Get-HCXMigration Get-HCXMigration cmdlet throws an error if any of the migrations were triggered without providing the ‘TargetStorageProfile’ param Fixed


Please check out the PowerCLI 12.6 release notes for more details on the improvements and bug fixes.

Thanks

The post What’s New With PowerCLI 12.6 Release appeared first on VMware PowerCLI Blog.

New Release – PowerCLI 12.7

$
0
0

The PowerCLI team has some exciting news this week! PowerCLI version 12.7 is out and it’s packed with lots of new and exciting features. We have made a long requested module available on PowerShell Core, extended many cmdlets and added some new ones, and also improved the performance of others.

PowerCLI 12.7 comes with the following updates:

  • The VUM module has been ported to PowerShell 7 and now supports Linux and macOS.
  • Remote authentication support has been added to Connect-NsxServer cmdlet.
  • The usability of Get-NsxOperation cmdlet has been improved.
  • The NSX module has been updated with the latest API features.
  • The Horizon module has also been updated with the latest API features of Horizon 8.4.
  • Support for vSAN health check threshold, historical health check and remote datastores has been added to the vSAN cluster configuration.
  • Performance improvements in Connect-SrmServer and Get-HCXVM cmdlets.

Let’s take a closer look at some of these updates.

Multi-platform VUM module

One of the last non-multiplatform PowerCLI modules is now available for Linux and macOS after a lot of customer requests that we received in the last months and years. We started our multiplatform journey shortly after the first PowerShell core version was launched. Since then we’ve ported almost all of the PowerCLI modules with now only two modules left. We’re very happy to see that our hard work in this direction already pays off – PowerCLI is now the multi-platform VMware CLI with more than half of our users today using PowerShell 7 and more than 40% using PowerCLI on Linux and macOS.

NSX module improvements

We have introduced the new NSX SDK module in PowerCLI 12.6. If you haven’t already you can check this great blog post from on how to use it to perform the most common NSX operations. In this release we’re updating it with the latest NSX API features, adding remote authentication to the Connect-NsxServer cmdlet with the -UseRemoteAuthentication parameter, and improving the usability of Get-NsxOperation cmdlet.

Let’s dig a bit deeper in the Get-NsxOperation improvements. We have changed the way the -Path parameter works in Get-NsxOperation. In 12.6 it required the path to be in the format that is used in the NSX API specification, which was different from the one that was used in the NSX API documentation. This is now changed and you can just copy/paste the operation URL from the API documentation to get the corresponding PowerCLI cmdlet with Get-NSXOperation as in the example below:

Another change in the -Path parameter behavior is that it no longer returns all the operations that contain the specified path, but only the exact matches. Of course, you can still use wildcards to find multiple operations by part of the path.

New vSAN cluster configuration options

We have added several new vSAN cluster configuration options. You can now set vSAN health check thresholds using the -CapacityThreshold parameter of Set-VsanClusterConfiguration and New-VsanHealthCheckThreshold. You can also enable or disable vSAN historical health check as well as mount or unmount datastore from another cluster as remote datastore using Set-VsanClusterConfiguration. Here are some samples:

$newThreshold = New-VsanHealthCheckThreshold -Enabled $true -YellowValue 95 -RedValue 99 -Target VsanDatastore
Set-VsanClusterConfiguration -Configuration $cluster -CapacityThreshold $newThreshold -HistoricalHealthEnabled $false

$remoteDatastore = Get-Datastore 'MyDatastore'
Set-VsanClusterConfiguration -Configuration $cluster -MountRemoteDatastore $remoteDatastore

Certificate issue while upgrading

You may encounter a certificate error while updating the existing PowerCLI module via Update-Module, as discussed here. This is due to the fact that we replaced the certificate we used to sign the modules with a new one from a new publisher. To resolve this issue delete the existing module and re-install the module with the Install-Module cmdlet.

Summary

PowerCLI 12.7 comes with improved multiplatform support, NSX and vSAN improvements, and SRM and HCX performance optimizations. For a full list of all improvements and fixes check the PowerCLI 12.7 release notes. For more information on specific cmdlets, see the PowerCLI Cmdlet Reference.

Let us know in the comments what you’re looking forward to most!

The post New Release – PowerCLI 12.7 appeared first on VMware PowerCLI Blog.

PowerCLI at VMware Explore US 2022

$
0
0

The countdown to VMware Explore in San Francisco is on and for the first time in three years we’re gathering together in person to show you the latest VMware technology innovations. And as usual there is a lot of great PowerCLI sessions and labs that you shouldn’t miss. The schedule builder is now live, so make sure that you add these great sessions to you schedule and stay up-to-date with the latest innovation in PowerCLI.

VMware {code} Sessions

Session: What’s New in VMware PowerCLI? [CODE2691US]
Date: Thursday, Sep 1, 1:00 PM – 1:45 PM PDT
Speaker: Kamen Nikolov
Join us for this session to learn about the latest PowerCLI features, such as VMware vCenter Server Appliance services and VMware vSphere certificate management, the new approach for invoking vSphere REST APIs, PowerShell runspace support, extended VMware Cloud on AWS management, and much more. We have prepared interesting demos of the new features, useful scripting tips and tricks, as well as answers to all your questions related to PowerCLI.

Session: Extending the UI with Script Actions – Meet PowerActions [CODE2690US]
Date: Thursday, Sep 1, 12:00 PM – 12:45 PM PDT
Speaker: Kamen Nikolov
Many organizations have a ton of useful VMware PowerCLI scripts developed in-house for VMware vSphere automation. The problem is that these useful and time-saving scripts are only available to those admins that possess enough PowerShell and PowerCLI knowledge to know how to use commands, parameters, variables and so on. What if these scripts were available as easy-to-run actions directly from the vSphere UI? Meet PowerActions, the vSphere UI plug-in that allows extending the UI with custom PowerCLI scripts. PowerActions provides a script library and a user-friendly interface that allows you to build custom scripts through a wizard. PowerActions can be used by anyone in the organization, even if they have never touched PowerShell before. Join our session to learn more about PowerActions and see it in action.

Session: Explore the New PowerCLI for NSX [CODE1881US]
Date: Wednesday, Aug 31, 11:00 AM – 11:45 AM PDT
Speaker: Madhukar Krishnarao
VMware PowerCLI v12.6 introduces new high-level cmdlets to automation with VMware NSX. Learn about these new cmdlets and how to navigate the modules and build code whether NSX is on-premises or on VMware Cloud.

Session: PowerCLI and REST APIs – A New Beginning [CODE2689US]
Date: Thursday, Sep 1, 11:00 AM – 11:45 AM PDT
Speaker: Kamen Nikolov
In the latest PowerCLI versions, we developed a new, more intuitive approach to calling VMware REST APIs. We also built integration with the VMware REST API documentation database, so you can fetch PowerCLI samples directly from the API documentation portal. Join our session and see a demo of how you can easily automate workflows by using VMware vSphere and VMware NSX REST APIs with PowerShell.

Session: Try This, Catch That, Finally – An Explanation on PowerCLI Error Handling [CODE1865US]
Date: Wednesday, Aug 31, 3:00 PM – 3:45 PM PDT
Speaker: Justin Sider
Automation is impossible if your VMware PowerCLI scripts cannot run through to completion. Handling errors properly can greatly improve your code writing skills. Whether the script is a few lines or a few hundred lines, there are great efficiencies to be gained from using try/catch/finally blocks. During this session, Justin will cover the main differences between terminating and non-terminating errors. Examples of each type of error will be shown so you can see the code in action. This session will also cover the ErrorAction parameter. This presentation will have plenty of live code examples interacting with APIs and custom functions to ensure you can see the real-world application of these PowerShell tools.

Hands on Labs

Lab: VMware vSphere Automation – PowerCLI [SPL-HOL-2211-04-SDC]
Date: Anytime the HOL area is open and available
Get hands-on with VMware PowerCLI. Gain familiarity with the tool, and then dive deeper into the functionality available with real-world examples. Both new and experienced users are sure to learn something new about automating their environments.

Lab: Automate your VMware Cloud on AWS [SPL-HOL-2287-04-ISM]
Date: Anytime the HOL area is open and available
Learn about a number of tools that will help you automate your VMware Cloud on AWS environment. See how with PowerCLI and DatacenterCLI can query the status of your SDDC, perform log analysis, security event audits and expand capacity with few commands. Be amazed by the simplicity, value and benefits of using infrastructure as code with Terraform to manage, change or decommission your infrastructure. Take a look at a recent Fling that was published to automatically save the network configuration of your SDDC and restore it to another VMC SDDC.

Also don’t miss the VMware Odyssey by Hands-on Labs, which also includes some PowerCLI tasks

Lab: VMware Odyssey by Hands-on Labs [ODY-HOL-2200-81-ODY]
Date: Anytime the HOL area is open and available
VMware Odyssey by Hands-on Labs is an exciting way to challenge yourself and compete against your peers for the chance to earn prizes and bragging rights. Our Tournament is back in 2022 and more exciting than ever! Each of the first three days of VMware Explore you can complete tasks in a live lab environment, while racing against the clock. Be sure to visit each day as the cumulative leaderboard will show the results in ranked order. The top scores will qualify for the live tournament on the last day, and the winners will be awarded prizes. Be sure to take an Odyssey challenge each day and we’ll see you on the leaderboard!


VMware Explore is the new premier event to learn about the latest PowerCLI news. So if you haven’t registered yet make sure that you do it today and add all those great sessions to your schedule.

The post PowerCLI at VMware Explore US 2022 appeared first on VMware PowerCLI Blog.


PowerCLI 13 is now GA!

$
0
0

We are excited to announce that PowerCLI 13.0 was officially released today. It is a major release full of new and exciting features. Here is what you can find in the new PowerCLI 13:

  • PowerCLI is now fully multi-platform!
  • The vCD module has been updated to support vCD 10.4 and some new features have been added to it.
  • Support for vSAN ESA has been added to the vSAN module.
  • OS customization spec support has been updated to support IPv6 and customization scripts.
  • Seed checkpoint and custom attributes support have been added to the HCX module.
  • vSphere and Horizon modules have been updated to support the latest API features of vSphere 8 and Horizon 8 2209.

Let’s take a closer look at some of these features.

Fully Multi-platform PowerCLI

We have started the PowerCLI muti-platform journey back in 2018, just months after Microsoft released the first multi-platform version of PowerShell. Since then, we have gradually improved the multi-platform support by porting more and more modules.

Now we’re happy to announce that PowerShell 13 is the first fully multi-platform version of PowerCLI. We have ported the last two Windows-only modules – ImageBuilder and AutoDeploy – and now they can run on all supported platforms.

To do that we have made some changes. Since Python is mandatory for the ImageBuilder module to run, we have decided not to bring Python with PowerCLI anymore, but to add it as a prerequisite for using the ImageBuilder module. So in PowerCLI 13, if you are using this module, you will need to have Python 3.7 installed on your machine. You will also need some additional packages installed in Python that the module uses (six, psutil, lxml, pyopenssl). We have added instructions in the PowerCLI User’s Guide on how to install these on all supported platforms. We have also introduced a PowerCLI setting that allows you to set the path to the Python 3.7 installation. For this setting you can use

Set-PowerCLIConfiguration -PytonPath "<path to the Python installation>"

VMware Cloud Director module updates

We have made several improvements in the vCD module in PowerCLI 13. First of all we updated the module to work with vCD 10.4 as well as to support the API features of vCD 10.4 (API version 37.0). But that’s not all. We have also extended some cmdlets with new parameters and parameter sets. For example, we have extended the New-CIVM cmdlet with a new parameter set that allows the creation of a blank VM, as well as the New-OrgVdc cmdlet with a new -StorageProfile parameter. We have also extended the Get-NetworkPool cmdlet to return the NSX-T-backed network pools.

Following some removals on the API side, we have removed the Get/New/Set/Remove-OrgNetwork cmdlets, which were replaced by the Get/New/Set/Remove-OrgVdcNetwork a long time ago.

VMware vSAN Express Storage Architecture™ support

In PowerCLI 13 we’re also adding support for the new vSAN ESA. You can read more about this new vSAN architecture here. We have introduced several new cmdlets (Get-VsanEsaEligibleDisk and Add/Get/Remove-VsanStoragePoolDisk) and extended some existing ones (New/Set-Cluster and Get-VsanClusterConfiguration) to enable support for vSAN ESA.

NSX module updates

To encourage the usage of the new NSX SDK module, we have added a dedicated chapter for it in the PowerCLI user’s guide. In PowerCLI 13 we are also deprecating the old way of accessing the NSX APIs through the Get-NsxtPolicyService, Get-NsxtGlobalManagerService and Get-VmcSddcNetworkService cmdlets.

HCX improvements

In PowerCLI 13 we’re also adding some new HCX features. The HCX module now allows enabling seed checkpoint and migration of custom attributes.

Certificate issue while upgrading

As a quick reminder – you may encounter a certificate error while updating the existing PowerCLI module via Update-Module, as discussed here. This is because we replaced the certificate that we used to sign the modules with a new one from a new publisher. To resolve this issue, delete the existing module and re-install the module with the Install-Module cmdlet.

Summary

PowerCLI 13 is the first fully multi-platform PowerCLI version, which also comes with updated vCD support, cmdlets for vSAN ESA and much more. For a full list of all improvements and fixes, check the PowerCLI 13.0 release notes. For more information on specific cmdlets, see the PowerCLI Cmdlet Reference.

Let us know in the comments what you think of this release!

The post PowerCLI 13 is now GA! appeared first on VMware PowerCLI Blog.

Managing VICredentials on PowerShell 7 using VMware.VISecret Module!

$
0
0

Many customers use the PowerCLI credential store to avoid hard coding credentials in scripts or saving them unencrypted in files. The credential store uses the Windows data protection API to encrypt the credentials and then saves them in a file. However, this API is only available in Windows and that’s why the PowerCLI credential store is not available on the cross-platform PowerShell 7. So what is the alternative for Linux and MacOS users?

Some time ago, Microsoft released two very useful cross-platform modules for managing secrets – SecretManagement and SecretStore. You can read more details about them in this blog post. SecretManagement provides cmdlets that help users manage secrets across different vaults and SecretStore is one vault implementation. These two modules can be used instead of the VICredential store. To illustrate how this can be done, we’ve built a sample module with alternative versions of the VICredential store cmdlets using the two Microsoft modules. You can use this module as it is or just as a reference to build your own solution. Let’s go over the main use cases.

Secret store configuration and vault registration

The first step is to register and configure the secret vault. In our sample module, we have added an Initialize-VISecret cmdlet that does this. It registers SecretStore as a default vault and configures it to not prompt for a password when accessing the vault.

function Initialize-VISecret {
    [CmdletBinding()]
    param(
        [string]$Vault = "VMwareSecretStore"
    )

    process {
         Set-SecretStoreConfiguration -Scope CurrentUser -Authentication None -Interaction None -Confirm:$false 
         Register-SecretVault -Name $Vault -ModuleName Microsoft.PowerShell.SecretStore -DefaultVault
    }
}

This is the mode that is closest to the VICredentialStore as user experience, since it will not prompt for password and will still keep the password encrypted. However, it’s less secure than protecting the vault with a password. In addition, in our sample module we’re using SecretStore as a vault, but if you prefer a different vault you can modify the Initialize-VISecret to use a vault of your choice.

Here are some community vault extensions that are available:

Saving, reading and deleting credentials from the vault

To save credentials to the vault, you should use the Set-Secret cmdlet in the SecretManagement module. The secret in this cmdlet is identified by its name only, but in our case a credential is described by two identifiers – the user name and the server it’s intended for. Therefore, in the New-VISecret cmdlet we’re concatenating “VISecret”, the server and user name by using the pipe symbol as a delimiter, and then we’re using the resulting string as an identifier of the secret. If you want to save credentials for more than one product you could extend the function to replace “VISecret” with another product specific string to build the identifier, for example “VMCSecret” for VMC. You can pass the password as a plain text string or as a secure string.

Similarly, when we read a credential from the vault by using Get-VISecret, it concatenates “VISecret”, the server and username to form the identifier. Then it uses the Get-Secret to retrieve the password for the corresponding server and username.

You can also delete a credential from the store by using Remove-VISecret, which again builds the identifier, and calls Remove-Secret to delete the secret from the vault. If you’re using SecretStore as a vault, you can remove all the credentials it stores by calling Reset-SecretStore

function New-VISecret {
    [CmdletBinding()]
    [Alias("Set-VISecret")]
    param (
        [Parameter(Mandatory=$true)]
        [string]$Server,
        [Parameter(Mandatory=$true)]
        [string]$User,
        [string]$Password,
        [securestring]$SecureStringPassword,
        [string]$Vault
    )
    begin {
        if ([string]::IsNullOrWhiteSpace($password) -and (-not $secureStringPassword)) {
            Throw "Either Password or SecureStringPassword parameter needs to be specified"
        }
        if (-not [string]::IsNullOrWhiteSpace($password) -and $secureStringPassword) {
            Throw "Password and SecureStringPassword parameters cannot be both specified at the same time"
        }
    }
    process {
        $params = @{
            "Name" = "VISecret|"+$server+"|"+$User
        }
         if ($password) {
            $params += @{"Secret" = $password}
        } elseif ($secureStringPassword) {
            $params += @{"SecureStringSecret" = $secureStringPassword}
        } elseif ($Vault) {
            $params += @{"Vault" = $Vault}
        }
        Set-Secret @params
    }
}

function Get-VISecret {
    [CmdletBinding()]
    param (
        [Parameter(Mandatory=$true)]
        [string]$Server,
        [Parameter(Mandatory=$true)]
        [string]$User,
        [switch]$AsPlainText,
        [string]$Vault
    )
    process {
        $params = @{
            "Name" = "VISecret|"+$server+"|"+$User
        }
        if ($AsPlainText.IsPresent) {
            $params += @{"AsPlainText" = $AsPlainText.ToBool()}
        } elseif ($Vault) {
            $params += @{"Vault" = $Vault}
        }
        Get-Secret @params
    }
}


Integrated connection experience

The last cmdlet in the sample module is Connect-VIServerWithSecret. It combines the cmdlets above to give you integrated experience, similar to the one that Connect-VIServer provides with VICredentialStore. You can call Connect-VIServerWithSecret with username and password and use the -SaveCredentials parameter to save the credentials in the vault. Then you can call it by passing just the username: Connect-VIServerWithSecret will automatically retrieve the password from the vault and connect you to the vCenter. When you’re using the VICredentialStore, if you only have a single credential saved for a specified server, you could connect with Connect-VIServer without specifying a username. In Get-Secret, however, the -Username parameter is mandatory as we cannot list all saved credentials and check if you only have a single credential saved for the specified server. To enable this experience, we have defined a global variable $global:defaultUser that lets you set a default user name for the Connect-VIServerWithSecret.

Conclusion

By using Microsoft’s SecretManagement and SecretStore modules, you can achieve similar user experience as when you’re using the VICredentialStore. SecretManagement also gives you a rich set of integration options with other third-party vaults, both locally and in the cloud. You can use the sample VISecret module to configure and use vaults in a similar way as with the VICredentialStore.

The post Managing VICredentials on PowerShell 7 using VMware.VISecret Module! appeared first on VMware PowerCLI Blog.

New Release – Power Actions 1.0

$
0
0

We are extremely excited to announce that the first standalone release of the new Power Actions went live today.

Power Actions is a vSphere Client plug-in that provides an easy way to share PowerCLI scripts with users that have no PowerShell experience. Power Actions provides a script library where you can upload PowerCLI scripts that you want to make available to everyone in your organization. Users can then easily execute those scripts using a user-friendly interface to specify the script parameters. This provides an extremely powerful mechanism to extend the vSphere Client with custom PowerCLI scripts.

How about the security and permissions? All the scripts are executed by using the permissions of the user that’s logged in to the vSphere Client. So, if a user does not have permission to perform certain operations they won’t be able to perform these operations with Power Actions as well.

Let’s take a closer look at how to get started with Power Actions:

Installation

Power Actions is distributed as a virtual appliance. You can download the OVA file from the Power Actions page on the VMware Flings site. Also from there, you can download the complete user’s guide that contains detailed installation instructions. After you install Power Actions you can use it through the Developer Center in the vSphere Client.

Script library

The main function of Power Actions is to run scripts from your script library. So the first thing to do is to create a script library and upload your scripts there.

Script libraries are actually content libraries, so any content library can be used as a script library. If you don’t have a content library at your disposal, you can create a new one by using either PowerCLI or the vSphere Client. The next step is to import your scripts to the script library. You can upload scripts one by one through the vSphere Client, or entire collections of scripts through PowerCLI.

Screenshot of the script library

Running scripts

Once you have uploaded your scripts to the script library, you can start running them. You have two options to run a script – from the script library directly or through the context menu. In both cases, when you execute a script with parameters, you’ll be prompted to enter them. However, when you run a script from the context menu, some parameters will be pre-populated.

Let’s take a closer look at how this works. In our Power Actions script library we have imported a simple PowerCLI script that creates snapshots of a collection of virtual machines. This is what the script looks like:

param (
    [Parameter(Mandatory=$true)]
    [VMware.VimAutomation.ViCore.Types.V1.Inventory.VirtualMachine[]] $vms, 
    [Parameter(Mandatory=$true)]
    [string] $snapshotName)

foreach ($vm in $vms) {
    New-SnapShot -VM $vm -Name $snapshotName
}

When we run this script from the script library, we’ll get a dialog in which we’ll have to specify the script parameters.

However, if we want to run the script from the context menu, we can right-click on a VM and select “Power Actions” -> “Run script”.

We’ll get a dialog to first select the script that we want to run, and then we’ll have to enter the parameters. In this case, the vms parameter will be pre-populated from the VM we right-clicked on.

Monitoring script runs and checking the results

The next screen in Power Actions is ‘Script runs’. There you can monitor your script runs and check their result. From this page you can also stop a running script.

Console

Another feature Power Actions provides is a built-in PowerShell console with the latest PowerCLI version pre-installed. When you open the console, it automatically connects to the vCenter Server by using the vSphere Client user. You can use the Power Actions console to run single commands or entire scripts. Keep in mind that the console will not be retained when you log out of the vSphere Client, so any files that you save on it will be lost after you log out. Beware that if you switch to another view in the vSphere Client or to another Power Actions screeen, and then return to the console, a new PowerShell session will be created and all in-memory variables from your previous session will be lost.

Summary

Throughout the years, Power Actions underwent multiple transformations and was part of different fling releases of the vSphere Client. Now we’re starting to develop it again as an independent product and this first fling release of the new Power Actions is the first step of the process. We are very excited about the plethora of possibilities that Power Actions brings and we can’t wait to receive your feedback, use cases, feature requests and ideas. So don’t hesitate to submit your comments on the Power Actions site.

The post New Release – Power Actions 1.0 appeared first on VMware PowerCLI Blog.

PowerCLI 13.1 is now released

$
0
0

After the exciting first release of Power Actions last week, this week brings another new release – PowerCLI 13.1.

With this release, we’re delivering one of the most requested PowerCLI features – a PowerCLI module for vSphere Replication. It is built on the same technology that we used to deliver the auto-generated modules for the NSX and vSphere REST APIs and provides full coverage of the new vSphere Replication REST API.

Here are some of the other exciting features of this PowerCLI release:

  • New auto-generated module for the new SRM REST API
  • Added support for vLCM host configuration and offline depots
  • New vSAN cmdlets for vSAN direct disk and remote datastore management
  • New cmdlets for vSAN cluster shutdown
  • Updated NSX and Horizon modules
  • Extended Python version support for the ImageBuilder module

Let’s take a closer look at some of these new features.

New SDK modules for SRM and vSphere Replication

With the 8.6 release of SRM and vSphere Replication, these two products received new REST APIs. In fact, it was the first public API released for vSphere Replication. This gave us the opportunity to automatically generate PowerCLI modules for these products as we had already done for NSX and vSphere. As with vSphere you will be able to find the PowerCLI examples directly in the vSphere Replication and SRM REST API documentation. We’re also working on a dedicated blog post to demonstrate how to use those modules to perform some common use cases.

vLCM improvements

In PowerCLI 13.1 we’re adding new parameters to the Set-VMHost cmdlet to allow you to set the ESXi host LCM configuraiton in the same way that you set the cluster LCM configuration. This is a new feature, supported only in vSphere 8.0 Update 1. We’re also introducing cmdlets for the creation of new LCM offline depots with PowerCLI.

New vSAN cmdlets

PowerCLI 13.1 comes with a lot of new vSAN functionality. New cmdlets are introduced for vSAN remote datastore management, direct disk management, and vSAN cluster shutdown.

VMware Cloud Director changes

For VMware Cloud Director, we changed the authentication mechanism of Connect-CIServer and it now authenticates against the new vCD API authentication endpoint. This will allow the cmdlet to continue working without issues with the future vCD versions. We also updated the Import-CIVappTemplate cmdlet to work with the latest APIs. Because of this we made some cmdlet interface changes, which might lead to the need of reworking some of your Cloud Director scripts.

ImageBuilder module Python version support

With PowerCLI 13.0 we ported the ImageBuilder and AutoDeploy modules to work on Linux and MacOS. That required users to have Python installed as a pre-requisite for those modules. In 13.0, these modules only supported Python version 3.7.x, which was quite limiting. With PowerCLI 13.1, we have fixed that and the ImageBuilder module now works with Python 3.7.1 and all later versions.

Conclusion

PowerCLI 13.1 is another release that brings a rich set of new features to our customers. It delivers one of the most requested PowerCLI functionalities, vSphere replication module, as well as new SRM module, new vSAN cmdlets, extended support for vLCM, and much more. For a full list of all improvements and fixes, check the PowerCLI 13.1 Release Notes. For more information on specific cmdlets, see the PowerCLI Cmdlet Reference.

Let us know in the comments what you think of this release!


The post PowerCLI 13.1 is now released appeared first on VMware PowerCLI Blog.

Managing SRM and VR with PowerCLI 13.1

$
0
0

PowerCLI 13.1 introduces two new auto generated modules that provide PowerShelI bindings for the vSphere Replication REST API and the Site Recovery Manager REST API. We will cover connection management for both modules – host based replication with vSphere Replication and creation of protection groups and recovery plans with Site Recovery Manager.

Connecting vSphere Replication server with Connect-VrServer

To connect to a vSphere Replication management server you must use the Connect-VrServer cmdlet. Replications can be configured within a single vCenter Server, or between local and remote vCenter Server instances.

When configuring replication within the same VC you can connect only to the local vSphere Replication site. For Server parameter specify the vSphere Replication server address. For User and Password parameters specify the user name and the password for the vCenter Server instance where the vSphere Replication appliance is deployed:

$vrConnection = Connect-VrServer -Server "MyVrAddress.com" 
   -User "administrator@vsphere.local" `
   -Password "MyLocalVCenterServerPassword"

Let’s take a moment and look at the VrServerConnection object, returned from the Connect-VrServer cmdlet. It contains ConnectedPairings property:

This property is a Dictionary, where all connected Pairings are stored. The Pairing is the VR API representation of the paired local and the remote sites. As we just authenticated only against the local VR site, the Dictionary contains only one entry. This is the local vCenter self-pair.

You can index this dictionary, by the vCenter name, and obtain certain Pairing object. You will need this Pairing object to invoke various operations from the VR API:

To authenticate against a remote vCenter Server, you will use another parameter set of the Connect-VrServer cmdlet. (Note that you must have a site pairing configured between the local and the remote vSphere Replication sites.). This time, for LocalServer parameter specify the already available VrServerConnection object. For RemoteServer parameter specify the name of the remote VC. For RemoteUser and RemotePassword parameters specify the user name and the password of the remote VC. Note that with VR we can have multiple remote sites configured:

$remoteVc = "myRemoteVcName"
$vrConnection = Connect-VrServer -LocalServer $vrConnection `
    -RemoteServer $remoteVc `
    -RemoteUser "administrator@vsphere.local" `
    -RemotePassword "MyRemoteVCenterServerPassword"

Now, if you check the ConnectedPairings property of the VrServerConnection object, you will see that the dictionary contains second pairing, allowing you to invoke API operations on the remote site:

Alternatively you can authenticate against the local and the remote sites with a single Connect-VrServer call:

$remoteVc = "myRemoteVcName"
$vrConnection = Connect-VrServer -Server $localVr `
   -User "administrator@vsphere.local" `
   -Password "MyLocalVCenterServerPassword" `
   -RemoteServer $remoteVc `
   -RemoteUser "administrator@vsphere.local" `
   -RemotePassword "MyRemoteVCenterServerPassword"

Configuring host based replication

For convenience, let’s store the remote site pairing that we will use for the replication in a variable:

$remotePairing = $vrConnection.ConnectedPairings[$remoteVc].Pairing

Retrieve the replicated VM

To start, you must retrieve the VM, which you want to replicate. Use the Invoke-VrGetLocalVms cmdlet, which requires PairingId and VcenterId parameters to be specified. We have these IDs with the Pairing object we stored in the $remotePairing variable:

$replicatedVm = Invoke-VrGetLocalVms -PairingId $remotePairing.PairingId `
   -VcenterId $remotePairing.LocalVcServer.Id.Guid `
   -FilterProperty 'Name' `
   -Filter "VrSrmDemo"

You can also apply filter to this call. FilterProperty parameter specifies the VM property that will be used for the search. In this case this is the Name property. The Filter parameter specifies the property value, you are looking for. The result of this call is a VirtualMachineDrResponseList object, which contains list of VMs that match the specified filter. In our case this will be a list with one VM:

Configure VM’s HDDs for the replication

When configuring host based replication, you have to specify the VM’s hard disks that will be replicated. For each replicated disk you have to specify a datastore on the target VC. In this example we will replicate all the hard disks of our VM on one target datastore on the remote VC:
Retrieve the target datastore on the remote VC, using the Invoke-VrGetVrCapableTargetDatastores cmdlet:

$targetDatastore = Invoke-VrGetVrCapableTargetDatastores -PairingId $remotePairing.PairingId `
   -VcenterId $remotePairing.RemoteVcServer.Id.Guid `
   -FilterProperty "Name" `
   -Filter "MyRemoteDS"

Here for VcenterId, specify the remote VC Id. Specify FilterProperty and Filter parameters to choose the target datastore by name.

Hard disks are available in the Disks property of our VirtualMachine object, stored in the $replicatedVm variable. Iterate over the Disks list and initialize ConfigureReplicationVmDisk objects for each hard disk. Store these configurations in $replicationVmDisks array variable:

$replicationVmDisks = @()
$replicatedVm.List[0].Disks | ForEach-Object {
   $replicationVmDisks += Initialize-VrConfigureReplicationVmDisk -VmDisk $_ `
      -EnabledForReplication:$true `
      -DestinationDatastoreId $targetDatastore.List[0].Id `
      -DestinationDiskFormat 'SAMEASSOURCE'
}

Configure Host Based Replication

First you have to initialize ConfigureReplicationSpec object. Besides various replication settings, we have to specify the disk replication configuration, stored in the $replicationVmDisks variable to the Disk parameter. You also have to specify the target VC Id and the Id of the replicated VM.

$replicationSpec = Initialize-VrConfigureReplicationSpec `
   -Rpo 60 `
   -NetworkCompressionEnabled:$true `
   -MpitEnabled:$true `
   -AutoReplicateNewDisks:$true `
   -LwdEncryptionEnabled:$false `
   -MpitInstances 1 `
   -MpitDays 1 `
   -Disks $replicationVmDisks `
   -TargetVcId $remotePairing.RemoteVcServer.Id.Guid `
   -VmId $replicatedVm.List[0].Id

Then use the Invoke-VrConfigureReplication cmdlet to configure the replication. For parameters, specify the PairingId and the ConfigureReplicationSpec object:

$task = Invoke-VrConfigureReplication -PairingId $remotePairing.PairingId `
   -ConfigureReplicationSpec $replicationSpec

The result of the operation is a TaskDrResponseList object, which in our example contains list of one task. If you want, you can specify array of ConfigureReplicationSpec objects, and replicate multiple VMs with single call.

To wait until the replication configuration task completes, retrieve the task until its Status property equals to something different from ‘RUNNING’:

Invoke-VrGetTaskInfo -TaskId $task.List[0].Id

In the next chapter we will use cmdlets from the VMware.Sdk.Srm module to create protection group and recovery plan for the replication that we just created.

Connecting Site Recovery Manager with Connect-SrmSdkServer

To connect Site Recover Manager server use the Connect-SrmSdkServer cmdlet. Do not use the old Connect-SrmServer cmdlet, already available in the VMware.VimAutomation.Srm module, as it’s not compatible with the VMware.Sdk.Srm module cmdlets.

Site Recover Manager supports only one pairing between local and remote SRM sites. You can connect either only to the local site, or you can authenticate with the remote site vCenter server site in the same call. Since we will further create protection group and recovery plan we will choose the second option. Note that you must have a site pairing configured between the local and the remote SRM sites.

$srmConnection = Connect-SrmSdkServer -Server "MySrmAddress.com" `
   -User "administrator@vsphere.local" `
   -Password "MyLocalVcPassword" `
   -RemoteUser "administrator@vsphere.local" `
   -RemotePassword "MyRemoteVcPassword"

If we look at the SrmServerConnection object, returned from the Connect-SrmSdkServer cmdlet, we will see that it contains property named ConnectedPairing. In this case this is a single Pairing object that represents the pair between the local and the remote SRM sites. You will need this Pairing object for invoking various operations from the SRM API:

Creating protection group and recovery plan for host based replication

In this chapter we will use the host based replication that we configured earlier. First we will initialize HbrProtectionGroupSpec with the VM that we already replicated:

$hbrSpec = Initialize-SrmHbrProtectionGroupSpec -Vms $replicatedVm.List[0].Id

In this example we reuse the VM Id, we have stored in the $replicatedVm variable, as it’s consistent between the VR and SRM APIs. If you need to retrive the replicated VM with the VMware.Sdk.Srm module, use the Invoke-SrmGetReplicatedVms cmdlet:

$replicatedVm = Invoke-SrmGetReplicatedVms `
   -PairingId $srmConnection.ConnectedPairing.PairingId `
   -VcenterId $srmConnection.ConnectedPairing.LocalVcServer.Id.Guid `
   -FilterProperty "Name" `
   -Filter "VrSrmDemo"

Use the HbrProtectionGroupSpec object to initialize SrmProtectionGroupCreateSpec. For the ReplicationType parameter specify HBR:

$protectionGroupSpec = Initialize-SrmProtectionGroupCreateSpec -Name "SrmDemoGroup" `
   -ReplicationType HBR `
   -ProtectedVcGuid $srmConnection.ConnectedPairing.LocalVcServer.Id.Guid `
   -HbrSpec $hbrSpec

Create protection group with the Invoke-SrmCreateGroup cmdlet:

$task = Invoke-SrmCreateGroup -PairingId $srmConnection.ConnectedPairing.PairingId `
   -ProtectionGroupCreateSpec $protectionGroupSpec

Wait for the SRM task to complete:

$task = Invoke-SrmGetTaskInfo -TaskId $task.Id

When $task.Status is equal to ‘SUCCESS’, retrieve the protection group, using the $task.Result property, which contains the ID of the created group:

$protectionGroup = Invoke-SrmGetGroup -PairingId $srmConnection.ConnectedPairing.PairingId `
   -GroupId $task.Result

To conclude this example we will create a recovery plan for the protection group. For that purpose first Initialize RecoveryPlanCreateSpec, required by the Invoke-SrmCreatePlan cmdlet:

$recPlanSpec = Initialize-SrmRecoveryPlanCreateSpec `
   -Name "SrmDemoRecoveryPlan" `
   -ProtectedVcGuid $srmConnection.ConnectedPairing.LocalVcServer.Id.Guid `
   -ProtectionGroups $protectionGroup.Id

Then create the recovery plan with the RecoveryPlanCreateSpec object and wait for the task to complere, using the Invoke-SrmCreatePlan:

$task = Invoke-SrmCreatePlan -PairingId $srmConnection.ConnectedPairing.PairingId `
  -RecoveryPlanCreateSpec $recPlanSpec
Invoke-SrmGetTaskInfo -TaskId $task.Id

Disconnect SRM and VR server connections

After you have finished interacting with the SRM server, close the connection, using the Disconnect-SrmSdkServer cmdlet:

Disconnect-SrmSdkServer "MySrmAddress.com"

To close the VR server connection use the Disconnect-VrServer cmdlet:

Disconnect-SrmSdkServer "MyVrAddress.com"

Conclusion

You can combine the VMware.Sdk.Vr and the VMware.Sdk.Srm PowerCLI modules to automate the end to end scenario of creating host based replication, and utilizing it with protection group and recovery plan. If you want to automate array based replication, available with the VMware.Sdk.Srm module, refer to the “Array Based Replication with PowerCLI 13.1” blog post. Also, you you can check out “vSphere Replication REST API with PowerShell: Configure VM replication“.

The post Managing SRM and VR with PowerCLI 13.1 appeared first on VMware PowerCLI Blog.

Viewing all 146 articles
Browse latest View live


<script src="https://jsc.adskeeper.com/r/s/rssing.com.1596347.js" async> </script>