Quantcast
Channel: VMware PowerCLI Blog
Viewing all 146 articles
Browse latest View live

Automating File-Based Backups of vCenter Server Appliance

$
0
0

Did you know the vCenter Server Appliance (VCSA) has file-based backup options?

This ability was actually released in vSphere 6.5. However, there was one feature in particular that was missing: a scheduler. I’m happy to say that as part of vSphere 6.7, the VCSA received a backup scheduler!

Recently, my teammate, Emad Younis released a couple cool walkthroughs to the vSphere Central site to manage file-based backup and restore actions. Under the covers, both of these actions are served up by vSphere’s RESTful APIs and therefore PowerCLI can also be used to automate these actions! One other benefit of using the API, you don’t have to hand out the root credentials. Users with the ‘SystemConfiguration.Administrators’ permission are able to perform all of the following tasks through the API and PowerCLI!

To perform a file-based backup with PowerCLI, we’ll need to make use of the CIS module. Since the CIS module is a low-level module, let’s see a couple examples of this in action.

Create a File-Based Backup

Let’s first start with the process to perform a backup.

First step, log in to the CIS Service for the VCSA:

Connect-CisServer -Server vcsa01.corp.local

Next, we need to find the appropriate service to perform a backup:

Get-CisService -Name *backup*

File-Based Backup Example: Listing CIS Services

Based on the output, we will want the ‘com.vmware.appliance.recovery.backup.job’ service. We will store that into a variable so we can easily interact with that specific service. To see the method we are going to use, take that variable and pipe it to ‘Get-Member’.

$backupJobSvc = Get-CisService -Name com.vmware.appliance.recovery.backup.job
$backupJobSvc | Get-Member

File-Based Backup Example - Working with the CIS Service

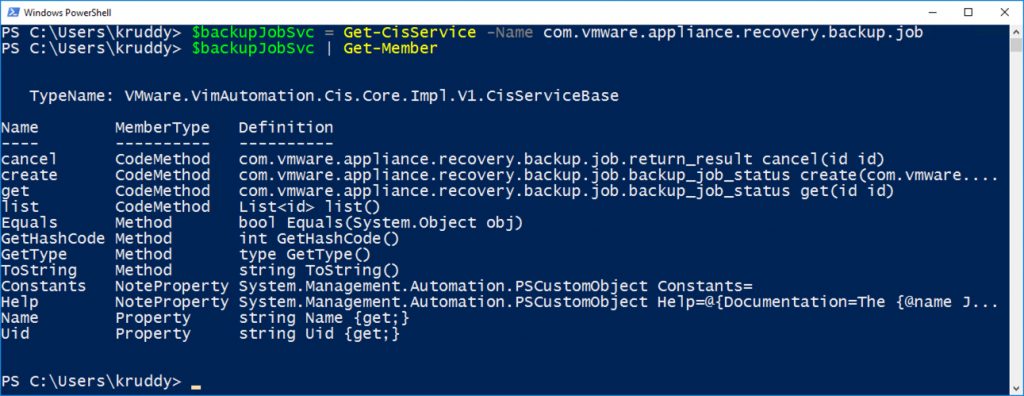
As part of the respose, we’ll see two important items. First, the ‘create’ method which we’ll use to actually create the backup job. Second, the ‘Help’ property. We can use ‘Help’ to help us form the input for the backup job with the following command:

$backupJobSvc.Help.create.piece

We can now fill in each of the parameters with information for our environment. There are a couple caveats here. First, the ‘parts’ parameter is expecting an input of an array type. Second, each of the password parameters require a special type in order to be accepted.

$backupSpec.parts = @("common")
$backupSpec.location_type = "FTP"
$backupSpec.location = "ftp01.corp.local"
$backupSpec.location_user = "backup"
[VMware.VimAutomation.Cis.Core.Types.V1.Secret]$backupSpec.location_password = "VMware1!"
$backupSpec.comment = "PowerCLI Backup Job"

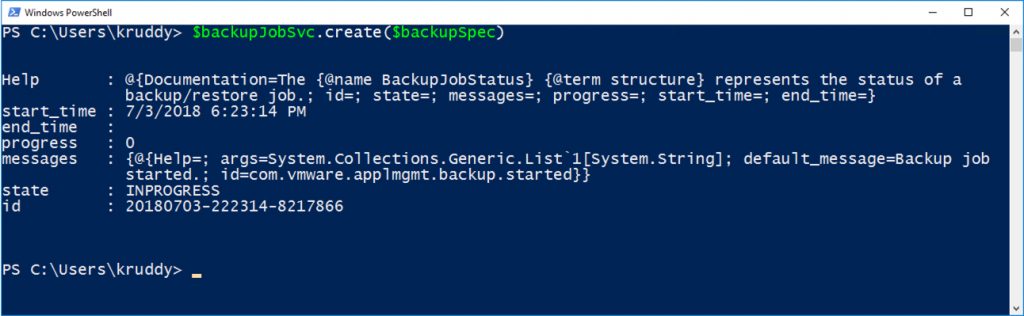
Finally, having input all of our information, we can create the backup job!

$backupJob = $backupJobSvc.create($backupSpec)

File-Based Backup Example: Creating Backup Job

We can combine this into a nice script as follows:

# Login to the CIS Service of the desired VCSA
Connect-CisServer -Server vcsa01.corp.local

# Store the Backup Job Service into a variable
$backupJobSvc = Get-CisService -Name com.vmware.appliance.recovery.backup.job

# Create a specification based on the Help response
$backupSpec = $backupJobSvc.Help.create.piece.CreateExample()

# Fill in each input parameter, as needed
$backupSpec.parts = @("common")
$backupSpec.location_type = "FTP"
$backupSpec.location = "ftp01.corp.local"
$backupSpec.location_user = "backup"
[VMware.VimAutomation.Cis.Core.Types.V1.Secret]$backupSpec.location_password = "VMware1!"
$backupSpec.comment = "PowerCLI Backup Job"

# Create the backup job 
$backupJobSvc.create($backupSpec)

Create a Scheduled File-Based Backup

Let’s now take a look at creating a scheduled backup job with PowerCLI.

Following a similar process to the last task, we will want to use one of the services we found previously called: com.vmware.appliance.recovery.backup.schedules

This time, we see two inputs are required. First, the schedule ID. Second, the specification which is similar to the prior example. The ‘Help’ property will be quite useful to create both specifications.

Much like the prior example, this one too has some caveats. The Schedule ID input can be a string of your choosing. For reference, performing this process in the UI creates a default ID of ‘default’. The scheduling recurrence configuration can be done in many ways through the ‘days’ property. If a daily backup is desired, there’s no need for any input and it can be left ‘unset’. If a specific day/s are desired, the input has to be of an array type.

Here’s a script which can be used to create a scheduled file-based backup:

# Store the Backup Job Service into a variable
$backupSchedSvc = Get-CisService -Name com.vmware.appliance.recovery.backup.schedules

# Create a Schedule ID specification based on the Help response
$schedSpec = $backupSchedSvc.Help.create.schedule.Create()
$schedSpec = 'weekly'

# Create a specification based on the Help response
$backupSchedSpec = $backupSchedSvc.Help.create.spec.Create()
$backupSchedSpec.parts = @("common")
$backupSchedSpec.location = "ftp://ftp01.corp.local"
$backupSchedSpec.location_user = "backup"
[VMware.VimAutomation.Cis.Core.Types.V1.Secret]$backupSchedSpec.location_password = "VMware1!"
$backupSchedSpec.enable = $true
$recurSpec = $backupSchedSvc.Help.create.spec.recurrence_info.Create()
$recurSpec.days = @("Sunday")
$recurSpec.minute = '59'
$recurSpec.hour = '23'
$backupSchedSpec.recurrence_info = $recurSpec
$retentSpec = $backupschedsvc.help.create.spec.retention_info.Create()
$retentSpec.max_count = '5'
$backupSchedSpec.retention_info = $retentSpec

# Create the backup job 
$backupSchedSvc.create($schedSpec, $backupSchedSpec)

Afterwards, if you log into the VCSA Appliance Management Interface (VAMI), your backup schedule should look much like the following:
File-Based Backup Example: Creating a Backup Schedule

Summary

The ability to create file-based backups of your vCenter Server is a function that is only available to the VCSA. This function is made possible by a set of RESTful APIs which PowerCLI can also consume, with the additional benefit of not being reliant on the root account! This blog post walked through examples of creating a file-based backup job and creating a scheduled file-based backup job.

More information about VCSA file-based backup can be found on the vSphere Central site: vCenter Server Appliance 6.7 File-Based Backup

Let us know in the comments how you’re automating your VCSA backups!

The post Automating File-Based Backups of vCenter Server Appliance appeared first on VMware PowerCLI Blog.


PowerCLI at VMworld US 2018

$
0
0

VMworld 2018 Banner

It’s August and that means VMworld is right around the corner! Last year, we had an unprecedented amount of PowerCLI and automation-based sessions and that trend has continued this year! There are more sessions, a re-vamped PowerCLI Hands-On-Lab, not one but two expert-led PowerCLI Hands-On Lab time slots, a Hackathon training session, and there are more vBrownBag & VMware {code} Power sessions than I can count! If you haven’t already registered, the time is quickly ticking away!

Make sure to add the following sessions to your schedule and catch up with the PowerCLI team and the amazing PowerCLI community members!

Sessions

Session: DEV3504BU – Development at VMware: A Look at How PowerCLI Has Evolved Over the Years
Date: Monday, Aug 27, 4:00 p.m. – 5:00 p.m.
Speakers: Kamen Nikolov & Kyle Ruddy
Kamen and Kyle will give attendees a behind the scenes look into the PowerCLI development process and the many ways PowerCLI has evolved over the last 10+ years.

Session: VIN2661BU – Start Automating All The Things with PowerCLI
Date: Tuesday, Aug 28, 2:00 p.m. – 3:00 p.m.
Speakers: Seth Crosby & Kyle Ruddy
Seth and Kyle will help attendees get more comfortable with using automation tools like PowerShell and PowerCLI. This session will feature an introductory overview, followed by several examples which attendees can start using in their environments immediately!

Session: VIN1709BU – Mac and Linux Users, Don’t Despair: PowerCLI Is There!
Date: Tuesday, Aug 28, 3:30 p.m. – 4:30 p.m.
Speakers: Luc Dekens & Alan Renouf
Luc and Alan will discuss how PowerShell and PowerCLI have gone multi-platform, what impact that has on your environment and your existing code, plus some keys to success.

Session: HCI2522BU – Getting Started with vSAN Automation
Date: Tuesday, Aug 28, 5:00 p.m. – 6:00 p.m.
Speakers: Alan Renouf & William Lam
Alan and William show attendess how to get started automating all the aspects of vSAN with tools such as PowerCLI and the vSAN management SDKs.

Session: VIN1992BU – A Deep(er) Dive with PowerCLI 10
Date: Wednesday, Aug 29, 8:00 a.m. – 9:00 a.m.
Speakers: Luc Dekens & Kyle Ruddy
Luc and Kyle will take a look at the more advanced use-cases when using PowerCLI to automate actions in your environment. From proper object handling to diagnosing speed issues to debugging and more, this session is going to be a deep dive into the “what’s possible” with PowerCLI.

Session: NET1528BU – PowerNSX: Bringing the Power of PowerCLI to VMware NSX Data Center
Date: Wednesday, Aug 29, 8:30 a.m. – 9:30 a.m.
Speakers: Nicholas Bradford & Anthony Burke
Nick and Anthony will show attendees what PowerNSX is and how to use it to help automate anything from ad hoc queries to complete NSX data center logical topologies.

Session: HCI2061BU – Forget Click, Click, Click: Manage vSAN at Scale with PowerCLI
Date: Wednesday, Aug 29, 11:00 a.m. – 12:00 p.m.
Speakers: Jase McCarty & Kyle Ruddy
Jase and Kyle will take an in-depth look at the ways vSAN can be managed with PowerCLI to easily achieve consistency and repeatability at scale.

Session: DEV2828BU – Automating IT Ops with Dispatch Serverless Framework
Date: Wednesday, Aug 29, 11:30 a.m. – 12:30 p.m.
Speakers: Alan Renouf & Berndt Jung
Alan and Berndt show off the power of serverless with Dispatch. Attendees will see how to setup and configure Dispatch, plus how to control event triggers with familiar tools, like PowerCLI, and existing scripts.

Session: NET1642BU – NSX-PowerOps: Day2 Ops, NSX Health, Security, and Automated Documentation
Date: Wednesday, Aug 29, 11:30 a.m. – 12:30 p.m.
Speakers: Hammad Alam & Puneet Chawla
Hammad and Puneet will discuss a community-built tool, NSX-PowerOps, which uses tools like PowerCLI and PowerNSX to create documentation of your environment.

Session: VIN3327BU – Documenting Your Virtual Infrastructure with PowerShell and PowerCLI
Date: Wednesday, Aug 29, 2:00 p.m. – 3:00 p.m.
Speakers: Tim Carman & Matthew Allford
Tim and Matthew take the burden of documentation and applies it to an open-sourced project which helps to document environments using nothing but PowerCLI.

VMware {code} Power Sessions

Session: CODE5560U – Closer look at vSphere programming and CLI interfaces
Date: Tuesday, Aug 28, 12:30 p.m. – 1:00 p.m.
Speaker: Vikas Shitole
Vikas will show off the wide variety of APIs, CLIs, and SDKs available for use with vSphere and how to get started with each one.

Session: CODE5547U – Deep dive into the Horizon View APIs & PowerShell module
Date: Tuesday, Aug 28, 1:00 p.m. – 1:30 p.m.
Speaker: Wouter Kursten
Wouter shows off some of the fantastic new cmdlets that have been created and added to the Horizon View Helper module which can be used to enable PowerCLI based automation of Horizon View.

Session: CODE5549U – A better way to see PowerCLI data
Date: Tuesday, Aug 28, 1:30 p.m. – 2:00 p.m.
Speaker: Jake Blecha
Jake will show how to wrangle all the object data PowerCLI can return to get access to what you’re looking for in the format you want.

Session: CODE5540U – PowerCLI Lint
Date: Tuesday, Aug 28, 2:15 p.m. – 2:30 p.m.
Speaker: Justin Sider
Justin will apply the concept of Linting and unity testing to PowerCLI code and introduce some tools to help make the process easier so you can write better and re-usable code.

Session: CODE5622U – It’s Magic! Automating VMware Cloud on AWS
Date: TBD
Speaker: Ryan Kelly
Ryan discusses how to start interacting with the VMware Cloud on AWS APIs with PowerCLI to automate your scalable, highly resilient, infrastructure in the cloud.

vBrownBag Sessions

Session: VMTN5513U – vDeploy – PowerCLI only method to fully deploy a VM
Date: Monday, Aug 27, 1:00 p.m. – 1:15 p.m.
Speaker: Russell Hamker
Russell will walk you through vDeploy, covering what it is, how to use it, and what it supports so you can automate the deployment of a Windows VM to any environment.

Session: VMTN5522U – Automating Troubleshooting with vSphere Operations Manager
Date: Monday, Aug 27, 1:45 p.m. – 2:00 p.m.
Speaker: Thom Greene
Thom will show how to leverage the vRealize Operations PowerCLI module to automate your troubleshooting workflows.

Session: VMTN5535U – Strategies to starting with PowerCLI
Date: Monday, Aug 27, 5:00 p.m. – 5:15 p.m.
Speaker: Seth Crosby
Seth will take you through a handful of valuable strategies for helping you overcome what is holding you back from managing your VMware infrastructure like a pro, with PowerCLI.

Session: VMTN5605U – Getting Started with GitHub for PowerCLI Users
Date: Tuesday, Aug 28, 5:15 p.m. – 5:30 p.m.
Speaker: Justin Sider
Justin will walk through a few different typical scenarios that system administrator experience and how GitHub can solve those issues. From public to private to internal repositories, attendees will gain an understanding how what each are, how to use the, and even some tips on securing them.

Session: VMTN5597U – Powershell, it’s not just for Windows anymore
Date: Wednesday, Aug 29, 10:45 a.m. – 11:00 a.m.
Speaker: Chris Nakagaki
Chris will demonstrate how to easily get up and running with PowerShell Core and PowerCLI on a Mac or Linux system, and where it could possibly go from here.

Session: VMTN5614U – Gentle Shutdown of a 2-node Starwind HCI Cluster using PowerCLI
Date: Thursday, Aug 30, 1:30 p.m. – 1:45 p.m.
Speaker: Matt Langguth
Matt will walk you through an issue with StarWind HCI clusters and how PowerCLI can come to the rescue and overcome the issue.

Meet the Experts

Session: Automate Your VMware Cloud on AWS Environment with Paul Gifford
Date: MTE5097U – Sunday, Aug 26, 3:15 p.m. – 4:00 p.m.
Come meet with Paul to discuss the automation of VMware Cloud on AWS with tools like PowerCLI.

Session: vSphere Automation and VMware Cloud on AWS with William Lam
Date: MTE5013U – Tuesday, Aug 28, 1:15 p.m. – 2:00 p.m.
Come meet with William to discuss vSphere and VMware Cloud on AWS based automation.

Session: PowerCLI with Kyle Ruddy
Date 1: MTE5063U – Wednesday, Aug 29, 3:15 p.m. – 4:00 p.m.
Date 2: MTE5007U – Thursday, Aug 30, 10:45 a.m. – 11:30 a.m.
Come meet with Kyle to discuss any thoughts, ideas, issues, or anything that comes to mind regarding PowerCLI.

Hands on Labs

Lab: SPL-1911-05-SDC_U – VMware vSphere Automation – PowerCLI
Date: Anytime the HOL area is open and available
Get hands-on with VMware PowerCLI. Gain familiarity with the tool, and then dive deeper into the functionality available with real world examples. Both new and experienced users are sure to learn something new about automating their environments.

Session: ELW-1911-05-SDC_U – Expert-Led Workshop – VMware vSphere Automation – PowerCLI
Date 1: Monday, Aug 27, 2:30 p.m. – 4:00 p.m.
Date 2: Tuesday, Aug 28, 12:30 p.m. – 2:00 p.m.
Speaker: Howard Shoobe
Howard will show attendees how to get hands-on with VMware PowerCLI. You will gain familiarity with the tool, and then dive deeper into the functionality available with real world examples.

Hackathon

And last, but certainly not least, the VMware {code} Hackathon! If you’ve never been or haven’t heard of it, this is a fantastic event to get involved with other community members to do some coding! There’s no requirement to know how to code whatsoever. In fact, there are some trainings running before the Hackathon to help you get orientated.

Session: CODEHACK – VMware {code} Hackathon
Date: Monday, Aug 27, 6:30 p.m. – 11:30 p.m.
Join VMware {code} for the third annual hackathon!

Session: HACK6013U – PowerShell Primer: Prepping for Hackathon Success!
Date: Monday, Aug 27, 6:30 p.m. – 7:30 p.m.
Speaker: Kyle Ruddy
Kyle will cover a number of scenarios to help attendees get up to speed so they can use PowerShell to succeed in their Hackathon quest.

Summary

If you’re looking for PowerCLI content, VMworld is the place to be this year! With 10 sessions, over 10 community sessions, multiple meet the experts, and several hands-on activities, there’s something for everyone regardless of skill level. Make sure you’re registered for VMworld and get these sessions added to your schedule today!

The post PowerCLI at VMworld US 2018 appeared first on VMware PowerCLI Blog.

New Release: PowerCLI 10.2.0

$
0
0

It’s new release day! Even though we’re counting down the days to VMworld, we still have a fresh version for you with PowerCLI 10.2.0!

Speaking of counting, this marks the 4th release of PowerCLI this year. I remember when getting 2 updates in a single year was a major event, much less four! A big shout-out to the PowerCLI engineering team for all the work that’s been done to make this process faster and easier. If you’d like to know more details, VMworld session DEV3504BU will take an in-depth look at the PowerCLI development process. It’s a session I’m super excited for!

On to the updates!

PowerCLI 10.2.0 Updates

PowerCLI 10.2.0 comes with the following updates:

  • Support for NSX-T 2.2
  • Deprecation of the PCloud module, so look for this module to be removed in the future
  • Update to Get-VIEvent to resolve the issue when receiving: Error in deserializing body of reply message for operation ‘RetrieveProperties’

For more information on changes made in VMware PowerCLI 10.2.0, including improvements, security enhancements, and deprecated features, see the VMware PowerCLI Change Log. For more information on specific product features, see the VMware PowerCLI 10.2.0 User’s Guide. For more information on specific cmdlets, see the VMware PowerCLI 10.2.0 Cmdlet Reference.

Remember, updating your PowerCLI modules is now as easy as ‘Update-Module VMware.PowerCLI’.

Update-Module VMware.PowerCLI

The post New Release: PowerCLI 10.2.0 appeared first on VMware PowerCLI Blog.

Introducing Code Capture

$
0
0

I am extremely excited to announce a new feature that’s been added to the vSphere HTML5 Web Client Fling. This new feature is called Code Capture. While the name might not sound familiar, hopefully you’re already acquainted with its predecessor – Onyx, which is currently the most requested feature on the PowerCLI Feature Requests site!

PowerCLI Feature Requests Site - Most Popular

Code Capture gives you the ability to take actions you’ve completed in the vSphere Client and outputs usable code. Once you have the vSphere HTML5 Web Client Fling installed, it’s just as simple as hitting the red ‘record’ button on the top menu, performing your activities, then hitting the red ‘stop’ button. At this point, you’ll be taken to the Code Capture section where you can browse your code and even copy or download the code as well!

Before jumping to download the fling, we should discuss what a VMware Fling really is. Flings are projects that are built by our engineers and made available for general consumption. These flings are distributed under the Technical Preview License and, therefore, are recommended to not be run on production environments. This also means there is no ability to open a VMware support request. However, you can open a bug against the fling itself using the ‘Bugs‘ tab. Also, I would like to point out the ‘Comments‘ tab where you can submit feedback. We would greatly appreciate any and all feedback you have!

Now, let’s checkout Code Capture!

Code Capture in Action

Code Capture In Action

Now let’s take a more in-depth look.

Code Capture Output

In the example above, we can see that we are shutting down a system by the name of ‘app01’. Once we click on the ‘stop’ button, it shows us the PowerCLI.NET code. This is important because, at first glance, the output may not be quite as you expect.

For example, you may have expected to see a command like Shutdown-VMGuest -Name app01 Instead, we saw low-level PowerCLI calls. Walking through the code, it created a VirtualMachine object, which referenced the app01 VM by MoRef, followed by the usage of a method named ‘ShutdownGuest’ that is called directly against the VM object. More information about this specific method: ShutdownGuest()

Code Output:

#----------------- Start of code capture -----------------

<#
.SYNOPSIS
Gets VI server connection by a given server uuid.

.DESCRIPTION
Gets VI server connection by a given server instance uuid from the default connected VI servers collection.
#>
function Get-VcConnection([string]$VcInstanceUuid) {
    $DefaultVIServers | Where-Object {$_.InstanceUuid -eq $vcInstanceUuid}
}

#---------------ParentVApp---------------
$_this = Get-View -Id 'VirtualMachine-vm-626' -Server (Get-VcConnection -VcInstanceUuid '87b30cb3-72b0-46f1-afb2-556824647b85')
$_this.ParentVApp

#---------------ShutdownGuest---------------
$_this = Get-View -Id 'VirtualMachine-vm-626' -Server (Get-VcConnection -VcInstanceUuid '87b30cb3-72b0-46f1-afb2-556824647b85')
$_this.ShutdownGuest()

#----------------- End of code capture -----------------

It’s worth noting, at this point in time, all of the returned code is going to be in this manner. There are on-going investigations to add the translation from this code into high-level PowerCLI cmdlets. If this type of conversion is important to you, please add a comment to the following PowerCLI Feature Request: Onyx support for HTML5 and REST APIs

Using the Output

If I were to power on the app01 VM, I could then use the code in a PowerShell session (where I’m already connected to the vCenter Server) to shutdown the app01 system. To make this easier, Code Capture includes a ‘Copy’ button which easily copies the entirety of the code to our clipboard. We can now paste this into our PowerShell session to accomplish the task!

Example:
Code Capture Copy Paste Output

Another option to extract the code from our browser is with the ‘Download’ button. Clicking ‘Download’ will, depending on your browser configuration, save a file named ‘power-cli-script.ps1’ to your Downloads folder. We can then call that file just like any script from our PowerShell session to accomplish the action.

Example:
Code Capture Using Downloaded Script

Summary

The next generation of Onyx is here and it’s called Code Capture, which is only available in the vSphere HTML5 Web Client Fling! Using the start and stop button on the main menu bar, Code Capture allows you to take your actions in the vSphere Client and output them to PowerCLI code. The code output can also easily be copied and/or downloaded from your browser session using the dedicated buttons in the Code Capture area.

Get started by heading over to the vSphere HTML5 Web Client Fling page and downloading the latest version today!

The post Introducing Code Capture appeared first on VMware PowerCLI Blog.

Discovering VMs with Specific VMware Tools Versions

$
0
0

A recent knowledge base (KB) article was released regarding an issue impacting a specific version of VMware Tools. The KB in question is 57796, which describes the possibility of a guest level network connectivity issues or even a purple diagnostic screen (PSOD).

Before getting to the discovery process, I want to cover some of the specifics for this KB. I do this because we’re going to need to be aware of these as we build out our one-liners and the subsequent reporting script.

The issue in the KB may be found when combined with the following:

  • VMware Tools version 10.3.0
  • ESXi 6.5 Hosts
  • VM Hardware 13
  • Windows Server 2012 or newer -OR- Windows 8 or newer

Now that we know what we’re looking for, lets cover some methods we’ll be using to make this easier.

Properties, Hash Tables, and More

Since we’re going to be focused on VMs, we’ll be making use of the Get-VM cmdlet. However, the information we need isn’t available as part of the cmdlet’s default response. We’ll need to choose specific VM properties to display.

Discovering those properties can be done in a couple different ways. If we just want to find out what properties are available and how they’re defined, we can use the Get-Member cmdlet. If we want to find out the values for all of those properties, we can use the Format-Table cmdlet. Both of these cmdlets can be used in the same way, by using the Get-VM cmdlet and passing the output to the desired cmdlet with a pipeline.

Example Code:
Show Properties for Virtual Machine Objects

In this case we’re going to be referencing the ‘Name’ property and an additional property which is available as part of the listed ‘Guest’ property, which is actually defined as an object. The property we’re looking for in the Guest object is named ‘ToolsVersion’.

We can output these specific properties using the Select-Object cmdlet. In order to properly display the ‘ToolsVersion’ property, we’ll be using a hash table to create a calculated property. The hash table is created with an ampersand and curly brackets. We can establish the calculated property with ‘name’ and ‘expression’ values.

Listing VMs and their VM Tools Versions

First things first, let’s figure out how to display our VMs’ names and their VM Tools version using the Select-Object cmdlet and a calculated property for the Tools Version.

Example Code:

Get-VM | Select-Object -Property Name,@{Name='ToolsVersion';Expression={$_.Guest.ToolsVersion}}

PowerCLI - Get VMs and list Name and Tools Version

Listing VM Specific Information from the KB

In the example above, we can see there’s one particular VM which may be impacted by the KB. So, the next step is to obtain the rest of the information about each of the VMs.

We’ve already obtained the VM’s name and VMware Tools version properties. Now we need to figure out the ESXi host version, VM Hardware version, and what OS is in use.

The ESXi host version can be found using the VMHost property. This property returns the full ESXi host object. Since we’re working with the full object, we can return the ‘Version’ property by way of the calculated property method we used previously.

The VM Hardware version can be found by referencing the ‘HardwareVersion’ property.

The last property we’re interested in is the OS type. This too is available as a sub-property to ‘Guest’. There’s a couple to choose from, but for this example we’ll start with the ‘GuestFamily’ property.

Example Code:

Get-VM | Select-Object -Property Name,@{Name='ToolsVersion';Expression={$_.Guest.ToolsVersion}},@{Name=’VMHostVersion’;Expression={$_.VMHost.Version}},HardwareVersion,@{Name=’GuestFamily’;Expression={$_.Guest.GuestFamily}}

Obtain requisite information for each VM per the KB

Listing Only Applicable VMs

For our last example, let’s take this process a step further and display only the susceptible VMs.

We’ll do this with the Where-Object cmdlet. We’ll use this cmdlet, in combination with a script block, to validate that each of those properties match those items listed in the KB.

We’ll be validating the following properties:

ToolsVersion 10.3.0
VMHostVersion 6.5.0
HardwareVersion vmx-13
GuestFamily windowsGuest

Example Code:

$vms = Get-VM
$kbVMs = $vms | Where-Object {$_.Guest.ToolsVersion -eq ’10.3.0’ -and $_.VMHost.Version -eq ‘6.5.0’ -and $_.HardwareVersion -eq ‘vmx-13’ -and $_.Guest.GuestFamily -eq ‘windowsGuest’}
$kbVMs

View only potentially impacted VMs

Summary

Knowledge Base article 57796 details a specific issue which has the potential to impact environments. We can use PowerCLI to easily poll our environment to obtain, and even isolate, the specific VMs which may be impacted.

Let us know in the comments how you’re building on what’s available here to create reports and even remediations!

The post Discovering VMs with Specific VMware Tools Versions appeared first on VMware PowerCLI Blog.

PowerCLI at VMworld EMEA 2018

$
0
0

VMworld Barcelona

The schedule builder is live, so that means VMworld EMEA is almost here! Earlier this year, at VMworld US, we had an amazing amount of PowerCLI and automation-based sessions and we’re bringing a bunch of them to Barcelona! There are more sessions than last year, a re-vamped PowerCLI Hands-On-Lab including an expert-led Hands-On Lab, a solid set of community sessions, and the return of the fantastic Hackathon event. If you haven’t already registered, the time is quickly ticking away!

Make sure to add the following sessions to your schedule and catch up with the PowerCLI team and the amazing PowerCLI community members!

Sessions

Session: DEV3504BE – Development at VMware: A Look at How PowerCLI Has Evolved Over the Years
Date: Tuesday, Nov 6, 5:00 p.m. – 6:00 p.m.
Speakers: Kamen Nikolov & Kyle Ruddy
Kamen and Kyle will give attendees a behind the scenes look into the PowerCLI development process and the many ways PowerCLI has evolved over the last 10+ years.

Session: VIN1992BE – A Deep(er) Dive with PowerCLI 10
Date: Thursday, Nov 8, 9:00 a.m. – 10:00 a.m.
Speakers: Luc Dekens & Kyle Ruddy
Luc and Kyle will take a look at the more advanced use-cases when using PowerCLI to automate actions in your environment. From proper object handling to diagnosing speed issues to debugging and more, this session is going to be a deep dive into the “what’s possible” with PowerCLI.

Session: HCI2522BE – Getting Started with vSAN Automation
Date: Thursday, Nov 8, 3:00 p.m. – 4:00 p.m.
Speakers: Alan Renouf & William Lam
Alan and William show attendess how to get started automating all the aspects of vSAN with tools such as PowerCLI and the vSAN management SDKs.

Session: NET1642BE – NSX-PowerOps: Day2 Ops, NSX Health, Security, and Automated Documentation
Date: Thursday, Nov 8, 12:00 p.m. – 1:00 p.m.
Speakers: Hammad Alam & Puneet Chawla
Hammad and Puneet will discuss a community-built tool, NSX-PowerOps, which uses tools like PowerCLI and PowerNSX to create documentation of your environment.

Session: VIN2527BE – Top 10 Automation Requests and How You Can Save Time
Date: Tuesday, Nov 6, 2:00 p.m. – 3:00 p.m.
Speakers: Alan Renouf & William Lam
Alan and William walk through the top ten automation requests and how to complete them in a variety of languages, including PowerCLI.

VMware {code} Power Sessions

Session: CODE5609E – It’s Magic! Automating VMware Cloud on AWS
Date: Wednesday, Nov 7, 1:30 p.m. – 2:00 p.m.
Speaker: Adam Osterholt
Adam discusses how to start interacting with the VMware Cloud on AWS APIs with PowerCLI to automate your scalable, highly resilient, infrastructure in the cloud.

Session: CODE5606E – Building a Front-End for PowerCLI Scripts
Date: Wednesday, Nov 7, 2:30 p.m. – 3:00 p.m.
Speaker: Lino Telera
Lino will show how one could interact with their PowerCLI scripts using middleware and frontend frameworks.

Session: CODE5629E – vSphere Integration and Automation: Choose Your Tool
Date: Wednesday, Nov 7, 3:30 p.m. – 4:00 p.m.
Speaker: Ivaylo Ivanov
Ivaylo will walk attendees through a comparison of the numerous ways users can choose to automate their vSphere environments.

vBrownBag Sessions

Session: VMTN5507E – Dev 4 the Ops Team
Date: Wednesday, Nov 7, 2:30 p.m. – 2:45 p.m.
Speaker: Chris Bradshaw
Chris will walk through the importance of having some form of coding experience and some easy ways to start, using none other than PowerCLI.

Hands on Labs

Lab: SPL-1911-05-SDC_E – VMware vSphere Automation – PowerCLI
Date: Anytime the HOL area is open and available
Get hands-on with VMware PowerCLI. Gain familiarity with the tool, and then dive deeper into the functionality available with real world examples. Both new and experienced users are sure to learn something new about automating their environments.

Session: ELW-1911-05-SDC_E – Expert-Led Workshop – VMware vSphere Automation – PowerCLI
Date: Tuesday, Nov 6, 2:00 p.m. – 3:30 p.m.
Speaker: Howard Shoobe
Howard will show attendees how to get hands-on with VMware PowerCLI. You will gain familiarity with the tool, and then dive deeper into the functionality available with real world examples.

Hackathon

And last, but certainly not least, the VMware {code} Hackathon! If you’ve never been or haven’t heard of it, this is a fantastic event to get involved with other community members to do some coding in a cool location! There’s no requirement to even know how to code.

Session: CODEHACK – VMware {code} Hackathon
Date: Monday, Aug 27, 6:30 p.m. – 11:30 p.m.
Join VMware {code} for the third annual hackathon!

Summary

If you’re looking for PowerCLI content, VMworld EMEA is the place to be! With 5 sessions, 4 community sessions, multiple meet the experts, and several hands-on activities, there’s something for everyone regardless of skill level. Make sure you’re registered for VMworld and get these sessions added to your schedule today!

The post PowerCLI at VMworld EMEA 2018 appeared first on VMware PowerCLI Blog.

New Release: PowerCLI 11.0.0

$
0
0

PowerCLI has been moving at quite the rapid pace over the last 2 years. In 2018, we’ve been releasing roughly every other month to make sure we get the latest features, performance improvements, and updates available as quickly as possible. Well, it’s been two months and we’re not going to break this trend. Today, we are releasing PowerCLI 11.0.0!

PowerCLI 11.0.0 comes with the following updates:

  • Added a new Security module
  • Added new cmdlets for Host Profiles
  • Added a new cmdlet to interact with NSX-T in VMware Cloud on AWS
  • Support for vSphere 6.7 Update 1
  • Support for NSX-T 2.3
  • Support for Horizon View 7.6
  • Support for vCloud Director 9.5
  • Multiplatform support for the Cloud module
  • Updated the Get-ErrorReport cmdlet
  • Removed the PCloud module
  • Removed the HA module

Let’s take a more in-depth look at some of these updates.

New Security Module

There has been a tremendous amount of improvements around security for vSphere lately. The new VMware.VimAutomation.Security module ensures you have the ability to automate these new features.

The Security module includes the following cmdlets:

  • Get-SecurityInfo
  • Get-VTpm
  • Get-VTpmCertificate
  • Get-VTpmCSR
  • New-VTpm
  • Remove-VTpm
  • Set-VTpm
  • Unlock-VM

Also, thanks to the Security module (with a little help from the Storage module), several other cmdlets are receiving enhancements as well:
New-VM has added the following parameters:

  • KmsCluster
  • StoragePolicy
  • SkipHardDisks
  • StoragePolicy
  • ReplicationGroup
  • StoragePolicyTarget

Set-VM has added the following parameters:

  • DisableEncryption
  • KmsCluster
  • SkipHardDisks
  • StoragePolicy

Set-VMHost has added the following parameter:

  • KmsCluster

Set-HardDisk has added the following parameters:

  • DisableEncryption
  • KmsCluster
  • StoragePolicy

New-HardDisk has added the following parameters:

  • KmsCluster
  • StoragePolicy

Host Profile Updates

There have been a lot of requests coming in for updates to the set of cmdlets available to manage Host Profiles. The VMware.VimAutomation.Core module has some updates you’ll want to check out!

The following cmdlets have been added to help manage Host Profiles:

  • Get-VMHostProfileUserConfiguration
  • Set-VMHostProfileUserConfiguration
  • Get-VMHostProfileStorageDeviceConfiguration
  • Set-VMHostProfileStorageDeviceConfiguration
  • Get-VMHostProfileImageCacheConfiguration
  • Set-VMHostProfileImageCacheConfiguration
  • Get-VMHostProfileVmPortGroupConfiguration
  • Set-VMHostProfileVmPortGroupConfiguration

Storage Module Updates

The VMware.VimAutomation.Storage module has grown by leaps and bounds in the last couple releases. This release adds two new cmdlets and quite a few updates to existing cmdlets. Some of the improvements include an update to support predefined time ranges when using Get-VsanStat. Get-VsanDisk has some additional properties which are returned, such as: capacity, used percentage, and reserved percentage. Also receiving an update is the Get/Import/Export-SpbmStoragePolicy cmdlets, as they now support storage policy components.

The following cmdlets have been added to help automate vSAN:

  • Get-VsanObject
  • Get-VsanComponent

More details on these updates for vSAN can be found on the Virtual Blocks blog, by Jase McCarty: More vSAN Cmdlets in PowerCLI 11!

vCloud Director Updates

This update is another direct result from feedback. There has been an impressive amount of people requesting updates to the VMware.VimAutomation.Cloud module. With this release, we are updating the module to support vCloud Director 9.5. There are also a couple of new cmdlets being added.

The following cmdlets have been added to help automate vCloud Director networking:

  • Get-EdgeGateway
  • New-OrgVdcNetwork
  • Remove-OrgVdcNetwork
  • Set-OrgVdcNetwork

Other Improvements and Updates

There are also a handful of updates which are all due to community feedback! There has been an update to the output when using New-VM combined with the ‘Confirm’ parameter so that the output matches that of the created VM. An update to Get-View has been added to help resolve a Vim error being received when the ‘Property’ parameter was specified. Another fix was when Get-VM would result in an error of ‘Value cannot be null’. The last big issue, there has been an update to the way Get-NetworkAdapter outputs a NSX-T logical network backed portgroup.

Summary

PowerCLI 11.0.0 has been released and there are a ton of fantastic new additions. Over 20 new cmdlets have been added to help automate vCloud Director networking, virtual TPM settings, Host Profile configurations, and VMware Cloud on AWS networking. More than 10 cmdlets have been enhanced to add newly released features. Plus, a handful of updates to improve the overall quality and reliability.

For more information on changes made in VMware PowerCLI 11.0.0, including improvements, security enhancements, and deprecated features, see the VMware PowerCLI Change Log. For more information on specific product features, see the VMware PowerCLI 11.0.0 User’s Guide. For more information on specific cmdlets, see the VMware PowerCLI 11.0.0 Cmdlet Reference.

Remember, updating your PowerCLI modules is now as easy as ‘Update-Module VMware.PowerCLI’.

Update-Module VMware.PowerCLI

Let us know in the comments what you’re most excited about!

The post New Release: PowerCLI 11.0.0 appeared first on VMware PowerCLI Blog.

Updating PowerCLI Local OS Support

$
0
0

VMware PowerCLI has gone through quite a few changes over the past couple years. This includes what operating systems (OS) PowerCLI can run on! The most significant update was the addition of MacOS and Ubuntu. However, as the PowerCLI team continually evaluates which OSes we should support, there are also times where OSes need to be removed. With that said, in a future release, PowerCLI will be deprecating local OS support for Windows 7 and Windows Server 2008 R2.

It is important to note that this update will not impact whether or not PowerCLI can operate on those deprecated OSes. We are simply removing them from our testing process.

With that said, in a future release of PowerCLI, the local OS support will be updated to be the following:

OS Type Version (64-Bit)
Server Windows Server 2016
Server Windows Server 2012 R2
Workstation Windows 10
Workstation Ubuntu 16.04
Workstation MacOS 10.12

If you’re interested in more information about the PowerCLI testing process, I would highly recommend checking out the following VMworld session recording: Development at VMware: A Look at How PowerCLI Has Evolved Over the Years

The post Updating PowerCLI Local OS Support appeared first on VMware PowerCLI Blog.


Improving PowerCLI Support with Get-ErrorReport

$
0
0

I am always surprised at the shock some people have when it comes to PowerCLI being supported by VMware! We highlighted this in a prior blog post: PowerCLI Support Breakdown However, in that blog post, there was one item that wasn’t covered which can really help streamline the process of receiving support. This item is a cmdlet by the name of Get-ErrorReport and it received a big update as part of PowerCLI 11.

Let’s walk through an example of creating a PowerCLI support bundle using Get-ErrorReport.

Receiving an Error

The first thing we need to do is receive an error! In this case, I’ll be using a known issue with the Move-VM cmdlet which occurs when attempting to move a VM into a vApp.

Example: Generating an error

The error we received was:

Move-VM : 11/14/2018 1:12:31 PM Move-VM         A specified parameter was not correct:
PlacementSpec.relocateSpec.pool

This is a pretty straightforward issue where the Move-VM cmdlet is not operating in the way which was been documented. We can now open a support request!

PowerCLI Support Bundle

Normally, when you open a support request, the first ask is for a support bundle from either the vCenter, an ESXi host/s, or even all of the above. Since this is a PowerCLI issue, those standard support bundles may not help. Plus, some of the more advanced PowerCLI troubleshooting options are not easy, or not readily available, in most environments. One example of which would be to use a tool like Fiddler or Wireshark to sniff the network traffic in order to determine what API methods are being used under the covers and hopefully identify the issue.

Instead of going through the process of installing Fiddler or Wireshare, we can retrieve all the required information by making use of the Get-ErrorReport cmdlet!

The Get-ErrorReport cmdlet has a couple important parameters we’re going to be making use of:
Note: If you’ve used Get-ErrorReport before, these parameters have changed

Destination Location of where the PowerCLI support bundle will be placed
IncludeServerLogs Specify whether we want to pull logs from the connected server
ProblemDescription Provide a description and/or support number
ProblemScript Scriptblock which contains the cmdlet causing the error

Continuing with our Move-VM example, we can use the following code to create our support bundle:

$errorCode = {
  $appsvr = Get-VM -Name appsvr02
  $vapp = Get-VApp -Name DemovApp
  Move-VM -VM $appsvr -Destination $vapp
}
Get-ErrorReport -ProblemScript $errorCode -Destination .\Documents\ -ProblemDescription "Using Move-VM to place a VM into a vApp"

Example: Get-ErrorReport command being run

We can now take that output and upload it to our support request!

Support Bundle Examination

If you happen to be curious about what information is contained within the support bundle, like I was, we can unzip the bundle and read through the contents fairly easy. Note: this section is purely educational as the support engineer will handle the actual diagnosis.

The support bundle contains the following files:

  • PowerCLI-Main-Log.svclog
  • Powershell-Debug-Stream.txt
  • Powershell-Error-Stream.txt
  • Powershell-Info-Stream.txt
  • Powershell-Verbose-Stream.txt
  • Powershell-Warning-Stream.txt

The contents of those files should be fairly straight forward, with the exception of the first one. The PowerCLI-Main-Log.svclog is a collection of diagnostic traces. These traces contain all of the pertinent information about the cmdlets being used, how it is being interpreted by PowerShell, and then the underlying call to the vCenter. The svclog file can be opened with the Microsoft Service Stack Trace Viewer. This application is available as part of the Windows SDK, available here: Windows SDK Archive

The following screenshot is a look at the actual exception being returned by the API service:
Example: Reading the svclog exception

We can see the server response was an internal server error, which has a status code of 500. We can then further read through the individual trace to see the properties and methods being used. We also have the option to look at the traces before and after the call happened to see each of the steps being performed as part of the code entered in our $errorCode scriptblock.

Summary

PowerCLI is supported by VMware and the Get-ErrorReport cmdlet was recently improved in PowerCLI 11. The upgrade helps to streamline the support experience by creating a PowerCLI support bundle which can be provided to VMware support. This support bundle includes all of the required environmental information that VMware support will need to start troubleshooting the issue being reported.

The next time you need to open a support ticket on PowerCLI, make sure to use Get-ErrorReport and let us know your feedback!

The post Improving PowerCLI Support with Get-ErrorReport appeared first on VMware PowerCLI Blog.

Getting Started with Desired State Configuration Resources for VMware

$
0
0

Today, we are happy to announce a brand-new and open-sourced way to manage your vSphere environment. The Desired State Configuration (DSC) Resources for VMware allows partners, automation engineers, DevOps teams, and system administrators a new way to apply standard configuration management processes through PowerShell DSC and PowerCLI!

Let’s take a walk through how we can get started using these DSC resources and apply our first configuration!

Desired State Configuration Resources for VMware Overview

PowerShell DSC has been out for a while, since Windows Server 2012 R2 as a matter of fact. To summarize in a single sentence: PowerShell DSC can manage and monitor a system’s configuration based on what’s known as configuration files, which happen to be written as PowerShell code. This is all made possible thanks to the Local Configuration Manager (LCM). LCM is the “engine” running locally on each of the target nodes that takes the configuration file, interprets it, and applies all the configured parts. These parts include a system’s configuration, in what manner the configuration is refreshed, and how often it is refreshed, just to name a few.

The above is important because the DSC Resources for VMware operate a little differently than a standard DSC configuration. The DSC Resources for VMware make use of a proxy LCM host. This is because the LCM cannot run on the VCSA (both vCenter and PSC based appliances) nor can it run on ESXi hosts. An important note about this proxy LCM host, it has to be Windows PowerShell based. Furthermore, only PowerShell 5.1 and PowerCLI 10.1.1 or newer will be supported.

Desired State Configuration Resources for VMware

This first release of the DSC Resources for VMware will be able to manage a couple different areas for both vCenter and ESXi hosts. They are as follows:

  • vCenterStatistics
    • Level
    • PeriodLength
  • vCenterSettings
    • EventMaxAge
    • TaskMaxAge
    • Logging Level
  • VMHostNtpSettings
    • NTP Server
    • NTPD Service Policy
  • VMHostDnsSettings
    • HostName
    • DomainName
    • Address
  • VMHostSatpClaimRule
    • RuleName
    • Transport
    • Description
  • VMHostTpsSettings
    • ShareScanTime
    • ShareForceSalting

Installation Overview

We now know what it is and what it can do, how about the installation? On the designated proxy LCM system, we will want to download the module from GitHub and make it available in one of our designated PSModulePath directories. The zip file is available through the following link: Desired State Configuration Resources for VMware

Here’s some code that can streamline the download and initialization process:

# Download the 1.0 release of the VMware.vSphereDSC module from GitHub
Try {
    Invoke-WebRequest -Uri 'https://github.com/vmware/dscr-for-vmware/releases/download/v1.0/VMware.vSphereDSC.zip' -OutFile $env:userprofile\Downloads\VMware.vSphereDSC.zip
}
Catch [System.Net.WebException] {
    # On error, the SecurityProtocol for the local PowerShell session will be updated to access TLS 1.2 and the download will be attempted again.
    $secProtocol = [Net.ServicePointManager]::SecurityProtocol
    [Net.ServicePointManager]::SecurityProtocol = [Net.SecurityProtocolType]::Tls12
    Invoke-WebRequest -Uri 'https://github.com/vmware/dscr-for-vmware/releases/download/v1.0/VMware.vSphereDSC.zip' -OutFile $env:userprofile\Downloads\VMware.vSphereDSC.zip
    # The SecurityProtocol will be then reverted back to the state it was at prior
    [Net.ServicePointManager]::SecurityProtocol = $secProtocol
}

# Create a new VMware.vSphereDSC directory in the PowerShell Modules folder which is located in the Program Files directory
$dscDirectory = New-Item -Path “$env:ProgramFiles\WindowsPowerShell\Modules” -Name 'VMware.vSphereDSC' -Type Directory

# Expand the downloaded zip file containing the VMware.vSphereDSC module into the prior directory
Expand-Archive -Path .\Downloads\VMware.vSphereDSC.zip -DestinationPath $dscDirectory

After we have installed the module we should be able to list the newly acquired module and import it into our active PowerShell Session:

Import-Module -Name VMware.vSphereDSC

Example: Importing the VMware.vSphereDSC Module

We can also verify the DSC resources we have available:

Get-DscResource -Module VMware.vSphereDSC

Example: Output of available DSC Resources

Next, we need to make sure the proxy LCM system can understand the DSC configuration files. This is done through the Windows Remote Management service. We can setup the WinRM service or verify that the WinRM service is setup with the following code:

winrm quickconfig

In my environment, this system already had WinRM setup so I received the following message:
Example: Windows Remote Management Configuration

We should now be all set to start setting up DSC resources in our environment!

Managing an ESXi Host’s NTP

The DSC Resources for VMware repository has some pre-created configuration files which can be sourced to create the MOF file. The MOF file, which stands for Managed Object Format, is the output from a configuration file which has been compiled by the LCM. These configuration files are located in the repo at the following location: \Source\VMware.vSphereDSC\Configurations In my environment, I’ve created my own fork of the repository and cloned it to my local system where I’ll be referencing the files.

In our example, we’re going to setup DSC to manage an ESXi host’s NTP configuration. We can see some parameters and some settings by opening the VMHostNtpSettings_Config.ps1 file that’s located in the ESXiConfigs directory.

Input Type Input Name Input Description
Parameter Name Resource Name
Server Server Host Name
User ESXi host username
Password ESXi host password
Setting NtpServer NTP server/s the host will use
NtpServicePolicy Status for the NTPD service

For my lab environment, I’m going to update the NtpServer values and accept the service policy setting of ‘automatic’. I’m also going to apply this configuration at the ESXi host level, so my host name and server name will match.

We can do this with the following commands:

# Use splatting to fill the parameter values
$ntpConfigInput = @{
    name = 'esx01.corp.local'
    server = 'esx01.corp.local'
    user = 'root'
    pass = 'VMware1!'
}

# Compile the MOF in the current directory
. VMHostNtpSettings_Config.ps1 @ntpConfigInput

As part of the output, we should see the following MOF file having been created:
Example: Configuring and creating MOF file

We can then test the MOF file against our host with the following command:

Test-DscConfiguration -ComputerName localhost -Path .\VMHostNtpSettings_Config\

Added to the output, I have also included another PowerShell session which is polling the host for the current NTP server/s and service policy:
Example: Pre-DSC Configuration

In the above example, notice the ‘InDesiredState’ property with a value of False.

Now, we’re ready to start applying our configuration. We do this with the following command:

Start-DscConfiguration -ComputerName localhost -Path .\VMHostNtpSettings_Config\ -Wait -Force

After a few moments, we’re ready to check the current DSC configuration with the following command:

Get-DscConfiguration

Again, I’ve added a second PowerShell session to show the current status of the host:
Example: Post DSC Configuration Status

For reference, this is the code I’m running to show the current status of the host’s NTP configuration:

Get-VMHost -Name VMHostName | Sort Name | Select Name, @{N=“NTPServer“;E={$_ | Get-VMHostNtpServer}}, @{N=“NTPPolicy“;E={(Get-VMHostService -VMHost $_ | Where-Object {$_.key-eq “ntpd“}).Policy}}

In some later blog posts, we’ll take a look at some of the other areas of this module including applying configurations to multiple hosts, applying vCenter settings, applying values to multiple hosts in a vCenter, and some ways to apply better security practices to both the credentials and the MOF.

Summary

PowerCLI is back with a brand-new feature, Desired State Configuration Resources for VMware! These resources allow PowerCLI to make use of PowerShell DSC to define the configuration of a desired node. The DSC Resources for VMware can define ESXi host settings such as NTP servers, DNS servers, and TPS share scan times. We can also define vCenter settings such as statistics level and logging level. As an additional benefit, these resources are also open-source and community contributions are absolutely welcome!

Check out the Desired State Configuration Resources for VMware on GitHub and let us know what you’re looking forward to using DSC on most in your vSphere environment!

The post Getting Started with Desired State Configuration Resources for VMware appeared first on VMware PowerCLI Blog.

New Community Module for Tag Management

$
0
0

vSphere tags, in my opinion, are one the unsung heroes when it comes to VMware environment management. They’re extremely versatile. They can be used as labels. They can be used to group similar objects and/or multiple object types together. They can be used to apply policies. There are third party products also using them. I’ve seen lots of companies use them in lots of creative ways. However, automating their usage can be slow in some environments and not available at all in larger environments.

There’s a new module in the PowerCLI Community Repository to help against some of those issues. This new module, named VMware.Community.CISTag, makes use of the vSphere REST API to manage tags in a more performant manner.

The VMware.Community.CISTag module includes the following advanced functions:

Function Name Synopsis
Get-CISTag Gathers tag information from the CIS REST API endpoint
Get-CISTagCategory Gathers tag category information from the CIS REST API endpoint
Get-CISTagAssignment Displays a list of the tag assignments from the CIS REST API endpoint
New-CISTag Creates a new tag from the CIS REST API endpoint
New-CISTagCategory Creates a new tag category from the CIS REST API endpoint
New-CISTagAssignment Creates new tag assignments from the CIS REST API endpoint
Remove-CISTag Removes a tag from the CIS REST API endpoint
Remove-CISTagCategory Removes tag category information from the CIS REST API endpoint
Remove-CISTagAssignment Removes tag assignments from the CIS REST API endpoint

There are also some requirements that are needed in order for this module to work:

  • vCenter 6.0 or newer
  • PowerCLI 6.5.3 or newer
  • Active vCenter CIS service connection, using Connect-CISServer
  • Preferred: Active vCenter connection, using Connect-VIServer

Let’s take a quick look at how to get started using this module.

Accessing the Module

There are a couple ways to get access to this great module, all of which go through the PowerCLI Community Repository. One of the easiest ways is to load up the repository’s page, click on the green ‘Clone or download’ button, then clicking on ‘Download ZIP’. This downloads the entire contents of the repository to your local system.

Download PowerCLI Community Repository to Local System

Once the download is complete, unzip the files and browse to the ‘Modules’ directory. We are now going to copy the VMware.Community.CISTag folder and paste it in one of the directories that are listed in the PSModulePath variable. Doing this allows the module to be available for automatic importing by your PowerShell session!

By default, the PSModulePath variable contains the following directories:

  • $home\Documents\WindowsPowerShell\Modules
  • $pshome\Modules

In my environment, I have placed the module in the first of the above options. This is also where my PowerCLI modules are available.

Module Overview

The functions are written in a very similar format to the existing PowerCLI Tag cmdlets. If you’ve ever used the existing tag cmdlets, these operate in a very similar fashion and offer a very similar response. However, there are some changes that you should be aware of. The PowerCLI Tag cmdlets generally work with objects, whereas these functions work with names or IDs. This means you should test these new functions thoroughly before updating any existing scripts and/or workflows. Making use of Get-Help will greatly aide in the transition.

Overall, I noticed some good performance increases as well.

Example: Comparing an environment with 400 tags assigned, saw an improvement of roughly 25%
Performance test of listing tag assignments

There are some other features that have been added which can be used to achieve even more performance. The first, by using an object’s ID whenever possible. Most of the functions also feature TagId and ObjectId which can be referenced instead of the name parameters. This helps by cutting down on the amount of additional calls which are being made to translate a name into an ID value.

The second way to see even more performance improvement is through the usage of bulk actions. This applies specifically to the TagAssignment functions. The underlying API method allows multiple tags to be assigned or removed from a single object or a single tag can be assigned or removed from multiple objects. Therefore the New-CISTagAssignment and Remove-CISTagAssignment functions accept strings or arrays for Tag or Entity properties. There’s also the ability to further speed up the process by using object IDs too.

Example: Comparing the difference between the bulk assignment of a single tag against multiple VMs. Top example is name based, the bottom example is ID based.
Bulk action performance results

The last big note on improvements for this module, I have yet to run into any timeout issues, maximum results errors, and so forth.

Example: Comparing an environment with 1400 tags assigned, where the Get-TagAssignment cmdlet fails while the Get-CISTagAssignment succeeds
Example comparison with 1400 tags assigned

Summary

The CISTag module is a great new resource for anyone automating tag usage within their vSphere environment. By switching to the tagging methods available in the REST API, we’ve seen performance improvements, the ability to overcome timeout errors, and more!

Head out to the PowerCLI Community Repository, download it, and let us know in the comments how you’re putting it to use in your environment!

The post New Community Module for Tag Management appeared first on VMware PowerCLI Blog.

New Release: PowerCLI 11.1.0

$
0
0

As 2018 comes to a close, we have one more release for you in the form of PowerCLI 11.1.0! If you’re keeping track, that brings us to 6 official PowerCLI releases in the 2018 calendar year. To quickly summarize 2018: PowerCLI has gone multi-platform, added 2 new modules, added 25 new cmdlets, and supported new VMware product versions faster than ever! There were also quite a few other updates that involve PowerCLI, such as the Fling modules containing high-level cmdlets for NSX-T and VMware Cloud on AWS, the Code Capture addition to the HTML5 Web Client Fling, and the brand-new PowerShell DSC Resources for VMware!

PowerCLI 11.1.0 comes with the following updates:

  • Added support to the SRM module for MacOS and Linux
  • Added support for SRM 8.1
  • Updated 2 Storage module cmdlets
  • Updated DeployAutomation and ImageBuilder module dependencies

Let’s take a look at some of the updates.

Site Recovery Manager Module Updates

The VMware.VimAutomation.SRM module is the newest module to be converted to for multi-platform support. That means this module can now be used with PowerShell Core on MacOS and Linux! This module has also received updates to support Site Recovery Manager 8.1. More information on this new version of SRM can be found at the following: VMware Site Recovery Manager 8.1 Release Notes

PowerCLI and SRM Compatability

Storage Module Updates

The VMware.VimAutomation.Storage module received a couple updates to fix some issues. The Get-VsanDisk cmdlet has been updated to now also list the vSAN disk where the Witness Component resides. An update has additionally been made to the Start-SpbmReplicationTestFailover cmdlet so that it no longer requires the VvolId parameter.

Summary

PowerCLI 11.1.0 has been released and completes the 6th release of the year! This new release includes support for Site Recovery Manager 8.1, as well as converting the SRM module over for multi-platform support. Two storage cmdlets have been updated to fix some reported issues. Lastly, some dependencies for the DeployAutomation and ImageBuilder modules have been updated.

For more information on changes made in VMware PowerCLI 11.1.0, including improvements, security enhancements, and deprecated features, see the VMware PowerCLI Change Log. For more information on specific product features, see the VMware PowerCLI 11.1.0 User’s Guide. For more information on specific cmdlets, see the VMware PowerCLI 11.1.0 Cmdlet Reference.

Remember, updating your PowerCLI modules is now as easy as: Update-Module VMware.PowerCLI

Example: Update-Module -Name VMware.PowerCLI

Let us know in the comments what you’re most excited about!

The post New Release: PowerCLI 11.1.0 appeared first on VMware PowerCLI Blog.

New Release: PowerCLI Preview for VMware Cloud on AWS

$
0
0

It’s a big week for PowerCLI! We’re closing out 2018 with several new releases. The new PowerShell DSC Resources for VMware came out last week. PowerCLI 11.1.0 was released earlier today. Now, we also have a brand-new Fling to help bridge the gap between the low-level cmdlets already available and the high-level cmdlets that are so easy to use. The PowerCLI Preview for VMware Cloud on AWS adds 14 new high-level cmdlets which are used in combination with the existing VMware.VimAutomation.VMC module.

What do I mean by ‘high-level’ cmdlets? There are generally two forms of cmdlets available through PowerCLI, high-level and low-level. High-level cmdlets abstract the underlying API calls and provide an easy to use and understand cmdlet, like Get-SDDC. Based on that, you can assume the output will be SDDCs within your VMware Cloud on AWS environment. However, every API call does not have a corresponding high-level cmdlet and that’s where the low-level cmdlets come into play. Low-level cmdlets interact directly with the API and therefore have complete coverage of the available API calls. An example of a low-level cmdlet would be Get-View, or in the case of the VMC module it would be Get-VmcService. More information about the low-level cmdlet usage of the VMC module is available in the following blog post: Getting Started with the VMware Cloud on AWS Module

Why is this being released as a fling? Much like the NSX-T preview module released earlier this year, we’re trying a new approach to creating cmdlets based on the APIs. Essentially, we take the VMC API swagger specification and programmatically create the entire module. It’s early in this new development process and we know there is the potential for issues and things that may or may-not make sense.

Another reason for it being a fling, we need your feedback! What cmdlets are you using the most? What should the output look like? What cmdlets aren’t working the way you think they should? What cmdlets are missing? As well as any other feedback you can come up with! The preference is to leave the feedback on the Fling’s comments page. However, if you post it as a comment here, I’ll make sure the right people receive it.

With that said, let’s get started using this new module!

Getting Started

Before we dive right in, the following section is going to be using a Windows environment. However, both the existing VMC module as well as the new VMC Preview module are multi-platform and can be used with PowerShell Core!

First, we’ll need to head out to the VMware Flings site, browse for the fling and download the zip file. Direct link: PowerCLI Preview for VMware Cloud on AWS

Next, extract the module and place it into one of your $PSModule directories. Better yet, do it with PowerShell:

Expand-Archive -Path $env:USERPROFILE\Downloads\PowerCliPreviewForVmwareCloudOnAws-1.0.0-11171858.zip -DestinationPath $env:USERPROFILE\Documents\WindowsPowerShell\Modules

We can then verify the module was placed in the proper location and is available for us to use:

Get-Module -Name *VMC* -ListAvailable

VMCPreview Module Install Process

Note: If you don’t see those two modules, you probably need to install the latest version of PowerCLI. Walkthroughs on how to do that are available:

Now that we can see the module, I would suggest browsing through the new cmdlets available. We can do that with the following command:

Get-Command -Module VMware.VimAutomation.VmcPreview

Listing the available commands

One last step before starting to use the new cmdlets, we need to authenticate to the VMware Cloud on AWS service. This requires the Connect-VMC cmdlet, which is available as part of the VMware.VimAutomation.VMC module, and our Refresh Token from the Account section of the VMware Cloud on AWS Cloud Console. We can then authenticate with the following command:

Connect-Vmc -RefreshToken xxxxxxxx-xxxx-xxxx-xxxx-xxxxxxxxxxxx

We are now authenticated and ready to start pulling information from the environment. Following along with the prior blog post, let’s start by pulling information about our organization. We can do that with the Get-Organization cmdlet.

Get-Organization Usage

We can clean up the output through the use of the Select-Object cmdlet with the following command:

Get-Organization | Select-Object -Property Id, DisplayName

Get-Organization Details

Another item we looked at in the last blog post, and the next logical step, SDDCs. The Get-Sddc cmdlet can be used, however it does require the addition of an Organization ID. I’ll store the Org ID from the prior step in a variable named orgId and then just jump to the cleaned-up view by using the following command to list the SDDC/s in the Org:

Get-Sddc -OrdId $orgId | Select-Object Id,Name,SddcType,SddcState

SDDC Example Output

Last thing I want to cover, these cmdlets make use of objects just like standard PowerCLI cmdlets do. Specific to the SDDC, we can access additional information such as what AWS Region and Availability Zone/s are in use, NSX information like the Manager URL (which will be important in a later blog post), and what the vCenter URL is. All of that information happens to be available in the ResourceConfig property of an SDDC. We can retrieve that information with the following command:

$sddc.ResourceConfig | Select-Object -Property Region,NsxMgrUrl,VcUrl

Additional SDDC Object Information

Summary

There’s a great new fling available called the PowerCLI Preview for VMware Cloud on AWS. This fling adds an additional 14 high-level cmdlets for VMware Cloud on AWS, like Get-Organization and Get-Sddc, which means that automating VMware Cloud on AWS has never been easier!

As with all of our Flings, please leave feedback on the Comments section! We want to know what you think. What cmdlets are you using the most? What should the output look like? What cmdlets aren’t working the way you think they should? What cmdlets are missing? As well as any other feedback you can come up with!

The post New Release: PowerCLI Preview for VMware Cloud on AWS appeared first on VMware PowerCLI Blog.

Obtaining Specific PowerCLI Versions from the PowerShell Gallery

$
0
0

The recommendation is to always be on the latest and greatest version of PowerCLI. However, whether it be for testing and validation or to possibly workaround an issue, there are instances where you may need to use an older version.

The PowerShell Gallery has the potential to make this process incredibly easy when using the RequiredVersion parameter for both Install-Module and Save-Module. These cmdlets download and/or install the indicated module at the specified version. The issue, especially with PowerCLI, comes in how the dependent modules are handled. This is because, in most cases, the module dependencies are specified to be obtained at a particular level or newer.

Example PowerCLI Dependency Listing:
PowerCLI Module Dependencies

This means if you want to download PowerCLI 6.5.4 with either the Install-Module or Save-Module cmdlets, the end result will not actually give you the requested version of PowerCLI. You would only receive the top-level VMware.PowerCLI module at version 6.5.4. All of the module dependencies which make up the PowerCLI 6.5.4 release will be at the latest and greatest version.

So, how can we properly download prior versions of PowerCLI?

Introducing Save-PowerCLI

Dimitar Milov, a PowerCLI engineer, came up with a function to address the issue and shared it in the comments on the PowerShell Gallery page for the VMware.PowerCLI module. From that point, I added a couple new features and shared it in both the PowerCLI Community repository and the VMware Code Sample Exchange.

Save-PowerCLI In Action

Demo: Save-PowerCLI Usage

Save-PowerCLI Code

Known Issues

There are a couple issues I’ve noticed when testing this against various versions of PowerShell.

  • Older versions of PowerShellGet (Example: 1.0.0.1) will fail because it can’t handle the formatting of one specific PowerCLI version.
    • Workaround: Update PowerShellGet. Example: Install-Module -Name PowerShellGet -Force
  • Newly released PowerCLI modules can be found downloaded, even if they did not exist at the time of the specific version release.

Summary

We always recommend how everyone should be on the latest and greatest version of PowerCLI. However, we also recognize that isn’t always possible. Whether it be for testing and validation, working around known issues, and so forth, there are reasons and needs to be able to obtain prior versions of PowerCLI from the PowerShell Gallery. The Save-PowerCLI function can streamline the download process of retrieving those specific versions of PowerCLI.

Let us know what you think of this function in the comments!

The post Obtaining Specific PowerCLI Versions from the PowerShell Gallery appeared first on VMware PowerCLI Blog.

Moving a Datastore Cluster to a New Folder

$
0
0

We often get lots of interesting requests about figuring out how to automate something. The latest request was about how to move a datastore cluster between folders. This is the type of automation action which probably doesn’t need to be used all that often and is more aesthetic in nature than anything else. However, the interesting part is that, this request came from someone that found out they couldn’t perform the action in the UI. So, PowerCLI to the rescue!

Move-DatastoreCluster

PowerCLI doesn’t have a high-level cmdlet for this action, so we’ll be creating our own. To perform this action, we’ll be using a method that’s available in the vSphere API known as “MoveIntoFolder.” We can see some additional information about this method in the VMware Code API Explorer: MoveIntoFolder Method

I have created and shared a script on the PowerCLI Community repository and the VMware Code Sample Exchange which takes that “MoveToFolder” and wraps it in an advanced function we can call with: Move-DatastoreCluster

Example Usage

The script will need to be, what’s known as, dot sourced so that the advanced function is available in our current PowerShell session. From that point we will use the ‘DatastoreCluster’ parameter to pass a Datastore Cluster and the ‘Destination’ parameter to pass a folder.

Putting this altogether looks a bit like the following:
Move-DatastoreCluster Example Code

Summary

PowerCLI is a great tool to use when automating VMware environments. In the case of Datastore Clusters, we can actually use PowerCLI to perform tasks which aren’t available in the vSphere Client! The Move-DatastoreCluster script has been shared and presents an advanced function, of the same name, which allows us to move Datastore Clusters between the available folders.

If this is a function you’d like to see added to PowerCLI, head out to the public feature request site and upvote the following idea: Enhancement for moving inventory items Datastore Cluster

The post Moving a Datastore Cluster to a New Folder appeared first on VMware PowerCLI Blog.


Documentation Walkthrough

$
0
0

Documentation is an important part of the automation and development process. When I first started using PowerCLI, I found the docs to be overwhelming and confusing. As my PowerCLI knowledge grew, I started to use them more and more. Instead of frustratingly browsing the multiple levels of properties that make up vCenter objects in a terminal, I found I could easily pick them out in the docs. As part of this blog post, we’re going to walk through the available documentation, which documentation should be used at what points, and then walk-through two use cases of using the documentation to perform a task.

PowerCLI Objects

PowerCLI allows us to access two different types of objects, .Net and vSphere. It’s important to know about these two object types and how to interact with them to understand what documentation should be used at what points.

To summarize the two objects quickly, the .Net objects are what PowerCLI high-level cmdlets interact with. Example: Get-VM returns back a UniversalVirtualMachineImpl .Net object. The vSphere objects are what the low-level cmdlets interact with, which is a direct connection to the vSphere Web Services API. These vSphere objects are accessible through Get-View and when referencing a .Net object’s ExtensionData property. Example: (Get-VM).ExtensionData returns back a VirtualMachine vSphere object.

If there’s a question about what object type we’re interacting with, we can verify the object type by using either the object level method of ‘GetType’ or with the ‘Get-Member’ cmdlet. Here’s how we can use the GetType method against the three examples I’ve already mentioned:
Example: Retrieving an Object's Type

These two object types also have their own sets of documentation. The .Net objects are available in the “Types” section of the PowerCLI Cmdlet Reference. The vSphere objects are available in the vSphere Web Services API Reference. The vSphere API has two main object types we’ll want to become familiar with, Managed Objects and Data Objects. Think of Managed Objects as the top-level inventory items, such as Datacenters, Clusters, Hosts, and VMs. It’s also worth noting that Managed Objects can also be services, such as the EventManager and ScheduledTaskManager, but we won’t be using them as part of this blog post. We can then think of Data Objects as the child objects that make up the top-level Managed Objects.

If you want to learn some more about these two objects and how they pertain to PowerCLI, PowerCLI mastermind Luc Dekens and I walked through these in a VMworld session last year: A Deep(er) Dive with PowerCLI 10 (VIN1992BE)

Documentation Lingo

At first glance, the documentation for both PowerCLI and the vSphere APIs can be a little overwhelming. There’s a lot of information available to consume. Let’s cover the main sections that are consistently available for both object types. These sections are: Property of, Parameter to, Returned by, Extends and/or Extended by, and Properties. “Property of” means that this particular object will be returned as a property for the listed objects. “Parameter to” means this object can be used as input for a particular cmdlet and/or method. “Returned by” means that a particular object will be the response by a cmdlet and/or method. Then we have “Extends” and/or “Extended by”, which is interesting because these can actually add properties to the given object which may not be listed in the documentation since it can change based on the object being referenced. Lastly, there are the “Properties” which are the items and objects that make up each object. Every time you get an object based response in PowerCLI, you’ll find those properties.

Next, we’re going to put all of this information to use in order to solve an issue where we’re looking for more information about a VM’s disk space and its associated filesystem.

Disk Space Utilization – .Net Object

For the first object type, we’ll be working with the .Net objects. We’ll want to start by referencing the PowerCLI documentation, known as the cmdlet reference. Instead of diving right in on the cmdlet list, we’re going to instead take a look at the Types. Since, at the root of the request, we’re looking for information about a VM, we’ll start with the VirtualMachine object. There, we can see all of the available properties including some that are relevant to our task such as: HardDisks, UsedSpaceGB, and ProvisionedGB. We can also take note of a deprecation notice for the HardDisks property which, as part of the Type column, refers us to the HardDisk object. Moving to the HardDisk object page, we can see some additional properties we might want to reference by the names of CapacityGB and CapacityKB. We’re not quite ready to move to coding just yet, we haven’t found any filesystem information. There’s one other section, that’s part of the VirtualMachine object, we should explore. This is the VMGuest object. Here we can see properties that have been pulled from VMware Tools, including one very interesting property for the our task: Disks. This property is related to the DiskInfo object. On the DiskInfo object page, we can see properties such as Path, Capacity, FreeSpace, CapacityGB, and FreeSpaceGB.

Quick recap, based on the request for hard disk and filesystem of a VM, we’re going to be interested in the following properties:

Object Property
VirtualMachine UsedSpaceGB
VirtualMachine ProvisionedSpaceGB
HardDisk CapacityGB
DiskInfo Path
DiskInfo CapacityGB
DiskInfo FreeSpaceGB

We now know what information we’re looking to retrieve, so we can start figuring out what code we can use to retrieve this information. The two main areas we’ll be concerned with are the “Property of” and “Returned by” sections. For the first two properties, we can use the Get-VM cmdlet to return those. Due to the deprecation of the HardDisk property, we have to use the Get-HardDisk cmdlet to return CapacityGB. Then, for our last three properties, we can use the output from the original Get-VM cmdlet. We know this because the DiskInfo object is a property of VMGuest, which just happens to be a property of VirtualMachine.

We can break it down to be the following properties:

Cmdlet Property Path
Get-VM UsedSpaceGB
Get-VM ProvisionedSpaceGB
Get-HardDisk CapacityGB
Get-VM Guest – Disks – Path
Get-VM Guest – Disks – CapacityGB
Get-VM Guest – Disks – FreeSpaceGB

Here’s what it looks like in PowerCLI code:

# Populating variables with required cmdlets
$vm = Get-VM -Name $vmName
$hardDisk = Get-HardDisk -VM $vm
# Creating a new PowerShell custom object to easily output properties
$output = New-Object -TypeName PSCustomObject
# Adding desired properties to the new PowerShell object 
Add-Member -InputObject $output -MemberType NoteProperty -Name UsedSpaceGB -Value $vm.UsedSpaceGB
Add-Member -InputObject $output -MemberType NoteProperty -Name ProvisionedSpaceGB -Value $vm.ProvisionedSpaceGB
Add-Member -InputObject $output -MemberType NoteProperty -Name CapacityGB -Value $hardDisk.CapacityGB
Add-Member -InputObject $output -MemberType NoteProperty -Name GuestPath -Value $vm.Guest.Disks.Path
Add-Member -InputObject $output -MemberType NoteProperty -Name GuestCapacityGB -Value $vm.Guest.Disks.CapacityGB
Add-Member -InputObject $output -MemberType NoteProperty -Name GuestFreeSpaceGB -Value $vm.Guest.Disks.FreeSpaceGB
# Viewing the output
$output

Here’s what it looks like in our PowerShell session:
Example: Disk Information from .Net Object

Disk Space Utilization – vSphere Object

For the second object type, we’ll be working with the vSphere objects. vSphere objects are vSphere Web Services API based, which means that we’ll be using a different set of documents to pull the same data. This document is known as the vSphere Web Services API Reference.

Taking a look at our request from the vSphere API level, we will again want to start at the VirtualMachine Managed Object. We can immediately notice a larger amount of data available to consume, since accessing the API gives us access to all of the available information. We’ll first want to start in the storage property, which leads us to the VirtualMachineStorageInfo data object. We can see there’s a property of perDatastoreUsage which is related to the VirtualMachineUsageOnDatastore object. This object has two properties we’re interested in, committed and uncommitted. The committed property will represent the used space amount, while the sum of committed and uncommitted will represent the provisioned space amount. Note, both of those properties are referenced in bytes so there will need to be some conversion done later.

Next, we’re looking for information about the hard disk itself. This is a multi-step process. Referencing the VirtualMachine object, we can see the layoutEx property contains information about the files that comprise a VM. The layoutEx property aligns with the VirtualMachineFileLayoutEx object, which has the property of disk. This disk property aligns with the VirtualMachineFileLayoutExDiskLayout object which gives us a key property. By reading the description of the key property, we can see that this key matches up to a VirtualDevice object which also has a key property. In reading through the available properties, we’re missing the property we’re looking for, which is a capacity-based property. This is where the ‘DynamicData’ comes into play. At the bottom of the properties, it specifies that some additional properties could be inherited by “DynamicData”. This is where the “Extended by” section comes into play. For our request, we can see that the VirtualDevice object is extended by the VirtualDisk object. When we look at the VirtualDisk object, we see the property that we’re looking for: capacityInBytes! At this point, we have our property but we don’t know how to retrieve it. Using the “Property of” section, we can backtrack to the VirtualMachine object. VirtualDisk is extended by the VirtualDevice object. The VirtualDevice object is a property of the VirtualHardware object. The VirtualHardware object is a property of the VirtualMachineConfigInfo object. Which takes us back to the VirtualMachine object, since the VirtualMachineConfigInfo is a property of the VirtualMachine object.

Last, we’re looking for filesystem-based information. Similarly to the .Net object, the VirtualMachine object has a guest property which is a GuestInfo object. The GuestInfo object has a property of disk, which is a GuestDiskInfo object. The GuestDiskInfo object has the capacity, diskPath, and freeSpace properties we’re looking for.

Attempting a quick recap, based on the request for hard disk and filesystem of a VM, we’re going to be interested in the following properties of the vSphere objects:

Object Property
VirtualMachineUsageOnDatastore committed
VirtualMachineUsageOnDatastore uncommitted
VirtualMachineFileLayoutExDiskLayout key
VirtualDisk capacityInBytes
GuestDiskInfo diskPath
GuestDiskInfo capacity
GuestDiskInfo freeSpace

Since we’re only going to be working with the root VirtualMachine object, we can move right over to the code. We can access the vSphere object in two ways, either through the usage of the Get-View cmdlet or through an object’s Extension Data. Once we have established that object in a variable, the experience is the same.

The two ways to retrieve the vSphere object for a particular VM can actually be extended into three ways, depending on what you are most comfortable with:

# Option 1: Using a .Net object’s ExtensionData 
$vm = Get-VM -Name $vmName 
$vm.ExtensionData
# Option 2: Piping a .Net object to the Get-View cmdlet
$vm = Get-VM -Name $vmName 
$vmView = $vm | Get-View
# Option 3: Using Get-View and filtering for the desired VM
Get-View -ViewType VirtualMachine -Filter @{"Name" = $vmname}

We can break it down to be the following cmdlets and properties:

Cmdlet Property Path
Get-VM | Get-View storage – perDatastoreUsage – committed
Get-VM | Get-View storage – perDatastoreUsage – uncommitted
Get-VM | Get-View layoutEx – disk – key
Get-VM | Get-View config – hardware – device – capacityInBytes
Get-VM | Get-View guest – disk – diskPath
Get-VM | Get-View guest – disk – capacity
Get-VM | Get-View guest – disk – freeSpace

Here’s what it looks like in PowerCLI code:

# Establishing the connection to our vSphere object
$vm = Get-VM -Name $vmName
$vmView = $vm | Get-View
# Creating a new PowerShell custom object to easily output properties
$output = New-Object -TypeName PSCustomObject
# Adding desired properties to the new PowerShell object
$diskCommit = $vmView.Storage.PerDatastoreUsage.Committed
$diskUncommit = $vmView.Storage.PerDatastoreUsage.Uncommitted
Add-Member -InputObject $output -MemberType NoteProperty -Name UsedSpaceGB -Value ($diskCommit / 1GB)
Add-Member -InputObject $output -MemberType NoteProperty -Name ProvisionedSpaceGB -Value (($diskCommit + $diskUncommit) / 1GB)
$diskKey = $vmView.LayoutEx.Disk.Key
$diskCapacity = $vmView.Config.Hardware.Device | Where-Object {$_.key -eq $diskKey} | Select-Object -ExpandProperty capacityInBytes
Add-Member -InputObject $output -MemberType NoteProperty -Name CapacityGB -Value ($diskCapacity / 1GB)
Add-Member -InputObject $output -MemberType NoteProperty -Name GuestPath -Value $vmView.Guest.Disk.DiskPath
Add-Member -InputObject $output -MemberType NoteProperty -Name GuestCapacityGB -Value ($vmView.Guest.Disk.Capacity / 1GB)
Add-Member -InputObject $output -MemberType NoteProperty -Name GuestFreeSpaceGB -Value ($vmView.Guest.Disk.FreeSpace / 1GB)
# Viewing the output
$output

Here’s what it looks like in our PowerShell session:
Example: Disk Information from vSphere Object

Summary

Documentation is often an overlooked part of the PowerCLI development process. PowerCLI allows us to work with both it’s own set of objects as well as the entire set of vSphere API objects! This blog post discussed the differences between those objects, where to find the documentation to interact with those objects, how to read the documentation, and wrapped up with an example of fulfilling a request using both types of objects.

Let us know in the comments what type of scenario you would like walked through for the next documentation based blog post!

The post Documentation Walkthrough appeared first on VMware PowerCLI Blog.

Configuring VMs For Opaque Networks

$
0
0

PowerCLI has a new object to interact with, thanks to NSX-T! The Opaque Network managed object gives us the ability to interact with NSX-T provisioned logical switches as though they are port groups. Technically, it has been available for a couple releases of vSphere but the functionality was really improved here recently.

Last year we released KB 65149 that included code to create a new function, named Set-NetworkAdapterOpaqueNetwork. This function could be used to assign an opaque network to a VM’s network adapter. I’m happy to relay that, as of PowerCLI 11.2.0, we no longer have to rely on that function. We can now use the Set-NetworkAdapater to assign an opaque network just as we would any other normal port group with the NetworkName parameter. We also have the ability to deploy OVAs and/or OVFs with an opaque network configured in the OVFConfiguration parameter.

Before we dive into some coding examples, we should begin by showing how to list out the available opaque networks. This is because opaque networks aren’t included as part of the response for either Get-VirtualPortGroup or Get-VDPortGroup. Each of those cmdlets return their own object types. Therefore, we need to rely on the Get-View cmdlet to interact directly with the vSphere Web Services API.

Retrieving Opaque Networks

We can list all of our vCenter’s opaque networks with the following command:

Get-View -ViewType OpaqueNetwork

Since we’re interacting directly with the API, we’re going to receive back all of the top-level information about each opaque network. We can condense the output and make it a little easier to read with the following code:

Get-View -ViewType OpaqueNetwork | Select-Object Name,OverallStatus

Sample: Condensed output from listing opaque networks

Configuring Opaque Networks

We now have a list of opaque networks which are available for us to use. The next step is to start configuring our VMs to use them. As of PowerCLI 11.2.0, we can use the already existing Set-NetworkAdapter cmdlet combined with the NetworkName parameter to make the change.

We can update a VM’s port group association to be an opaque network with the following code:

Get-VM -Name “VMName” | Get-NetworkAdapter | Set-NetworkAdapter -NetworkName “OpaqueNetworkName”

Example: Set-NetworkAdapter Usage

Summary

NSX-T adds a new object for PowerCLI to interact with in the form of an opaque network. These are a representation, at the vSphere level, of a logical switch which has been provisioned from NSX-T. PowerCLI 11.2.0 includes updates to existing cmdlets that allow us to assign opaque networks to our VMs as port groups. The first, which was demonstrated in this post, is to modify a VM’s network adapter with the Set-NetworkAdapter cmdlet paired with the NetworkName parameter. The second, while deploying OVAs and/or OVFs through Import-VApp when using the OvfConfiguration parameter.

Update today to the latest version of PowerCLI to ensure you have access to the latest features and functionalities.

The post Configuring VMs For Opaque Networks appeared first on VMware PowerCLI Blog.

Getting Started with the HCX Module

$
0
0

PowerCLI 11.2.0 introduced a brand-new module that allows us to easily automate VMware HCX! The VMware.VimAutomation.HCX module adds 20 new cmdlets to already existing count of well over 600 cmdlets contained in the entire set of PowerCLI modules. This is important because HCX is one of the newest technologies VMware has released and it has some impressive power.

To give a quick overview, think of VMware HCX as a swiss army knife – a single tool with multiple options to move your workloads in and out of the cloud. Schedule migrations with HCX vMotion, take advantage of replication assisted vMotion for bulk migrations and even VMs with larger footprints, or simply protect your data with the available disaster recovery options. HCX is a powerful tool to easily manage the location of your workloads.

For more information on HCX itself, see the following blog article from my colleague Emad Younis: Learning Hybrid Cloud Extension (HCX)

My lab environment is shared between a couple of my peers and I didn’t happen to deploy HCX to this environment. So, let’s walk through a couple examples of using the HCX module to perform some environment discovery and follow that up with performing an HCX vMotion.

Getting Started

The first time I use a module, I examine the cmdlets that are available. We can do that with the following code:

Get-Command -Module VMware.VimAutomation.HCX

We can see in the response that each of the cmdlets have a prefix, for the noun portion, of HCX. There’s the standard Connect-HCXServer and Disconnect-HCXServer cmdlets for authentication, along with the low-level Get-HCXService cmdlet so we can access the API directly. The other cmdlets are high-level, which have abstracted the available API calls and provided us with easy to understand names and parameters.

First, we need to authenticate to our HCX environment. We will connect directly to the on-premises HCX Manager using the Connect-HCXServer cmdlet.

Example: Connect-HCXServer Output

Now that we’re connected, we can take a look at some of the appliances which have been deployed. We can use the Get-HCXAppliance cmdlet to do that.

Example: Get-HCXAppliance Output

We can see that we have 3 appliances deployed and the type for each of them. This falls in line with what you would see under the “HCX Components” tab of the Infrastructure Interconnect page in the HCX Management UI.

Another piece of information on that particular page is the status of the Interconnect. We can receive that with the Get-HCXInterconnectStatus cmdlet.

Example: Get-HCXInterconnectStatus

We also want to know some site-based information. We can make use of the Get-HCXSite cmdlet to do this. However, we will be making use of two parameters to get the full picture. These two parameters are Source and Destination. If no parameter is used, we’ll receive the source site information by default.

Example: Get-HCXSite Output

There are also a handful of cmdlets to help us discover the what vSphere objects are available to the HCX environment. These include Get-HCXVM, Get-HCXDatastore, Get-HCXNetwork, and Get-HCXContainer. The first three should be fairly obvious, but the fourth cmdlet is a little more ambiguous. Get-HCXContainer returns back a list of multiple object types including clusters, datastores, folders, hosts, and resource pools.

Example: Get-HCXContainer Output

One item to take note of, by default each of these cmdlets only return objects for the source site. If you want to receive objects from some other site, you will need to specify that with the Site parameter.

At this point, I think we’re fairly familiar with our environment so let’s take a look at performing an HCX migration!

HCX Migration

The HCX Migration service offers numerous ways to migrate our VMs between the available sites. There are five cmdlets to help us automate migrations.

We can start off by using Get-HCXMigration to see a status on any existing migrations. In this case, there has been one previous migration and we can use the “Format-List” parameter to see the all the properties for the HCXMigration object.

Example: Get-HCXMigration Output

Next, let’s perform an HCX Migration. We’ll need to populate a handful of parameters to create the migration with New-HCXMigration. This is quite similar to performing a standard vMotion between vCenters with Move-VM. One big caveat though, the New-HCXMigration cmdlet is looking for HCX objects and not the standard objects we receive from vCenter. Therefore, we’ll be using the HCX associated cmdlets to create variables for each of those parameters.

Here’s some example code based on my environment:

$vm = Get-HCXVM -Name KR-DEV-03
$destSite = Get-HCXSite -Destination
$srcSite = Get-HCXSite -Source
$destCompute = Get-HCXContainer -Name Compute-ResourcePool -Site $destSite
$destDS = Get-HCXDatastore -Name WorkloadDatastore -Site $destSite
$destNet = Get-HCXNetwork -Name VMC-192.168.9-DHCP -Site $destSite

Then, we can run our New-HCXMigration cmdlet. In my environment, I stored the output from the cmdlet into a variable since we will need to reference it later.

Example code:

$newMigration = New-HCXMigration -DestinationSite $destSite -MigrationType vMotion -SourceSite $srcSite -TargetComputeContainer $destCompute -TargetDatastore $destDS -TargetNetwork $destNet -VM $vm

Our migration is created, but it hasn’t actually started yet. There’s one more step to perform before we start the migration, and that’s testing the migration!

Example code:

Test-HCXMigration -Migration $newMigration

Assuming a successful validation, we can now move onward to performing the migration with the Start-HCXMigration cmdlet.

Putting the above altogether, it should look similar to the following:

Example: New Migration Workflow

Summary

A new module has been made available as part of PowerCLI 11.2.0 to automate VMware HCX. This module includes 20 cmdlets which can be used to discover HCX environments and automate the lifecycle of network extensions, migrations, and disaster recovery replication. PowerCLI makes it easier than ever to migrate and protect your workloads!

Let us know in the comments what HCX actions you’re using PowerCLI for!

The post Getting Started with the HCX Module appeared first on VMware PowerCLI Blog.

New Release: PowerCLI 11.2.0

$
0
0

The first release of 2019 is here! Today marks the release of PowerCLI 11.2.0 and it is an exciting one. PowerCLI now has 21 modules, to ensure you can automate roughly any VMware product. We’re adding new, and more secure, methods to authenticate. There are also improvements to existing cmdlets so you can use the latest and greatest technologies alongside the newest APIs available.

PowerCLI 11.2.0 comes with the following updates:

  • New module available for VMware HCX
  • Added support for NSX-T Policy services
  • Added support for OAuth based connectivity to vCenter
  • Added support for Opaque Networks
  • Updated Storage module cmdlets

Let’s take a look at some of the updates.

New Module for VMware HCX

VMware HCX is an amazing option that breathes new life into the term Hybrid Cloud. To give a quick overview, think of VMware HCX as a swiss army knife – a single tool with multiple options to move your workloads in and out of the cloud. Schedule migrations with HCX vMotion, take advantage of replication assisted vMotion for bulk migrations and even VMs with larger footprints, or protect your data with the available disaster recovery options. HCX is a powerful tool to easily manage the location of your workloads, and PowerCLI now offers 20 cmdlets to help automate its management.

More information on this exciting, new module can be found on the following blog post: Getting Started with the HCX Module

Added Support for NSX-T Services

NSX-T gives administrators the ability to abstract the management of the applied networking, security, and even availability into what’s known as policies. These policies greatly simplify the management experience. Making it even simpler, with the new Get-NsxtPolicyService cmdlet, we can now use PowerCLI to automate these policies with direct connectivity to the API. This cmdlet is also compatible with the newly announced NSX-T 2.4!

PowerCLI Compatibility Matrix with NSX-T

The new policy service cmdlet is great, but that isn’t the only update for NSX-T PowerCLI 11.2.0 comes with. There’s also new support for opaque networks in some of the cmdlets we already know and love. The cmdlets updated to support opaque networks are: Set-NetworkAdapter and Import-VApp.

For more information about how to use these cmdlets with opaque networks, see the following blog: Configuring VMs For Opaque Networks

Updated Authentication Support

Security is always an important topic, especially when it comes to automation. As part of VMware Cloud on AWS, there has been an update to expand into GovCloud. In order to participate in GovCloud, the service has to adhere to a more stringent set of security and privacy controls. The control that will be the most noticeable for PowerCLI users will be around authentication. Therefore, we have added two new cmdlets and updated an existing cmdlet to support OAuth2. For the VMC module, we have a new cmdlet, named New-VcsOAuthSecurityContext, which will produce an OAuth security context based off our VMware Cloud on AWS refresh token. For the Core module, there’s a new cmdlet, named New-VISamlSecurityContext, which will take the OAuth security context and translate it to a SAML2 security context. That SAML2 security context can then be used with the updated cmdlet, Connect-VIServer, to authenticate to the vCenter.

This exchange should look like the following:

$oauthCtx = New-VcsOAuthSecurityContext -ApiToken "xxxxxxx-xxxx-xxxx-xxxx-xxxxxxxxxxxx"
$samlCtx = New-VISamlSecurityContext -VCenterServer "vcsa.fqdn" -OAuthSecurityContext $oauthCtx
Connect-VIServer -SamlSecurityContext $samlCtx

It’s worth noting, at this point in time, this functionality is reserved only for GovCloud instances of VMware Cloud on AWS deployed SDDCs.

Storage Module Updates

Last, but certainly not least, the Storage module has a number of updates. The Get-VsanSpaceUsage cmdlet has a new parameter which allows us to return results for a specific storage policy. There has been quite a few new parameters added to the Set-VsanClusterConfiguration cmdlet, which includes: CustomizedSwapObjectEnabled, GuestTrimUnmap, LargeClusterSupported, ObjectRepairTimerMinutes and SiteReadLocalityEnabled. Another updated cmdlet is Test-VsanNetworkPerformance, which now has a DurationInSecond parameter so we can control how long the performance test actually lasts.

Summary

The first PowerCLI release of 2019 has some significant improvements. PowerCLI 11.2.0 introduces OAuth2 support and the ability to access the new NSX-T Policy APIs, plus an entirely new module containing 40 cmdlets to manage HCX!

For more information on changes made in VMware PowerCLI 11.2.0, including improvements, security enhancements, and deprecated features, see the VMware PowerCLI Change Log. For more information on specific product features, see the VMware PowerCLI 11.2.0 User’s Guide. For more information on specific cmdlets, see the VMware PowerCLI 11.2.0 Cmdlet Reference.

Remember, updating your PowerCLI modules is now as easy as ‘Update-Module VMware.PowerCLI’.

Example: Update-Module

Let us know in the comments what you’re most excited about!

The post New Release: PowerCLI 11.2.0 appeared first on VMware PowerCLI Blog.

Automating VMware Cloud on AWS SDDC Cluster Lifecycle

$
0
0

VMware Cloud on AWS has the ability to add new clusters to an existing SDDC. This is most useful for workload separation. A cluster could be specified as the failover resource, a development environment, and so forth. However, as of Version 1.6, there’s a new reason to add new clusters to an SDDC: custom core counts! The ability to control the CPU count for hosts in a cluster is extremely important when it comes to running mission-critical applications that happen to be licensed per-core. Even better, it is extremely easy to automate the lifecycle of a cluster with PowerCLI.

Let’s check out some examples of how we can manage clusters within the VMware Cloud on AWS service.

Environment Setup

As part of this blog, I will be using a previously deployed SDDC and will begin by working with the low-level VMC module to perform these tasks. We will start by opening a PowerShell session and authenticating to the VMware Cloud on AWS service with our API Token. Then, we need to identify a couple services to use. These services will be the following:

  • com.vmware.vmc.orgs
  • com.vmware.vmc.orgs.sddcs
  • com.vmware.vmc.orgs.sddcs.clusters
  • com.vmware.vmc.orgs.tasks

One last setup requirement, we will need to grab IDs for the Organization and SDDC which we’ll be working with.

We can summarize the above criteria with the following code:

# Connect to the VMware Cloud on AWS Service
Connect-VMC -RefreshToken "xxxxxxx-xxxx-xxxx-xxxx-xxxx-xxxxxxxx"
# Reference Orgs service and populate a variable with the desired Org
$orgSvc = Get-VmcService -Name com.vmware.vmc.orgs
$org = $orgSvc.List() | select -first 1
# Reference Sddcs service and populate a variable with the desired SDDC
$sddcSvc = Get-VmcService -Name com.vmware.vmc.orgs.sddcs
$sddc = $sddcSvc.List($org.Id) | select -first 1
# Reference Clusters service
$sddcClusterSvc = Get-VmcService -Name com.vmware.vmc.orgs.sddcs.clusters
# Reference Tasks service
$taskSvc = Get-VmcService -Name com.vmware.vmc.orgs.tasks

If any of these commands seem foreign, please check out the following blog post for more information: Getting Started with the VMware Cloud on AWS Module

SDDC Cluster Service Overview

We will be using the SDDC Clusters service, and therefore the sddcClusterSvc variable. In order to discover the actions we can perform with the Clusters service, we will take the output from the sddcClusterSvc variable and pipeline that into the Get-Member cmdlet:

$sddcClusterSvc | Get-Member

Sample: Getting additional information from the SDDC Cluster Service

Here we can see that there are two methods available, create and delete. As part of this blog post, we will walk through the usage of these two methods in the following sections. However, there’s a method or two that are missing, get and list. We can pull that information directly from the get method on the SDDC itself. The cluster information is available by referencing the resource_config property, then the clusters property.

To pull out some basic cluster information, we can use the following command:

$sddc.resource_config.clusters | select cluster_id, cluster_name, cluster_state

Example: Pulling output from the SDDC response about only the clusters

Cluster Creation

For the first example, we have been tasked with creating a new cluster within our SDDC.

In order to populate the parameters for the create method, we will make use of the Help property for the SDDC Cluster service stored in the sddcClusterSvc variable. We can identify all of the parameters required for the create method, including an Org ID, SDDC ID, and the cluster configuration specification, with the following command:

$sddcClusterSvc.Help.create

Example: Output from Help for the Create method

We already have our Org ID and SDDC ID stored in a variable. Next, we need to create a cluster config spec for the new cluster. If we take the prior command and append the ‘cluster_config’ property, we can view all of the properties available to populate the spec. Then, by again using ‘Get-Member’, we can see that the cluster_config has a method of create which we can use to create the object for that particular specification.

Example: Establishing the contents for the Cluster Config spec

We’ll then store the spec in a variable named sddcClusterCreateSpec. Based on the prior screenshot, there’s only one required property. This property is for the desired number of hosts for the new cluster. We’ll populate that property with a value of ‘1’, then run our create method to start the creation of the new cluster.

Example: Creating a new cluster with 1 host

Putting the above together, we can create a new cluster with a single host using the following code:

# Create Cluster Config spec and populating the required properties
$sddcClusterCreateSpec = $sddcClusterSvc.Help.create.cluster_config.Create()
$sddcClusterCreateSpec.num_hosts = 1
# Perform the Create action and output some basic information from the returned task
$sddcClusterTask = $sddcClusterSvc.Create($org.Id, $sddc.Id, $sddcClusterCreateSpec)
$sddcClusterTask | Select-Object Id,Task_Type,Status,Created

If we login to the VMware Cloud on AWS Cloud Console, we should see the following in our SDDC’s Summary tab:

Example: SDDC Cluster Deployment

Cluster Creation – Custom Core Count

For the second example, we have been tasked with creating another new cluster within our SDDC. However, this time, we only want a specific core count to be available. We will use our prior example and add-on to the specification by setting the host_cpu_cores_count to be a value of 8, 16, 36, or 48, depending on the host type. We can do this by adding the following command to the existing workflow:

$sddcClusterCreateSpec.host_cpu_cores_count = 8

Putting the prior example together with the above command, we can create a new cluster with a single host that’s been configured with a CPU core count of 8 using the following code:

# Create Cluster Config spec and populating the required properties
$sddcClusterCreateSpec = $sddcClusterSvc.Help.create.cluster_config.Create()
$sddcClusterCreateSpec.host_cpu_cores_count = 8 
$sddcClusterCreateSpec.num_hosts = 1
# Perform the Create action and output some basic information from the returned task
$sddcClusterTask = $sddcClusterSvc.Create($org.Id, $sddc.Id, $sddcClusterCreateSpec)
$sddcClusterTask | Select-Object Id,Task_Type,Status,Created

Example: Creating a new cluster with 1 host and only 8 CPU cores per host

Cluster Removal

For the third example, we have been tasked with deleting the first cluster we created, Cluster-2. Making use of the Help property from the SDDC Cluster service, we can run the following command to find out what parameters the delete method requires:

$sddcClusterSvc.Help.delete

Example: Output from Help for the Delete method

We can see that we have three parameters to enter: Org ID, SDDC ID, and Cluster ID. We still have the first two stored in variables, so we need to obtain the Cluster ID. If we remember back to the SDDC Cluster Service Overview section, there’s no list or get methods for the SDDC Cluster service. Therefore, we need to refresh our sddc variable and return back the updated list of clusters to obtain the ID. We can do that with the following commands:

$sddc = $sddcSvc.List($org.Id)
$sddc.resource_config.clusters | select cluster_id, cluster_name, cluster_state

We will then store the cluster information for only Cluster-2, by filtering the cluster_name property with a where statement and storing it in a variable by the name of cluster. Then, we’re ready to run the delete method. We can do that with the following commands:

$cluster = $sddc.resource_config.clusters | where {$_.cluster_name -eq 'Cluster-2'}
$sddcClusterTask = $sddcClusterSvc.delete($org.id, $sddc.id, $cluster.cluster_id)

Example: Deleting a cluster from an SDDC

Putting the above together, we can delete the newly created Cluster-2 with the following code:

# Update SDDC variable and filter the clusters for only Cluster-2
$sddc = $sddcSvc.List($org.Id)
$cluster = $sddc.resource_config.clusters | where {$_.cluster_name -eq 'Cluster-2'}
# Perform the Delete action and output some basic information from the returned task
$sddcClusterTask = $sddcClusterSvc.delete($org.id, $sddc.id, $cluster.cluster_id)
$sddcClusterTask | Select-Object Id,Task_Type,Status,Created

VMC Community Module Update

Another option to perform the above tasks is with the VMware.VMC community module, which is available on the PowerCLI Community Repository as well as the PowerShell Gallery. I have updated the module to include the following advanced functions:

  • Get-VMCSDDCCluster
  • New-VMCSDDCCluster
  • Remove-VMCSDDCCluster

The only difference between the above sections and these functions, these functions expect names instead of IDs as input. Otherwise, they work exactly as you would expect. An example of them in use:

Example: Using the SDDC Cluster functions from the VMware.VMC module

Summary

VMware Cloud on AWS based SDDCs can contain multiple clusters, which is beneficial for a couple reasons. First, workload separation. A cluster could be specified as the failover resource, a development environment, and more. Second, and new as of Version 1.6, these clusters can be deployed with a specific amount of CPU cores. This control is certainly important when it comes to running mission-critical applications that happen to be licensed per-core. All of the cluster actions are available via the VMware Cloud on AWS APIs, and therefore PowerCLI as well! This blog post walked us through how to identify the deployed clusters, deploy new clusters, and remove clusters which are no longer needed.

Let us know in the comments how you’re making use of additional clusters in your automation workflows!

The post Automating VMware Cloud on AWS SDDC Cluster Lifecycle appeared first on VMware PowerCLI Blog.

Viewing all 146 articles
Browse latest View live


<script src="https://jsc.adskeeper.com/r/s/rssing.com.1596347.js" async> </script>